Building On Pipeline Easements (Or Close To)

Previous posts have talked about Sewer and Drain Easements but you build close to or over a pipe on an easement?

Permission

You must get permission from the owner of the easement to build on the easement.

Some easement owners won’t permit any building.

However some will allow certain works after a fee is paid.

This fee can amount to several thousand dollars particularly if you want to build right over the sewer.

Costs

The minimum costs are likely to be a CCTV survey of the pipe which could cost over a thousand dollars.

Additional costs may include either exposing the pipe and encasing the whole line in concrete, or re-routing the pipe and paying for the cost of establishing a new easement.

Getting the Design Right.

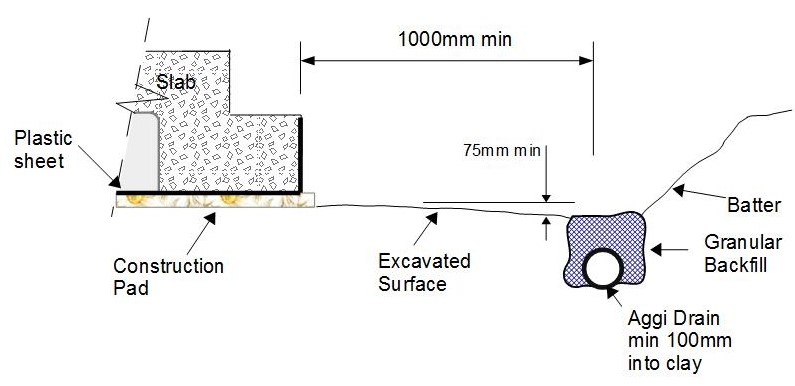
When building close to a buried pipeline, whether the building is in the easement, or close to it, the designer needs to ensure no loads are placed  on the pipe.

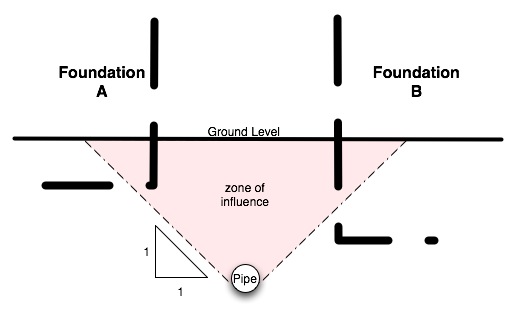
To avoid placing any load on the pipe the base of any foundation should be below the zone of influence of the pipe.

This zone of influence starts at the base of the pipe and rises at a slope of 1 in 1 to ground level.

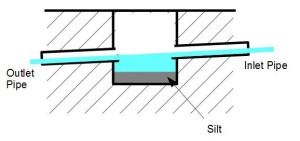
In the diagram above

  • Foundation A is unacceptable The base is inside the zone of influence.
  • Foundation B is acceptable Even though it is the same horizontal distance from the pipe as Foundations A because the base is outside the zone of influence.

The base of the foundation is the lowest point of the foundation, that is the bottom of the slab, In the case of piers the base of the piers.

Building Over the Pipe

Some water authorities do allow building right over a pipe. in that case the base of foundations on both sides of the pipe needs to be outside the zone of influence.

Any beam or slab over the pipe needs to be designed to span between the foundations.


To better understand what you can build see

Restrictions in the Blocks section


Waterproof or Water Resistant

The Difference

Waterproof material, or construction, does not allow moisture to penetrate through it.

Water Resistant material, or construction, means it restricts moisture movement and will not degrade when it gets wet.

Where it matters

The Building Code of Australia (Volume Two – Table 3.8.1.1) provides details of the ‘wet areas’ that are required to be water resistant or waterproof.

Below is a short summary:

Showers

  • Waterproof:  Floor, 150mm up walls, all wall and floor junctions, all penetrations.
  • Water Resistant: Walls up to 1800mm from floor.

Areas adjacent to showers

  • Waterproof:  Timber or particle floor, all wall and floor junctions.
  • Water Resistant: Concrete and cement sheet flooring.

Areas adjacent to baths and spas

  • Waterproof:  Timber or particle floor, tap and spout penetrations.
  • Water Resistant: Concrete and cement sheet flooring, exposed wall from 150mm above hob down,

Laundries and toilets

  • Waterproof:  Junction of fitting to wall, surface penetrations.
  • Water Resistant: 150mm above fitting where fitting is within 75mm of wall.


To me this seems a bit lightweight. . . . Over the past 40 years of homeownership I have experienced both an overflowing bath, and a broken laundry hose.

I would suggest you consider at the least extending the waterproofing to the whole of the bathroom and laundry floors.

A  floor drain  is also a good idea

Overflowing Drains

Its not unusual to see local flooding around a house, or on streets, during exceptionally heavy rainfall.

If you are unlucky you might even see a manhole ‘Pop It’s Top!’  like this one!

This is because the council drains don’t have the capacity to deal with these really heavy rains!

Why It Happens

The roof drainage to get the water off your roof will be designed for very severe storms.

This is because the risk to your property from gutters and downpipes not being able to cope is very high. (see this link: Roof Risk)

Some localised shallow flooding around the house, that will be drained away over an hour or two, however is low risk.

Council Design Considerations

To design the public drains to cope with extreme events would have huge costs.  . . Even if the pipes were big enough downstream flooding of rivers would be made worse.

For this reason although the roof drainage will be designed for a storm that may occur only over every 20, or even more years apart; the public drains may be designed for no more than a storm that occurs every 5 years.

The difference in additional rainfall between a 1 in 5 year storm and a 1 in 20 year storm can be an extra 50%. (See this link: Rainfall Intensity)

This is the water that could cause short term flooding around your house.

What You Can Do

Basically the best advise I can give is to avoid buying blocks at the bottom of slopes (These will be the worst affected by temporary flooding)

If you do get some localised flooding in your garden that either

  • Doesn’t drain away as the rain eases; or
  • Occurs every time it rains.

You should contact the council as it could be a sign of a problem.


Temporary Down Pipes

A great way to stop the building site from becoming water logged is for the builder to install temporary down pipes as soon as the roof has been covered.

Although this is generally good practice it is really important if you are building on Reactive Clay as it will minimise the occurrence of Soil Heave damaging the slab.

Basically the temporary down pipes are a polythene tube (see photo) which is taped to the gutter outlet and the pipe that the final downspout will be connected to.

As you can see the temporary down pipes aren’t going to cost much.

If I was looking round a large development area at the houses being constructed seeing temporary downpipes in place would certainly make me think that the builder was more committed to quality


For Similar Posts see Getting it Right


Silt Pits

Any drainage system should have silt pits at regular intervals.

This includes both stormwater systems and agricultural drains.

In the case of the above photo this is a combination drain and grate  silt pit. (As the water  can become stagnant this is a potential breeding ground for mosquitos!)

The pit may be either circular or square, with a base below the level of the inlet and outlet pipes. This means any sand or silt that gets into the drainage system will get washed into the silt pit where it falls to the bottom and can be easily removed.

Collecting the silt in the pit stops it being washed further along the system eventually causing a blockage,

The following diagram illustrates how the silt pit works.

Part of your ongoing property maintenance, after you move in, should to check the silt pits every year. If the silt gets up to the outlet pipe the pit will need to be cleaned.


For more posts see Drainage


Soakwells

In Western Australia you are required to dispose of storm water on your block, rather than to a public storm water drain.

There are also many areas that don’t have public stormwater drains including many beach side areas.

In either case if this applies to your block then you will probably need soakwells, so here is some information.

How Soakwells Work

Basically the soakwell is an underground storage tank with holes in it so it ‘leaks’ into the soil.

The soakwell is surrounded by gravel which helps distribute the water ‘leaking’ out of the tank into the soil. It also prevents sand running into the tank.

Types

Traditionally soakwells have been constructed out of precast concrete like this round example on the right.

Now  there are a range of options which include:

Plastic Tanks Made  of Polyethylene, or Glass reinforced Plastic, these are really just a version of the concrete soakwells

Drainage Cells These are plastic mesh boxes that look something like plastic milk crates. They are stacked in the excavated whole wrapped in a geotextile. Make sure you have a Silt Trap before the drainage cells.

Location

In general soakwells should be further away from all buildings and boundaries than the depth of the soakwell (measured from ground level).

On restricted blocks I have heard of the soakwell being installed under the house. . . . perhaps OK on sand but not so good if there is clay soil (see Building on Clay)

Size

The size and number of soakwells required depend on the following:

  • Infiltration Rate The rate at which the water can be absorbed into the soil.
  • Maximum Rainfall The storage volume should be able to take the flow from the maximum rainfall less the amount of water that can ‘infiltrate’ into the soil.
  • Groundwater Level To be effective the entire volume of the tank needs to be above the groundwater level.

You should contact your local council  to find out their requirements with regard to soakwells. A typical requirement is 1 cubic m of volume for every 80 sqm of roof.

For sites that have rocky or clay, the volume required will be much larger.

See Drainage for more posts


Soil Heave – Protecting the Slab During Construction

There has been a lot of talk in the Melbourne papers recently about ‘Slab Heave’ when Building on Clay so I thought I would explain how to minimise the risk during construction.

A key issue when building on clay is to avoid any extra moisture getting into the clay under the slab. causing the clay to swell, by keeping the area around the slab well drained.

This is particularly important where part of the slab is below the natural ground level such as when ‘Cut and Fill’ is required to get a level site.

Detail For Protection Against  Soil Heave

The diagram below shows what you should be looking for, during construction, to protect the ground under your slab from gaining moisture.

The key issues are:

  • The excavated surface falls away from the edge of the slab for at least 1m with a minimum drop of 75mm.
  • Where the water will not continue to flow away from the slab an Aggi Drain in a granular back filled trench should be provided. This drain should be a minimum of 100mm below the surface level of the clay and fall to a suitable discharge point.
  • Any trench in the area between the slab and the aggi drain should be topped with well compacted clay to ensure there is no easy passage for water to penetrate under the slab.
  • Roof drainage should be connected to a suitable point of discharge as soon as possible after the roofing material is fixed. (See Temporary Downspout)

Although the requirement for an aggi drain is not as critical where the ground slopes away from the slab, it is nevertheless good practice to have one.


Also see Agricultural Drains


Stormwater Discharge Point

One check that is often forgotten when buying a house block in an established suburb is how storm water is removed from the site.

Forty, or more, years ago when land was cheaper, it was not unusual for blocks to be quite large compared with the size of the house.

Disposing of storm water by allowing it to soak into the garden in the garden was acceptable. (This is still effective in sandy areas such as much of Western Australia)

As a result many properties were built without connection to a surface water sewer.

Modern Knock Down and Rebuild Problems

If you buy block  in an older suburb with the intention of subdividing, or demolishing and building a bigger house, you could have problems if you haven’t got access to a storm water sewer.

Disposal to a much smaller garden area probably won’t work.

In order to protect adjoining properties from overflows from your property the council are likely to make discharge to an approved point conditional on any development approval.

Dealing with the attendant problems if you plan to extend or subdivide a block without a stormwater discharge point can add thousands of dollars to your costs.

Options

Possible options are:

    1. Soakwells. If you are lucky enough to have a sandy block soakwells may be a solution. Low cost.(see this link: Soakwells )
    2. Pipe to existing surface water sewer. This may involve negotiating with adjacent property owners. Very difficult to achieve unless the affected neighbours also want to subdivide. Very expensive.
    3. Discharge to Street
      Check with your council to see if this is permitted. A typical street connection will look something like this kerb outlet. Can be a reasonable cost if the block is above the road, or very expensive if the block is below road level Pumps and a detention tank will be needed (See these links Pumps and Detention Tank)


See Guide to Buying a Block for more information


On-Site Stormwater Detention – Storage

Background

Many urban developments, and subdivisions, require stormwater flows from your block to be limited to a maximum flow rate. (See: ‘Onsite Stormwater Dention‘ for the reason why)

Although councils will require the calculations to be done by a qualified hydraulic engineer here is some explanation of the process so you can understand what is required.

Permissible Site Discharge

The ‘Permissible Site Discharge'(PSD), which is a maximum flow rate, will normally be set by your Council based on the block area.

The flow rate is usually controlled by making all the flow pass through a Orifice (a small diameter hole) before it can be discharged.

Designing Storages

Reducing the flow involves the following steps:

  1. Calculating the Peak Discharge from your block. The Local ‘Intensity of Rainfall‘ x Total Impemeable Area (The area of roof and hard paved surface)
  2. Calculating the size of a storage required, the Site Storage Requirement (SSR) to take the rainfall that cannot be discharged until the storm has passed. Your council may require this to be calculated in a particular way and/or using a particular computer program.
  3. Designing the storage to fit on your block.

NB The storage volume is different from rainwater collection volume as the detention storage volume is expected to be empty unless it is raining hard.

Onsite Storage Options

The three options that are available are:

  • Below Ground Tanks. Most expensive option but does have the advantage of being able to located under driveway or garden if you are short of space. May need a pump to empty tank if public stormwater drains are shallow. (Some councils require tank to be emptied by gravity which can make them difficult on some blocks.)

  • Above Ground Tanks These are less expensive than underground tanks but can take up a lot of area so can be a problem for small blocks. Some councils will allow the detention volume to be provided within the same tank as rainwater storage.
  • Basins Basins are the least expensive method of providing storage but require much larger areas than above ground tanks. They are normally a low lying area of the garden which can be flooded for a short period of time. Because of issues such as drowning risk there are often council regulations limiting the depth of storage.


See Drainage for more posts


Onsite Stormwater Dention – Why

If you want to redevelop or subdivide an existing urban house block, you might find that a planning condition is that you will need to provide On-site Stormwater Detention (OSD).

You may also find it is a condition on individual blocks on smaller subdivisions.

Why Is Onsite Stormwater Detention Needed?

Before development of towns and cities a large proportion of the rain that fell in an area soaked into the ground or flowed slowly across the land to a creek or river. When areas started to be developed two things happened:

  • More and more of the land was built on, or paved, which meant rain was unable to soak into this ground.
  • Stormwater drains were built to carry the rainwater quickly away from the houses to be discharged into streams and creeks.

Initially while Australia had a small population this didn’t cause too many problems.

Since the mid 1950’s and the rapid growth in population more and more land has been built on.

The result has been more and more water has been discharged surface water drainage systems causing overloading of the piped systems and flooding of the rivers.

In order to try and reduce flooding Planning Authorities are attempting to reduce rainwater flows from developments to a flows similar to an undeveloped site.

OSD On Large Subdivisions

If you buy a block on a large subdivision it is unlikely that you will be asked to provide OSD on your Block.  This is because large developers  as a condition of the overall development have to provide Stormwater Detention Storage for the whole development.

The way they usually do this is by making much of the open space they also have to provide as Ponds, Lakes or Wetlands, which can fill up during periods of rain and then slowly empty. (Now you know why so many developments have a reference to Water in their name)

Other posts will explain more about how the Storage Volumes are Calculated and will look at various storage options.

Guide to Buying a Block has lots of info like this on what to look for before you buy land.


Exit mobile version