

In a post on Outlet Location I talked about improving the water quality by avoiding taking water from the bottom of the tank.
This post shows how you can keep the floating particles on the top of the water out of your supply for just a few dollars.
Mid Level Outlet
In order to avoid the floating particles you need to take the water from at least 100mm below the surface, and avoid siphoning the water out of the tank.
To do this you will need:
- A valve socket, to be screwed into the existing tank outlet.
- A 90 degree bend.
- 2 ‘T’ junctions.
- Around 2.5 of plastic pipe.
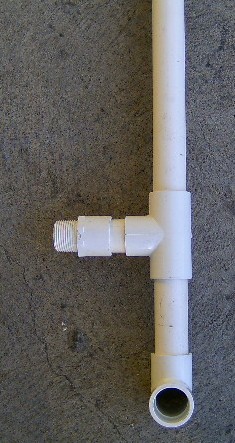
I would recommend at least 25mm dia pipe although larger would be better if it will fit in the tank outlet.The components are assembled as shown in the photo on the right.
The top pipe should finish above the water level of the tank when full.
In normal use the water is taken from the level of the Bottom ‘T’. When the level drops to the level of the horizontal pipe the air coming down the vertical pipe will act to stop a siphon forming and sucking down the top level of water.
Low Level Outlet
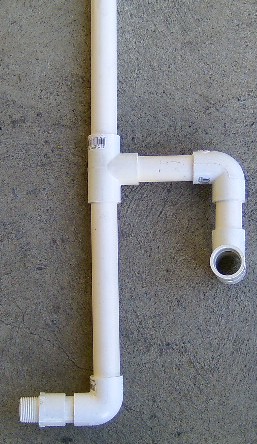

The only additional component if you are going to improve the existing low level out let is an extra 90 degree band.
It is however assembled in a slightly different order as shown in the photo on the right.
The only problem with this arrangement is it means that the Water below the outlet cannot be accessed unless you have an extra bottom outlet. (or use a submersible pump dropped into the tank)
For more about tank water quality see Rainwater Safety
Did you glue the fittings together?
Yes I did, I should have included a tin of pipe cement in the list of things you need.
Thanks BRIAN