Retaining Wall Drainage

I’ve previously posted about the importance of Drainage Behind a Retaining Wall to minimise the forces acting on the wall…. here is some advice on how to make sure it works.

You should aim to properly drain surface water away from the wall.

Then you need to consider drainage of water in the soil.

There are two sorts of retaining walls as far as drainage is concerned:

Permeable Walls (water can drain through the wall)

Examples of permeable walls are:

With permeable walls the water should seep out anywhere on the face.You still need to put a drainage layer behind the walls. This will ensure that there is a clear path to the seepage points and that any dirt is filtered out rather than staining the face of the wall. It can be worth using a drainage pipe behind the wall as extra security against water pressure building up.

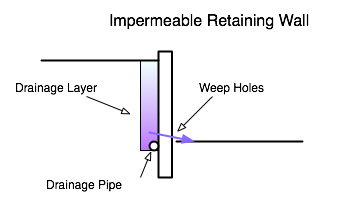
Impermeable Walls (water cannot flow through the wall)


Examples of impermeable walls are:

  • Reinforced concrete walls.
  • Block Work or Brickwork Walls (see this link: Besser Brick Walls)
  • Sleeper walls…. With a plastic backing.

With these walls you need to make special provision for drainage.

Either:

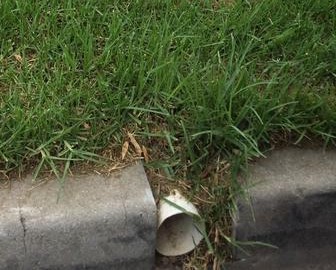
  • Weep holes which are specially constructed holes through the structure at 1m, or less, spacing.

or

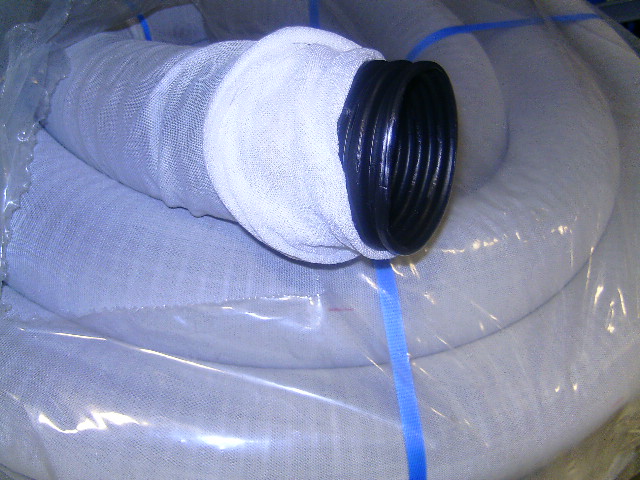
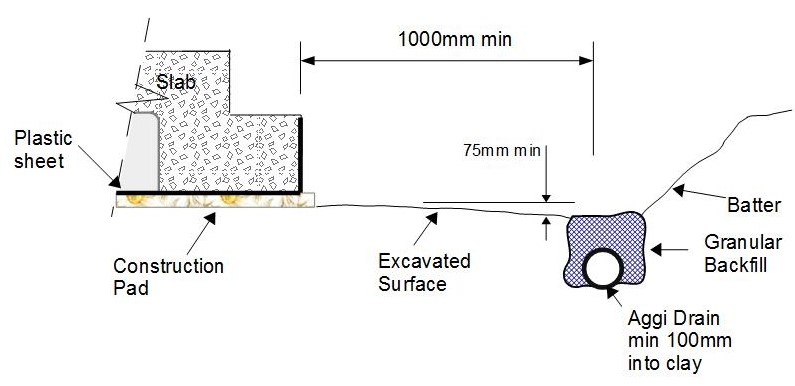
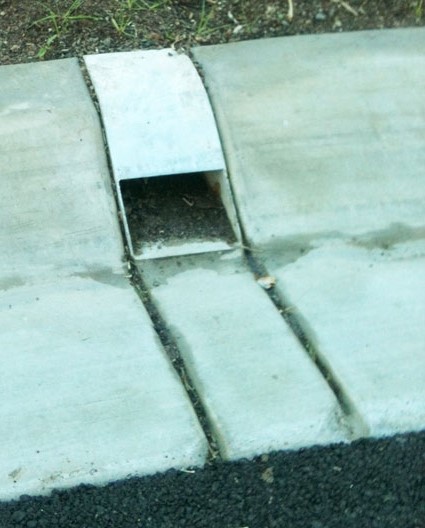
  • An  Agricultural Pipe(a perforated or slotted pipe see this Link Aggi Pipe) discharging to a surface water drain. A good idea is where possible have discharge points with silt pits (see this link: Silt Pit) at both ends of the wall.
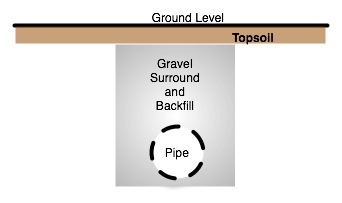
Drainage Layer

  • For the drainage layer I would recommend  at least 100mm thickness of 10mm size, or smaller gravel.
  • If you are going to have a pipe the width of the drainage layer should be 50-100mm greater than the pipe diameter.
  • Isee lots of people use a geotextile round the pipe. In my experience thegeotextile can get clogged with silt and stop the drainage occuring.

For responsibility for Boundary Retaining Walls see Fairness

See Why Aggi Pipes Have Slots In The Base to learn more


Agricultural Drains

Agricultural drains (often called aggi drains) are used to:

  • Drain waterlogged ground.
  • Avoid soil heave by keeping your foundations dry (see this Link: Protect foundations)
  • Keep the soil behind retaining walls dry. (see this link: Retaining Walls)

Existing Drains

In the old days agricultural drains used to be constructed out of short lengths of clay pipe butted together without proper joints. (If you are building on a demolition site you may still come across these pipes.)

The water seeped into the pipe through these butt joints.

Current Method

Nowadays agricultural drains come in two types:

    • White slotted UPVC pipes with longitudinal slots which come in straight lengths (usually 6m long).
    • Black corrugated UPVC pipes with lateral slots that come on coils of various lengths.

For domestic jobs the black corrugated coils are probably the easiest option.

DON’T get the pipes with a Geotextile ‘Sock’ around the Pipe (see this link:  Geotextiles Around Drainage Pipes)

Laying Aggie Pipes

You don’t need to be a plumber to lay agricultural drains in your garden. Some advice for laying the pipes are:

  1. The pipes should be laid at a gradient of no flatter than 1 in 100 (1cm in 1m) to the point to which the flow will be directed. A gradient of 1 in 50 is better!
  2. When excavating a trench for agricultural drains you need to dig the trench at a width of at least twice the width of the pipe and at least 25mm deeper than the level of the pipe.
  3. Lay 25mm of 10mm gravel in the trench keeping it at the set gradient.
  4. Lay the pipe along the top of the gravel keeping it as straight as possible.
  5. Fill the trench with 10mm gravel to 100mm below ground level.
  6. Fill the last 100mm with topsoil.
  7. Make sure you have a silt trap before the point where you connect to the point of discharge.(see this link:  Silt Trap)

Geotextile around Drainage Pipes

Many articles about installing agricultural drains recommend that you place a geotextile in the trench before the initial gravel surround and then wrap the geotextile over the gravel afterwards.

You can also buy agi pipe with a geotextile “sock’ around it like this:

The idea is that the geotextile prevents the gravel,or the pipe getting clogged with fine materials.

Its something I used to do, but . . . I DO NOT  recommend this anymore.

The Reason

Practical experience has shown that what happens is:

  • If you wrap the gravel with geotextile the geotextile actually collects all the  particles on its surface and gets clogged up. This stops the water getting to the gravel and on through to the pipe.

or

  • If you wrap the pipe and put the sock around the pipe its only the very fine particles that get through the gravel but they then get caught in the ‘sock” in front of the slots. This again stops water getting into the pipe and draining away.

Recomendation

It far better to just go for a 10mm or smaller gravel surround.

This stops the larger particles.

Any fine material that gets through the gravel will be that fine it will easily pass through the slot and likely to get washed down the pipe.


See Agricultural drains for more information.

Balcony Drainage


If you are going to have a balcony don’t forget to consider  the drainage.

You need to make sure that you have a large enough drain, for example this.

And the whole balcony slopes down to the drain.

If the drainage isn’t done properly you are going to have staining on the front of your house.

Here are a couple of photos of balconys with drainage problems.

This is a really bad example of staining where it looks like there was no drain, and the water drains off the edge.


Although this isn’t as bad you can see that some water has been staining the building as water runs out of the grout between the tiles.

Different Roof Drainage

Most of us are used to the traditional Australian roof drainage connecting to down pipes . . . . but this isn’t how everyone sees it.

The Hawaii Solution

Travelling around Hawaii I was quite surprised to see how many houses completely dispensed with any form of roof drainage like this photo.

No Gutters and no downpipes.

OK as long as you aren’t building on Reactive Clay

Not a problem in Hawaii where it is mainly volcanic sands or rock.

The Frank LLoyd Wright Solution


I recently talked about visiting some Frank Lloyd Wright ‘Prairie Houses’ in America.

With the ‘Prairie House; style there was an emphasis on horizontal lines.

To avoid the strong vertical lines of the downpipes Frank just got rid of them.

To collect the rain below each discharge point he positioned a pit like this one.

The only problem is that in the slightest breeze there is going to be a lot of spray.

The Japanese Solution

This system of a chain of cups is a fairly common Japanese alternative to a down pipe.

For small flows the water drains through each cup to the one below it.

With heavier rain the flow runs on the outside of the cups where it is held to the cup by surface tension.

If you can’t get hold of the Japanese cups a simple chain can work just as well.

Water Bills

I hear a lot of complaints about Water Bills . . . . . but Town Water is one of the ‘Great Bargains’ of our age!

Don’t Believe Me?

Well lets look at the facts.

Typical Water Charges

Well I live in Melbourne’s City West Water area so my  water charges are:

Water Service Charge

$54.65/quarter. This is to cover things like the maintenance of the thousands of km’s of pipes that  are ready to deliver the water to you.

Water Usage Charge

To encourage people to be responsible in the water usage the cost/kilolitre rises at 440 litres per day and again at 880 litres per day. (The average Melbournian uses 160 litres per day, but my wife and I are careful and only use around 100 litres each per day)

  • $2.3060 per kilolitre for the first 440 litres of water used per day.
  • $2.7241 per kilolitre for water usage above 440 and up to 880 litres per day.
  • $4.0749 per kilolitre for water usage above 880 litres per day.

Cost For A Family

Well the daily cost for an average family of 4 using 640 litres per day is:

1st  440 litres  $1.01

2nd 200 litres $0.54

Service Charge $0.60

Total $2.15 /day     (Equivalent to $3.36/kilolitre)

Remember this is for a product that has been; Collected, Stored(for up to 4 years), Treated, and Delivered to your tap exactly when you want it.

Some Comparisons

You may not be familiar with what a kilolitre really means but here are  3 equivalents.

  1. It weighs one tonne.
  2. It is equivalent to a cube 1m x 1m x 1m.
  3. Just over 4 large wheelie bins.
  4. 2,000 x 500ml bottles

Comparison With Any Other Product

If you can find any other product that you can have delivered to your door for $3.36/ tonne let me know . . . even dirt costs around $60/tonne.

Comparison with Bottled Water

Well the cheapest I could find bottled water was in my local Costco, where it worked out at $500/kilolitre!

Comparison with Beer

One days water supply = the cost of 1 stubby.


Still think Town Water is expensive? . . . . Then leave a comment!


Soil Heave – Protecting the Slab During Construction

There has been a lot of talk in the Melbourne papers recently about ‘Slab Heave’ when Building on Clay so I thought I would explain how to minimise the risk during construction.

A key issue when building on clay is to avoid any extra moisture getting into the clay under the slab. causing the clay to swell, by keeping the area around the slab well drained.

This is particularly important where part of the slab is below the natural ground level such as when ‘Cut and Fill’ is required to get a level site.

Detail For Protection Against  Soil Heave

The diagram below shows what you should be looking for, during construction, to protect the ground under your slab from gaining moisture.

The key issues are:

  • The excavated surface falls away from the edge of the slab for at least 1m with a minimum drop of 75mm.
  • Where the water will not continue to flow away from the slab an Aggi Drain in a granular back filled trench should be provided. This drain should be a minimum of 100mm below the surface level of the clay and fall to a suitable discharge point.
  • Any trench in the area between the slab and the aggi drain should be topped with well compacted clay to ensure there is no easy passage for water to penetrate under the slab.
  • Roof drainage should be connected to a suitable point of discharge as soon as possible after the roofing material is fixed. (See Temporary Downspout)

Although the requirement for an aggi drain is not as critical where the ground slopes away from the slab, it is nevertheless good practice to have one.


Also see Agricultural Drains


Onsite Stormwater Dention – Why

If you want to redevelop or subdivide an existing urban house block, you might find that a planning condition is that you will need to provide On-site Stormwater Detention (OSD).

You may also find it is a condition on individual blocks on smaller subdivisions.

Why Is Onsite Stormwater Detention Needed?

Before development of towns and cities a large proportion of the rain that fell in an area soaked into the ground or flowed slowly across the land to a creek or river. When areas started to be developed two things happened:

  • More and more of the land was built on, or paved, which meant rain was unable to soak into this ground.
  • Stormwater drains were built to carry the rainwater quickly away from the houses to be discharged into streams and creeks.

Initially while Australia had a small population this didn’t cause too many problems.

Since the mid 1950’s and the rapid growth in population more and more land has been built on.

The result has been more and more water has been discharged surface water drainage systems causing overloading of the piped systems and flooding of the rivers.

In order to try and reduce flooding Planning Authorities are attempting to reduce rainwater flows from developments to a flows similar to an undeveloped site.

OSD On Large Subdivisions

If you buy a block on a large subdivision it is unlikely that you will be asked to provide OSD on your Block.  This is because large developers  as a condition of the overall development have to provide Stormwater Detention Storage for the whole development.

The way they usually do this is by making much of the open space they also have to provide as Ponds, Lakes or Wetlands, which can fill up during periods of rain and then slowly empty. (Now you know why so many developments have a reference to Water in their name)

Other posts will explain more about how the Storage Volumes are Calculated and will look at various storage options.

Guide to Buying a Block has lots of info like this on what to look for before you buy land.


Stormwater – Kerb Discharge

If you are going to build on an existing house block you will probably have a planning permit condition that storm water must discharge to an approved point.

If there is no surface water system one option can be to discharge to the street.

This is normally by constructing a proper kerb outlet like the photo below:


But not like this dodgy installation on the right!

Or even discharging over people walking along the path like the one illustrated in this post: Overflow Fail

A kerb connection can be at a reasonable cost as long as the house is above the road.

If the house is below the road you will need either:

or

  • A pump and storage for the storm water, which can add significantly to the build cost.


For more information on issues like this see Guide to Buying a Block


Plumbing Acronyms

There are a lot of acronyms used on plumbing drawings so here are a few definitions:

AGAgricultural (Drains)
B – Basin
Bth – Bath
BT – Boundary Trap
DP – Down Pipe
FW – Floor Waste
HWS – Hot Water Service
IC – Inspection Chamber
IS – Inspection Shaft (also IO -Inspection Opening)
ORGOverflow Relief Gully
PRV – Pressure Reducing Valve
RRJ – Rubber Ring Joints
RWH – Rain Water Head
SHR – Shower
ST – Stop Tap
SW – Storm Water Pipe (or SWD – Storm Water Drain)
SWJ – Solvent Welded Joints
TR – Laundry Trough
VC – Vitrified Clay
VP – Vent Pipe (sometimes UVP – Upstream Vent Pipe)
WC – Water Closet (Toilet)
S –  Kitchen Sink
SV – Stop Valve

If you have seen an acronym you don’t understand, then let me know, and I will try to give you an answer.

See Jargon for more posts


Exit mobile version