Australian Standards

A lot of people people misunderstand how Australian Standards apply to Contracts so here is a quick guide.

Standards Australia

All Australian Standards (AS) are published by Standards Australia. which is a non-government organisation.

It’s role is to meet Australia’s need for relevant standards for quality in goods and services that are also consistent with international standards.

Individual Standards

Each standard is a document specifying how a product, service or system can be practically obtained safely, reliably and consistently.

Role of Standards in Law

Australian Standards are not ‘Legal Documents’ and there is no automatic requirement to carry out any work or service to an Australian Standard unless:

  • A Government Law, or Regulation, (Such as the Building Code of Australia BCA) requires that an Australian Standard applies; or
  • The Specification for the project states that an Australian Standard will apply.

Even where an Australian Standard is mentioned you will quite frequently see words like: “or alternative that is deemed to satisfy the intent.”

Summary

Just because you are building in Australia don’t assume that Australian Standards will protect you as they may not even apply to the contracted work.


To understand the role of the Specification see: Contract Documents
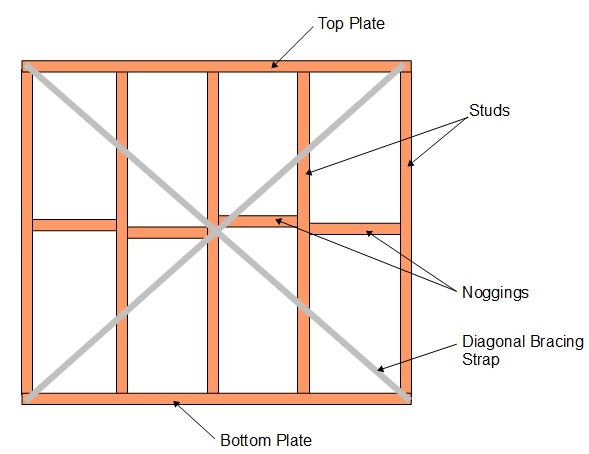
 

Basic Timber Frame Panel

The House Construction-The Frame post explains the background to frame construction.

The drawing below shows a typical standard wall frame

Minimum timber size will be 95mm x 35mm although this may increase for the  following reasons:

  • Additional wall insulation may increase the depth of the frame to 125mm 
  • If the wall requires more structural strength that may increase the timber thickness from 35mm to 45mm.

Studs

Studs are the main structural component as they support the main vertical load of the roof and and upper floors.

Normal spacing is at 450mm centers for external walls and 600mm for internal walls unless specified otherwise for structural reasons.

Top Plate

The top plate fixes the top of the stud in position and acts as a mounting point for the structure above the frame.

A single top plate does not have the strength to carry major loads, such as roof trusses or upper floor beams so these should be fixed directly above the studs. 

To increase the strength, if required, a second timber can be added during erection to make a double top plate. This additional timber is fixed to overlap adjacent frames, junctions, and corners, and increases overall ridgidity

Bottom Plate

The bottom plate holds the frame to the base and fixes the bottom of the stud in position .

It needs to be firmly fixed to the base. If the base is uneven packing needs to be installed under the stud positions to prevent any vertical movement of individual studs.

Noggings

Noggings are the individual short pieces of timber between the studs. They are there to prevent the studs bowing under the load or warping. It is important that they fit exactly into the space.

Maximum spacing between noggons and top and bottom plates is 1350mm. For walls up to 2.74m  high a single noggin meets the standards. Taller rooms and you will need 2.

Diagonal Bracing Strap

The diagonal bracing straps are typically galvanised steel strip which is nailed to each strut. The bracing is the part of the frame that resists any sideways deformation of the frame, such as wind loading.

Although these braces seem insubstantial compared to the struts and plates they are vital to the overall strength. If you find a brace has been cut during construction ask for it to be replaced!

Where there are openings the details in the following link are required: Openings in Timber Frames.

Want to know more?  The following external link is worth a look: Timber Plus Toolbox

Types of Fill

You will often find a reference to ‘Fill’ in your Geotechnical Report.

Your site may require ‘Cut and Fill’ to level the site.

Here is a bit of information about the various types of fill:

Ordinary Fill

Ordinary fill is normally excavated material from the site or from a unspecified location. After placement the excavator  tracks across it several times (known as Track Rolling) and then levels the top surface.

This fill is cheap but cannot be relied on for house foundations. You will either need to excavate through the fill to the underlying material, or use Concrete Piers.

Controlled Fill

Controlled fill is a known (tested) material either from the site or a specially imported material.

The filled area is constructed as follows:

  • The material is placed in layers, typically 150mm.
  • The water content is optimised, usually by adding water.
  • Each layer is compacted with specialised compaction equipment such as a vibrating roller.
Photo Courtesy of Coates Hire
  • At least 3 satisfactory tests of the compacted density of the filled area are carried out.

Providing the whole slab foundation will be on the controlled fill  your foundations only need to go down the required depth into the controlled fill.

No matter how well the fill was controlled I would not want to build where part of the house was to be on fill, and part on original ground…… In that case I would still like Concrete Piers, or Screw Piles installed through the fill to the original ground.


See Soil Classification for more information


Should You Use Yor Own Building Inspector?

Although I give lots of opinions on all aspects of building a house, including checking quality, I would never say “Don’t employ your own Building Inspector.”

I’m very experienced in the construction industry and have done lots of research so I’m happy doing it myself. A lot of people wouldn’t have the same level of knowledge and might be happier getting a more experienced person in.

A good inspector is going to charge around $400 for an inspection, so an inspection at every stage is going to cost around $2,000. . . . Not a lot for peace of mind when you are paying for a $200,000, or more, new house.

Be Involved

Even if you employ an Inspector they are only going to be going round at the completion of each Stage with several weeks between visits. A lot can happen in that time.

If you do some research and visit regularly you might see things that are covered up before the Inspector gets on site. I managed to stop things being done on my last build which would have caused delays if left unchallenged until the Stage Payment was due.

I would also say its well worth visiting the site with the Inspector and asking him about what he is looking at. He may also give you a different opinion on something the builder has told you.


To find out more about inspecting a new house see

Practical Completion Inspection


Exit mobile version