Building on sand at first seems to be an issue…… although I have heard it said that sand is actually the easiest ‘soil to build on.
If you live in West Australia there is a good chance that your house will be on sand so there is plenty of experience around .
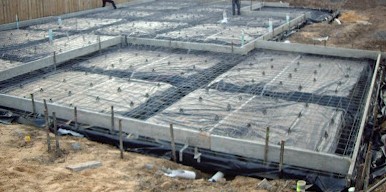
Raft Foundations
Modern raft foundations actually cope with this any problems of building on sand quite well.
This is because the raft foundation spreads the load of the building over the whole area of your house which matches the weight carrying capacity of the sand very well.
This is much better than concentrating the loads on the wall foundations.
If you are building on sand a waffle pod raft foundation is probably the best way to go.
This is because the waffle pod doesn’t rely on any excavated trenches of the conventional raft slab to form the beams that gives the base its rigidity.
Soil Erosion
The main concern with sand is that it is very erodible so its important to make sure that the building site is flat and there are adequate retaining walls preventing the sand being eroded on the downhill side of the house………and eventually from under the house!
This is particularly the case if you are building a property with a sea view, you wouldn’t like to finish like this *house!
One of the things that frequently gets forgotten is the hatch that gives access to the roof space.
Location
A usual location is in acorridor close to the secondary bedrooms.
It doesn’t seem that important but when you need the heating serviced, electrical alterations, plumbing alterations, etc, you are going to get tradies coming through the house.
Alternative Locations
When they have gone I often find dirty fingerprints on the hatch. . . which means I then need to get a ladder to clean the hatch.
It’s worth thinking about where you put this hatch.
If you have a single storey house the garage is probably the most convenient location followed by the laundry.
If you have got a 2 storey house an unobtrusive location may be a bit harder to find. . . . but make sure you think about it otherwise Sod’s Law says it will finish up in the worst spot.
Type and Size
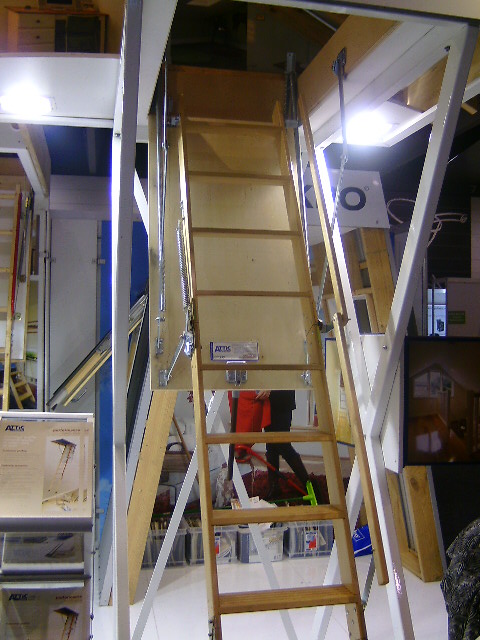
If you are the sort of person who can’t throw anything away you might want some extra space for storage.
In that case perhaps you should think about a larger hatch fitted with a ladder. (The ladder in the photo is a product of the ATTIC Group which is going to cost over $1,000)
Finally
Don’t put anything heavy in the attic as the roof trusses aren’t designed for heavy loads.
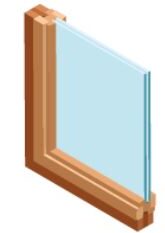
I’ve posted on Double Glazing but that not the only way to save heat loss through windows so I thought I would do a numerical comparison of the various options for glazing treatment of windows.
In a bedroom of our last house the South facing windows were approximately 4m square (We are in Australia so these windows don’t get any sun).The basis of my calculations is a difference of 15oC between internal and external temperature.
The equation used to calculate heat loss is:
Heat Loss = Area x Temperature Difference x ‘U’
for
‘U’ single glazing = 7*
‘U’ double glazing = 3*
‘U’ brick veneer = 0.51
* ‘U’ value includes effect of frame.
Option 1 Do Nothing
Heat loss through sinle glazing = 4 x 15 x 7 = 420watts = 0.42kw/hour
Remember this heat loss is for one room only.
Option 2 Reduce window by 40% to 2.4 m
Heat loss through single glazing = 2.4 x 15 x 7 = 252watts = .25kw/hour
Heat loss through new brick vineer = 1.6 x 15 x .51 = 12 watts = 0.012kw/hour
Total heat loss = 0.25kw/hr + 0.012kw/hr = 0.262kw/hour
With our builder this was a no cost option that has reduced the heat loss by 38%.
Option 3 Double Glazing
Heat loss through double glazing = 4 x 15 x 3 = 180watts = 0.18kW/hour
This is a heat loss reduction of 57% but at a significant cost.
Option 4 Reduce Window by 40% and Double Glazing
Heat loss through double glazing = 2.4 x 15 x 3 = 108watts = 0.108kW/hour
Heat loss through replacement brick wall = 1.6 x 15 x .51 = 12 watts = 0.012kW/hour
Total = 0.108kW/hour + 0.012kW/hour= 0.12kW/hour
This final option has reduced the heat loss by over 70% and will be around 30% cheaper than double glazing the original large windows.
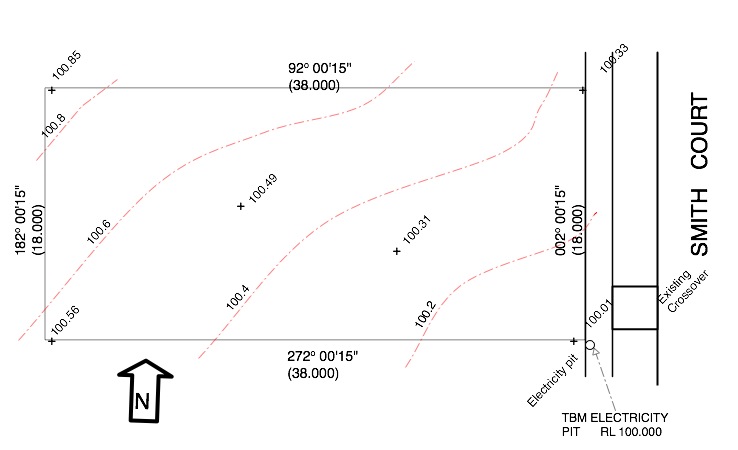
I’m used to look at survey plans but I do understand that most people struggle to understand them.
Here is a quick guide to help you understand the survey plan for your new house.
The plan below shows a survey plan, with a North Point, has been provided.for the block previously mentioned in the Title Plan Post. It doesn’t include the easement to make it easier to see the other details.
The bearing and length of each boundary are the same as the title plan in the format.
For example the North boundary is at bearing of 92 degrees 0 minutes 15 seconds (92° 00′ 15″) and 38m long.
The footpath along the front of the block and the nature strip crossover (constructed by the developer is shown, as well as an electrical pit.
TBM stands for Temporary Bench Mark.
This means the surveyor will use this feature as the level on which all other level information such as slab levels will be based.
It is normal for the TBM to be set at a round number typically either 10.000m or 100.00m.
Usually the only time the TBM’s actual height will be the correct height above Sea Level (Australian Height Datum) is when there is a risk of flooding and the floor level will need to be above the 100 year flood level.
Once the TBM has been set the surveyor calculates the surface levels of the block.
This is shown by contours, (shown dashed) which are lines of equal height.
The normal contour interval for residential block surveys is 0.2m intervals and each contour is labelled with the height it represents.
In addition to the contours the surveyor will show spot levels at the corners and sometimes in the middle of the block. (These are marked with a ‘+’ and a height)
From this drawing you can see:
The lowest part of the block is the South East corner at 100.00m
The highest part of the block is the North west corner at 100.85m
The block slopes upwards from the front at approx 0.53m. (around 1 in 70)
The block slopes upward in a Northerly direction at approx 0.30m (around 1 in 60)
As the contours are roughly similar spacing from each other the slopes are fairly constant.
In summary although there is a slope on the block it isn’t too severe so the site costs for dealing with the slope could be around $4- $6,000.
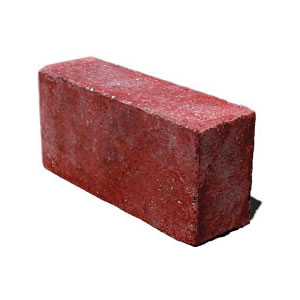
When you are deciding about building dimensions its better to take into account the size of building materials.
With brick veneer being so popular that means the dimensions of the bricks.
Make sure that all lengths, are based on either all complete bricks, or complete bricks with one half brick.
Similarly all heights should be based on complete bricks. Doing this has the following advantages:
Less wastage of bricks
Savings on labour due to less cutting of bricks
Stronger walls due to more regular bonding
The Work (design) Size of a standard brick is: 76 mm high x 230 mm long x 110 mm wide. These seem unusual dimensions but they are based on the old imperial dimensions of 3 inches by 9 inches by 4 inches.
When calculating overall wall dimensions it is normal to allow for 10mm vertical and horizontal mortar joint between bricks.
I have included ‘Tables of Dimensions for Brickwork’ at the following two links:
Clay brick sizes may vary after they are fired but size variation between bricks averages out when blended properly during laying by a good bricklayer.
There are three dimensional quality levels for bricks DW1, DW2 and DW0
If you want to check the quality of the bricks the normal method of measuring is to measure 20 bricks dry stacked together against the work size of 20 Bricks.
Dimensional Category DW1 means the height and width will differ by less than plus or minus 50 mm from 20 times the work size, and the length will differ less than plus or minus 90 mm.
Dimensional Category DW2 means the height and width will differ by less than plus or minus 40 mm from 20 times the work size, and the length will differ less than plus or minus 60 mm.
Dimensional Category, DW0 means there are no requirements. This is usually reserved for non-standard shaped bricks and bricks that have been rumbled or otherwise distorted during the manufacturing process for aesthetic reasons.
Planning some building work in the garden? see Brick Fences
One of the small things that can really make a difference to your house is how doors open……..but its one thing that is frequently forgotten.
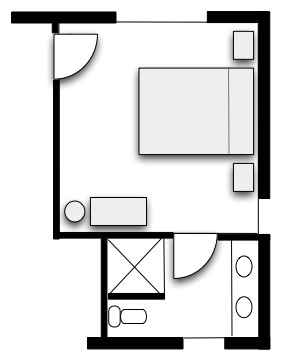
This sketch shows a typical bedroom and ensuite layout. (I know it doesn’t show the wardrobe but I’m trying to keep it simple)
A couple of things you need to think about are:
Into The Room Or Not
You will see as usual the doors to open from the corridor, into the room, and into the en-suite from the bedroom.
Particularly in the case of bathrooms and en-suites it makes a lot of sense for the door to open into the bedroom as this makes a lot more usable room in the bathroom.
It also minimises the risk of sending my wife flying if I open the door while she is at the mirror putting her make up on.
In the case of separate toilets its actually much safer to have the door open outwards. (The reason is if an ill person passes out they are likely to fall forward against the door, stopping it being opened. . . this means getting to them can be extremely difficult)
Left Or Right Handed
How to tell – When you look at the door from the side it opens towards, and you can see the hinges…. which side are they on?
That is the hand of the door.
Looking at the door to the bedroom you will see that the door is hinged on the right as you look at it from inside the room (right handed).
This works well as the door opens against the wall. Having the door hinged from the left side doesn’t seem much different, but it means you have to walk round the door to get out.
It seems minor but in a previous house we got one door wrong and it annoyed us every day for 6 years.
Plan Doors Early!
You need to get the door opening sorted out before you can finalise your electrical plan as it will affect which side of the door you put the light switches.
Once the wires are installed and the drywall installed changing the door direction can be a major cost.
More on doors including 24 pages of Check Lists for your new house choices in the
I’ve heard people say that they have got the best house on the street……………………..but when you see it, its got the smallest garden, or sometimes no garden at all.
If that is the case they have probably overdeveloped and spent money they will never get back.
This above photo shows one example.
The house must be around 800-1,000sqm (say 100 squares).
It would be twice the size of any of its neighbours.
Most people looking for a house expect a reasonable amount of garden for their children to run around in, and room to have barbies in summer.
Others might want to grow veggies.
I certainly wouldn’t want to see a fence right in front of every downstairs window.
Remember at some stage every house is going to be sold.
If you overdevelop your block you are aren’t going to get as much interest in your home, and less likely to get what you expect from the sale.
Signs of Over Development
Here are a few signs:
Building a huge double storey house when all the surrounding houses are small singe storey.
The house is no more than 1 m from the side boundaries and no more than 2m from the back boundary.
A swimming pool fills the whole backyard.
Want to build a big house – make sure that you buy a big enough block to avoid falling into the over development trap.
Don’t be like the owner of this house on the left that I saw for sale for at least 6 months.
Have you ever been put off a house due to over development?
See Size for more posts on how much house you need.
Well in my garage there are the following fuel sources
50 Litres of Petrol. (in the car fuel tank)
A litre of white spirit.
A litre turps substitute.
2 x 5kg gas bottles.
Several tins of half used gloss and enamel paint.
Large box of scrap wood.
Various cardboard boxes.
As far as ignition sources go there is
Electrical Sparks from 240 volt power tools
Sparks from angle grinder
Car electrical system
And I don’t even have a welder or brazing torch!
If a fire started, and was undiscovered, how long would it take to spread to the rest of the house?………………….Not very long if you have got a standard internal door and one layer of standard plasterboard on the walls and ceiling. (In the UK if there is a room above a garage the standard is two layers of plasterboard with off set joints between sheets)
It could well be worth upgrading the specification for your new house to improve the fire resistance of garage walls, ceilings and doors! Perhaps you might also consider fitting a sprinkler point.