Different Soil Classification Results

When you look at a new house block its always worth asking the Developer’s Agent what the Soil Classification is ……….. Only don’t take what you are told too seriously!

Usually the developers opinion is going to be that the site is going to be better (lower site costs) than your builder.

To understand why you need to consider the differing situations of the Developer and the Builder.

The Developer

  • May have done 20 or 30 tests over the whole development.
  • Is mostly interested in selling blocks
  • Since the tests were taken has had sewers and drains constructed on the site.
  • Probably done some spreading of fill from roadworks construction and site leveling

The Builder

  • Has had 3 tests done on your block.
  • Knows that even with the three tests the information represents less than 0.01% of the soil under your block.
  • Want to be sure the foundations are strong enough.
  • Want to avoid claims, from you, for foundation movement causing structural cracks.

If I got a soil classification from a Developer I would ask the Builder what extra site costs would be required for that soil, and then budget for at least another $5,000.


For lots more information why not get the Guide to Buying a Block only $4 at this link: Buying a Block
Drop Edge Beams

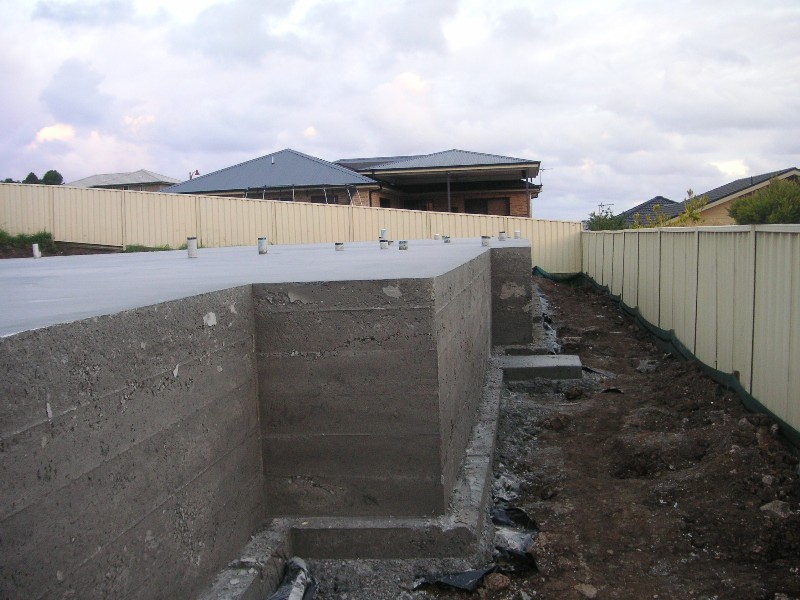
If you want to build your new home on a slope you may need to have the additional cost of needing drop edge beams on the low side of the slabs.

These are a sort of retaining wall to hold the fill under the house slab as shown in the drawing below.

Here is a photo of a typical drop edge beam before the brickwork has been started.

Costs (2013) are in the order of $500-$700/sqm of beam, plus the cost of the fill under the slab.

Say. . . $12,000 to $18,000 for a 20m long house with a 1.5m drop beam so a significant extra!

The photo below shows the same wall after the brickwork has been completed.


If you are building on a slope you may also want to know about Retaining Wall Fairness

Thanks to Grumblebum54 for the photos

Building On Rock

Based on the Soil Classification rock is considered one of the best surfaces to build a house foundation.

It comes under the Classification Class A.

That  doesn’t mean its going to be cheap especially for a conventional raft or waffle pod slab.

Any excavation such as leveling the site and excavation for sewerage and drainage trenches is going to be be expensive. This is due to it requiring a heavy excavator and rock breaking equipment.

Keeping Costs Down

If you have a site that has rock close to the surface the most economic base construction is likely to be Piers for Lightweight Construction. (including  Pole Houses and Queenslanders)

If  you want a Masonry House  (such as Brick Veneer or Double Brick) then you need to minimise the amount of excavation by going for suspended floors.
 

Also see Provisional Sums to find out the issues of finding rock during the construction.


Building on Fill – Screw Piles

I have previously posted about building on fill using Concrete Piers.

Well one alternative to constructing concrete piers is to use Screw Piles such as the one to the right.

These are made from a thick steel tube with:

  • A cutting edge on the bottom.
  • A  spiral plate close to the bottom.
  • A keyway at the top to lock into the drive tool.

The pile is screwed into the ground using a drive tool mounted on an excavator.

Screw piles will normally be more expensive than concrete piers when only a few shallow piles are needed.

They can be cost effective, and fast to install, when a larger number of piles are required or soil disposal is a major problems.

Other advantages are:

  • There is minimal spoil to be removed from site.
  • You don’t have to worry about rain as much during the installation.
  • They can be easily installed when the base of the pile is below the water table.
  • They can be installed in very restrictive locations.

Edit based on question I received

If you are worried about corrosion normal screw piles are fairly thick steel to stand the driving forces (individual thickness of material may vary)

Typically corrosion for plain steel piles in natural ground can be in the range 0.12 – 0.3 mm in 10 years, although galvanised steel will be less.

See Ground Conditions for more about your new house foundations.

Waffle Pod Raft Slab

A ‘Waffle Pod’ slab is now probably the most common Concrete ‘Raft’ House base. Its generally taken over from the Conventional Raft Foundation.

It’s an example of composite construction with polystyrene pods forming voids in the underside of the concrete ‘Waffle’.

This photo shows the pods, with the reinforcement placed over them, prior to placing the concrete.

Advantages

  • Cost
  • No trenches resulting in:
    • Simpler excavation; and
    • Flat site means site is easier to keep dry than trenches that collect water.
  • Waffle Pods bring house further out of ground. In an area that is wet the higher the better.
  • Better insulation from the ground meaning the floor will warm up quickly from cold. (especially if you go for in slab heating)

Disadvantages

  • More susceptible to bad workmanship – If the pods move during placing of the concrete.
  • More susceptible to bad drainage which can lead to soil heave if building on reactive clay
  • Lower thermal mass so less suited to passive solar design.
  • Thinner slab (typically 75mm rather than 100mm) means may not be as resistant to point loads such as jacking a car. Some people specify 100mm thickness for garage floor.
  • A thicker overall slab may be needed if you want Floor Drains (To allow for the dropped floor in those rooms)

Problem Sites

If  your block has difficult ground conditions its still possible to use a waffle pod slab with:


Also see Ground Conditions


Building On Fill – Concrete Piers

Its not unusual for the Site Investigation for your new house to reveal fill materials on top of the more stable clay or rock.

Even if there is no fill the builder may need to level a sloping site using ‘Cut and Fill’ methods, or the top layers of soil are generally poor.

To deal with the problem of building on poor ground concrete piers are commonly used.

These are basically a hole that is excavated through the fill and into the top of good ground. The hole is then backfilled with concrete to the level of the underside of the slab.

When they are finished you have a flat site with concrete pads (like the photo below), ready for the slab to be constructed

You don’t have to have Concrete piers over the whole site, just the parts where there will be fill between the bottom of the slab and the stronger soils.

The following diagram shows a typical slab on a cut and fill site with piers excavated through the fill to the good ground.

See the following link for an alternative to Concrete Piers: Screw Piles.

The Slab is likely to be either a Waffle Pod Raft or a Conventional Raft Slab

When the site investigation indicates fill the builder will often put in a Provisional Sum for so many metres of concrete piers.

At the time of construction they will drill down to  good ground in the fill areas and calculate the actual metres you will need to pay for.

If your whole house is on ‘Controlled Fill‘ You may not need to use concrete piers.


Lots more information in the anewhouse Guide to Buying a Block for only $4

See Ground Conditions for more about your new house foundations.


Exit mobile version