Understanding your Survey Plan

I’m used to look at survey plans but I do understand that most people struggle to understand them.

Here is a quick guide to help you understand the survey plan for your new house.

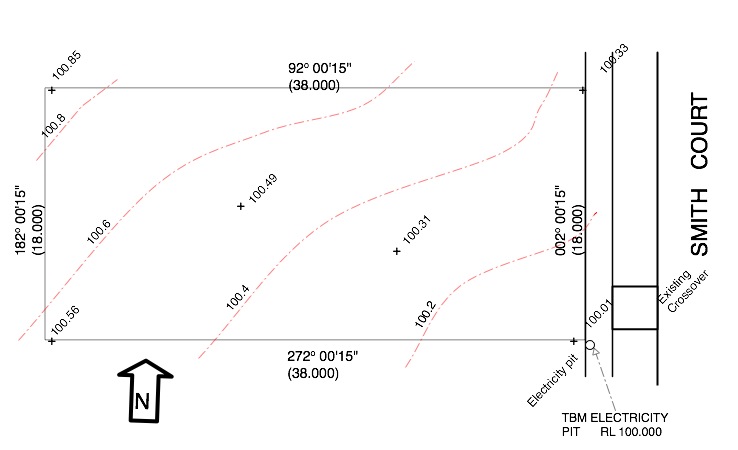
The plan below shows a survey plan, with a North Point, has been provided.for the block previously mentioned in the Title Plan Post. It doesn’t include the easement to make it easier to see the other details.

The bearing and length of each boundary are the same as the title plan in the format.

For example the North boundary is at bearing of 92 degrees 0 minutes 15 seconds (92° 00′ 15″) and 38m long.

The footpath along the front of the block and the nature strip crossover (constructed by the developer is shown, as well as an electrical pit.

TBM stands for Temporary Bench Mark.

This means the surveyor will use this feature as the level on which all other level information such as slab levels will be based.

It is normal for the TBM to be set at a round number typically either 10.000m or 100.00m.

Usually the only time the TBM’s actual height will be the correct height above Sea Level (Australian Height Datum) is when there is a risk of flooding and the floor level will need to be above the 100 year flood level.

Once the TBM has been set the surveyor calculates the surface levels of the block.

This is shown by contours, (shown dashed) which are lines of equal height.

The normal contour interval for residential block surveys is 0.2m intervals and each contour is labelled with the height it represents.

In addition to the contours the surveyor will show spot levels at the corners and sometimes in the middle of the block. (These are marked with a ‘+’ and a height)

From this drawing you can see:

  • The lowest part of the block is the South East corner at 100.00m
  • The highest part of the block is the North west corner at 100.85m
  • The block slopes upwards from the front at approx 0.53m. (around 1 in 70)
  • The block slopes upward in a Northerly direction at approx 0.30m (around 1 in 60)
  • As the contours are roughly similar spacing from each other the slopes are fairly constant.


In summary although there is a slope on the block it isn’t too severe so the site costs for dealing with the slope could be around $4- $6,000.


For more see Blocks


Wall Dimensions Standard Bricks

When you are deciding about building dimensions its better to take into account the size of building materials.

With brick veneer being so popular that means the dimensions of the bricks.

Make sure that all lengths, are based on either all complete bricks, or complete bricks with one half brick.

Similarly all heights should be based on complete bricks. Doing this has the following advantages:

  • Less wastage of bricks
  • Savings on labour due to less cutting of bricks
  • Stronger walls due to more regular bonding

The Work (design) Size of a standard brick is: 76 mm high x 230 mm long x 110 mm wide. These seem unusual dimensions but they are based on the old imperial dimensions of 3 inches by 9 inches by 4 inches.

When calculating overall wall dimensions it is normal to allow for 10mm vertical and horizontal mortar joint between bricks.

I have included  ‘Tables of Dimensions for Brickwork’ at the following two links:

Checking Bricks Meet Specification

Clay brick sizes may vary after they are fired but size variation between bricks averages out when blended properly during laying by a good bricklayer.

There are three dimensional quality levels for bricks DW1, DW2 and DW0

If you want to check the quality of the bricks the normal method of measuring is to measure 20 bricks dry stacked together against the work size of 20 Bricks.

  • Dimensional Category DW1 means the height and width will differ by less than plus or minus 50 mm from 20 times the work size, and the length will differ less than plus or minus 90 mm.
  • Dimensional Category DW2 means the height and width will differ by less than plus or minus 40 mm from 20 times the work size, and the length will differ less than plus or minus 60 mm.
  • Dimensional Category, DW0 means there are no requirements. This is usually reserved for non-standard shaped bricks and bricks that have been rumbled or otherwise distorted during the manufacturing process for aesthetic reasons.

Planning some building work in the garden? see Brick Fences

Thinking Of Copying Plans?

If you go around a display Home the builder’s representative will usually give you a brochure with a floor plan.

If you look on the net you can often download their plans, or you can even copy them from a newspaper article.

How hard would it be to get a different builder to build your new house using the same floor plan and save money?

You could even combine the front of one floor plan with the back of another so it wasn’t an exact copy.

The best advice I can give you is DON’T.

Why Not?

Some of the reasons are:

  • Most builders spend large sums of money developing their designs and guard their copyright jealously. If you get caught you could be up for thousands of dollars for breach of copyright. Tens of thousands if you go to court.
  • A court won’t only consider the whole plan, they can still find in the builders favour if substantial amount is the same.
  • Most reputable builders know the risks of breach of copyright and being made a co-defendant in a legal case and won’t want to build your house.
  • If you find a builder who will build to the plan he is unlikely to be reputable. Do you really want your house built by a dodgy builder?
  • If you copy a standard layout it will still cost several hundred dollars to get all the remaining plans drawn up to a level where you can get building permits and approvals.

Here are some of the ways people have been caught:

  • They asked the builder for a price on the house on a particular block. When the builder didn’t get the job they checked on the design of the house as it was built.
  • The contractors laying the concrete base recognised the layout as the big builder was a major customer of theirs.
  • The frame fabricators recognised the layout as the big builder was a major customer of theirs.

Buying a set of plans can cost from a few hundred dollars if you use a standard plan,

if you use an architect it could be thousands.

Here are a couple of websites that are worth a look.

http://www.ozehouseplans.com.au/
http://www.homebuildersaustralia.com.au/house-plans.html


For other posts see House Design

Accessible Design


Accessible design is making a house suitable to be lived in or visited by a disabled person.

If you don’t think this is important remember that one in five Australians has a disability.

So for instance:

  • You might be fine now but what if you or a family member has an accident?
  • How will you manage when you get older if you are in the same house?
  • If a friend or relative becomes disabled will they be able to visit you?

Also for those thinking about starting a family remember . . . a wheelchair friendly house is also a pushchair friendly house.

Ideas To Incorporate Into Your Design

Here are some of the things to think about:

  • A level site.
  • Driveways and garages wide enough to get a wheelchair next to the car.
  • Ramps rather than steps. Usually at a slope of no more than 1 in 14.
  • Doors at least 800mm wide, internal and external.
  • Corridors at least 1200mm wide.
  • Toilet doors opening outwards.
  • Reinforced walls next to toilets to allow fitting of grab rails.
  • Walk in large showers.
  • Aim for  1000mm space between furniture in all rooms.

Building these things into a new house is a lot cheaper than having to change the house some years down the track.

If you think this is just common sense its interesting to see how often designers and builders get this wrong.

I recently visited a retirement village where all the houses were built on stumps with a minimum of two steps to get up to the front door.

Some even had three steps.!

For similar posts about house design see Plans

Much more information on what to look for in the
Guide to Choosing a New House


Separate Toilets?

Most house plans show a toilet in the master bathroom but a separate toilet in the other bathroom……………. Why?

Maybe it’s because you don’t want visitors to see the bathroom, but where are they going to wash their hands?

Is it because you want somewhere quiet to go and read?

In England the only time people generally had a separate toilet was downstairs when the main bathroom with a toilet was upstairs.

I used to hang my college certificates in the downstairs toilet in one house. . . . That’s because I think you should never be in a dignified position when you are reviewing your achievements.

To make your house more accessible for a disabled visitor, or even old or injured family members, it’s easier for the toilet to be in the bathroom.

To get an idea go and look how a disabled toilet is organised in your local shopping centre.

I suppose if you have a big family queuing for the bathroom it might be a problem but then I would have though the best thing would be, rather than have a bathroom and a toilet to have two shower rooms each having a washbasin and a toilet.

With the shower rooms being smaller than a bathroom they probably wouldn’t take up much more space than a bathroom plus toilet.

Perhaps in one room you could have a half bath rather than a shower tray so you could still be able to give small children and babies a bath.

Must have a separate toilet

If you really want a separate toilet, as many people do, here are a couple of reasons why you might think of opening the door outwards rather than inwards as is typical.

    • You can make the toilet area a bit smaller which can help fit it in.
    • If someone passes out they will most likely fall forward against the door. If the door opens inwards how would you get them out?

One question I haven’t resolved is how should you decorate a separate toilet and should you install magazine rack?

After all reading on the toilet is the only time most of us men do any multi-tasking.


N.B I hope you liked the photo of the Avocado Bathroom. . . it was very trendy when we were re-modelling our first home

For other posts about House layouts see Plans

For Toilets see Plumbing

More plumbing information and 24 pages of Check Lists in the ‘Selection / Pre-Start Guide’


Buying Plans From The Internet

These days there are a vast number of house plans available of the Internet.

There are very many high quality companies that provide plans on the net.

However as with all internet based service you need to be careful.

Climate

There are many variations of climate across Australia to what is suitable foe Tasmania may be totally unsuitable for Darwin.

This may be even more pronounced for plans that come from other countries.

Building Standards

Building standards are again something that varies widely from state to state and between countries

Materials

Different countries have differing construction methods. . . . there is no advantage in saving on plans if its going to cost extra to get a material which need to be specially imported..

Dimensions

The Big trap here is buying plans from the USA which use feet and inches, something the modern tradesman may no longer understand.

Overall

I would be very reluctant to use an overseas plan provider for my house and then be faced with delays due to ensuring compliance with local standards.

If you find a plan on the internet that you really like you will need to be sure that the company that can provide you with:

 1. A full set of drawings, with dimensions in metric units, including:

        • A block plan based on survey information, that you will need to organise.
        • Floor Plan
        • Foundation plan these will need to be signed off by an engineer based on the soil investigation.
        • Exterior elevations.
        • Interior details of kitchen, bathrooms and laundry.
        • Roof plans showing adequate information for a truss manufacturer and builder to construct the roof.

2. A full specification and material list.

3. The ability to modify drawings to meet your exact requirements.

Some plan providers can provide additional drawings for plumbing, electrical and heating.  Alternatively it might be easier to get these services directly through the builder you select.
Generally the process will be:

  1. Find a design you like on the internet from a company that will provide all the above services.
  2. Pay an initial deposit to get a copy of the plans.
  3. Make modifications to the plan to meet your requirements.
  4. Receive final plans and specification of a standard you can use for planning, energy rating, and building approval and for use in a contract with a builder.

Understanding Plans – Basic Floor Plan

A basic floor plan is the sort of plan you will see in the developer’s brochure or on their web site.

Most people aren’t used to looking at plans and relating them to what they are going to get.

So here is a way of helping you understand.

1. Get a pad of metric graph paper. These usually have smaller squares with 2mm sides and heavier lines every 10mm.
2. If we are going to draw a plan at 1 in 100 then the side of every small square is equivalent to 200mm, or 20cm.
3. Start in a simple room, say a bedroom, and measure one wall. Draw a thin line along one of the lines of the graph paper.
4. From one of the corners measure to the next corner and draw this line on the graph paper, don’t worry about the doors or windows at this stage.
5. Carry on measuring and drawing until you have gone right the way around the room. You should now have drawn a box that looks something like the picture below.

6. Mark the position of the doors and the windows.
7. Thicken the outside of the lines to the thickness of one square for external brick walls.
8.Thicken the outside of the lines to the thickness of half a square for internal walls.
9. Draw in a quarter circle to show the way that the door opens. You should now have a drawing that looks something like the picture below.

10. This will help you relate the size of your existing room to one you see on a plan.

11. If you want to see how the furniture looks its better to cut out sections of graph paper the same size as the furniture rather than draw on the paper. You can then move these around.


Once you have got the hang of this you can expand the drawing to include all the rooms of the house.

For similar posts see Drawings and Floor Plans


Pool Before, Or After House

I have seen pools built before the house is built, and afterwards, so I thought I would discuss the options.

Build First

A lot of people find it very hard to visualise a finished house and it’s surrounds from drawings.

Especially when you are faced with a large empty block.

If this is you then it might be worth waiting until the house is built.

The problem is that unless you have a wide, or corner block, you are likely to cut off easy access to the site.

This means that

  • There will be a lot of mess around your new home during the build
  • The pool build will be more expensive, and take longer.

Pool First

If the pool is built first there will normally be good access to the site for large excavators and tip trucks.

There will be no need tor large cranes to lift heavy loads over the house.

As a result it should be possible to save thousands of dollars on the price of your pool.

You should also be able to take a dip in the pool as soon as you move in.

Risks

Co-ordination between Architect, House Builder, and Pool Builder is critical.

Make sure that all three agree on the location, and height, before any construction starts

A couple of problems I have heard about with pools are:

  • A pool was built before the house where the pool builder was given the wrong height by the owner. . . . When the builder arrived on site he realised that for the house to match the pool height would cost another $30,000 for additional fill and foundations, which was down to the owner.
  • The property owner decided to have the pool built after handover, but didn’t tell the builder to avid the area. The builder laid the house drainage and sewerage pipes across the pool area. . . . . Re-laying the pipes cost an extra $4,000.


Photo from www.Buzzle.com

Types of New House Permits

Here is some information on the several sorts of permits that are involved before you start building a house.

Planning Permit

Sometimes called a Development Approval (DA) if you are buying a block on an existing subdivision you should already have Development Approval.

This DA will provide details of the restrictions on what you can build on your block.

If you want to do any of the following you will probably need to apply for a Planning Permit:

  • Change of use (for example farming to residential).
  • Subdivision of an existing block.
  • Substantially altering an existing building.
  • Changing any conditions of the existing permit.

Building Permit

A Building Permit is an approval that confirms that the proposed work meets the standard of the Building Regulations.

A permit is usually required for works that involve:

  • Building a New House.
  • Major alterations to an existing house.
  • Additions to an existing house (for example a Pergola or Deck).
  • Demolition of an existing house.

Road Opening Permit

A Road Opening Permit,from the Council Engineering Department is normally required to create or alter the access to a property, install service trenches, and build over a council Easement.

Sewer Build Over Permit

In many areas the sewers are controlled by a Water Authority rather than the council. If you want to build on a Sewer Easement you will require a separate permit from the Water Authority.

Want to know more? …………………….The best thing is to go down to your local council and talk to the staff there.


Once you have finished you will need an Occupancy Permit

See Restrictions for more limitations on how you develop your block


Exit mobile version