Pre-Wetting A New House Block

Reason For Pre-Wetting

If you are Building On Clay that is dry there is a risk of Soil Heave.

This is due to expansion of the clay if the moisture level increases with particular risk factors being:

  • Building after a long period of very dry weather when large cracks in the surface are visible.
  • Knock down and rebuild projects where there is a risk that part of the new foundations are on drier land than other parts.
  • Where there are trees, or trees have recently been removed.

To minimise the risk there is often an Engineers requirement to pre-wet the site to stabilise the moisture content.

Pre-Wetting Requirement

A typical requirement is to run sprinklers for 2 hours a day for 8-10 days which should increase the soil moisture to a depth of approx 1m.

Then the fill/construction pad below the slab should be laid within 2-3 days,

You are aiming for the equivalent of 20-25 mm of rainfall a day (20-25L/m2) The intention is on each day to thoroughly wet the top layer of soil and fill all the cracks with water without actually waterlogging the site.

For maximum effect the best time to do the pre-wetting is the late evening to minimise evaporation.

I have hear of builders saying the pre-wetting isn’t needed. Don’t accept this without soil moisture tests that have been accepted by the engineer who made the original requirement.

Effectiveness of Pre-Wetting

Although pre-wetting will minimise the risk of Soil Heave

  • It doesn’t mean that good foundation design can be neglected.
  • Letting the site moisture content stabilise through a winter, after removal of buildings/trees, is likely to be more effective.


See Ground Conditions for more Posts


Stormwater Discharge Point

One check that is often forgotten when buying a house block in an established suburb is how storm water is removed from the site.

Forty, or more, years ago when land was cheaper, it was not unusual for blocks to be quite large compared with the size of the house.

Disposing of storm water by allowing it to soak into the garden in the garden was acceptable. (This is still effective in sandy areas such as much of Western Australia)

As a result many properties were built without connection to a surface water sewer.

Modern Knock Down and Rebuild Problems

If you buy block  in an older suburb with the intention of subdividing, or demolishing and building a bigger house, you could have problems if you haven’t got access to a storm water sewer.

Disposal to a much smaller garden area probably won’t work.

In order to protect adjoining properties from overflows from your property the council are likely to make discharge to an approved point conditional on any development approval.

Dealing with the attendant problems if you plan to extend or subdivide a block without a stormwater discharge point can add thousands of dollars to your costs.

Options

Possible options are:

    1. Soakwells. If you are lucky enough to have a sandy block soakwells may be a solution. Low cost.(see this link: Soakwells )
    2. Pipe to existing surface water sewer. This may involve negotiating with adjacent property owners. Very difficult to achieve unless the affected neighbours also want to subdivide. Very expensive.
    3. Discharge to Street
      Check with your council to see if this is permitted. A typical street connection will look something like this kerb outlet. Can be a reasonable cost if the block is above the road, or very expensive if the block is below road level Pumps and a detention tank will be needed (See these links Pumps and Detention Tank)


See Guide to Buying a Block for more information


Different Soil Classification Results

When you look at a new house block its always worth asking the Developer’s Agent what the Soil Classification is ……….. Only don’t take what you are told too seriously!

Usually the developers opinion is going to be that the site is going to be better (lower site costs) than your builder.

To understand why you need to consider the differing situations of the Developer and the Builder.

The Developer

  • May have done 20 or 30 tests over the whole development.
  • Is mostly interested in selling blocks
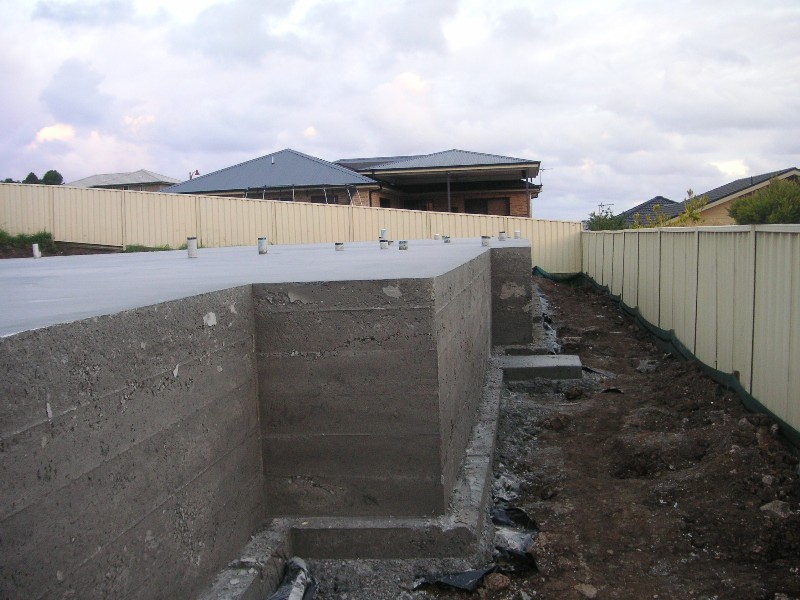
  • Since the tests were taken has had sewers and drains constructed on the site.
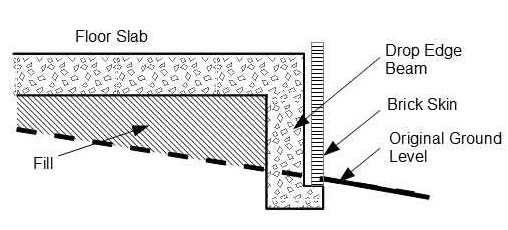
  • Probably done some spreading of fill from roadworks construction and site leveling

The Builder

  • Has had 3 tests done on your block.
  • Knows that even with the three tests the information represents less than 0.01% of the soil under your block.
  • Want to be sure the foundations are strong enough.
  • Want to avoid claims, from you, for foundation movement causing structural cracks.

If I got a soil classification from a Developer I would ask the Builder what extra site costs would be required for that soil, and then budget for at least another $5,000.


For lots more information why not get the Guide to Buying a Block only $4 at this link: Buying a Block

Buying a Block

anewhouse GUIDE  – E book

 Aimed at making sure you consider a wide range of issues to ensure you get the right block for your new home!

Posts from this Blog and Much More.

In pdf format so you can read it on your tablet computer.

82 pages packed with advice  including Comprehensive Checklists that can be printed out.

Reduced . . . Now Only $2


CLICK HERE for more details


Drop Edge Beams

If you want to build your new home on a slope you may need to have the additional cost of needing drop edge beams on the low side of the slabs.

These are a sort of retaining wall to hold the fill under the house slab as shown in the drawing below.

Here is a photo of a typical drop edge beam before the brickwork has been started.

Costs (2013) are in the order of $500-$700/sqm of beam, plus the cost of the fill under the slab.

Say. . . $12,000 to $18,000 for a 20m long house with a 1.5m drop beam so a significant extra!

The photo below shows the same wall after the brickwork has been completed.


If you are building on a slope you may also want to know about Retaining Wall Fairness

Thanks to Grumblebum54 for the photos

Types of Fill

You will often find a reference to ‘Fill’ in your Geotechnical Report.

Your site may require ‘Cut and Fill’ to level the site.

Here is a bit of information about the various types of fill:

Ordinary Fill

Ordinary fill is normally excavated material from the site or from a unspecified location. After placement the excavator  tracks across it several times (known as Track Rolling) and then levels the top surface.

This fill is cheap but cannot be relied on for house foundations. You will either need to excavate through the fill to the underlying material, or use Concrete Piers.

Controlled Fill

Controlled fill is a known (tested) material either from the site or a specially imported material.

The filled area is constructed as follows:

  • The material is placed in layers, typically 150mm.
  • The water content is optimised, usually by adding water.
  • Each layer is compacted with specialised compaction equipment such as a vibrating roller.
Photo Courtesy of Coates Hire
  • At least 3 satisfactory tests of the compacted density of the filled area are carried out.

Providing the whole slab foundation will be on the controlled fill  your foundations only need to go down the required depth into the controlled fill.

No matter how well the fill was controlled I would not want to build where part of the house was to be on fill, and part on original ground…… In that case I would still like Concrete Piers, or Screw Piles installed through the fill to the original ground.


See Soil Classification for more information


Building On Rock

Based on the Soil Classification rock is considered one of the best surfaces to build a house foundation.

It comes under the Classification Class A.

That  doesn’t mean its going to be cheap especially for a conventional raft or waffle pod slab.

Any excavation such as leveling the site and excavation for sewerage and drainage trenches is going to be be expensive. This is due to it requiring a heavy excavator and rock breaking equipment.

Keeping Costs Down

If you have a site that has rock close to the surface the most economic base construction is likely to be Piers for Lightweight Construction. (including  Pole Houses and Queenslanders)

If  you want a Masonry House  (such as Brick Veneer or Double Brick) then you need to minimise the amount of excavation by going for suspended floors.
 

Also see Provisional Sums to find out the issues of finding rock during the construction.


What Sort of Plan?

Buying Land…….There are several sorts of Plans/ Surveys of your Block to think about before you can start building a house.

Here is a guide to the various plans based on the same block:

Title Plan

Title Plans are the legal document that describes the land. Initially they are usually the only plan that is available  They are limited to:

  • Showing the dimensions and bearings of the boundaries.
  • Showing the locations of Easement.

The drawing below is a typical title plan

Feature Survey

The Feature Survey is an accurate representation of the block prepared by a surveyor. Typically the information shown is:

  • Boundaries.
  • Site Contours.
  • Locations of trees.
  • Any other above ground features such as driveway crossovers and manholes.

If you buy direct from a project builder they will normally arrange the feature survey. If you want to get quotes from several builders it can be worth getting a feature survey done first.

Geo-Technical Plan

The Geo-Technical Plan is more in the form of a sketch than an accurate representation of the site. The main purpose is to indicate the approximate location of boreholes. Other information that may be included is:

  • Indication of location of trees as these may affect the Geotechnical Recomendations.
  • Any rock outcrops.
  • Direction of fall.
  • Ponds / swampy areas.


See Blocks for more information on buying land.


Exit mobile version