Understanding Tank Water Quality

The drawing on the right shows a fairly typical rainwater tank layout.

I have seen lots of tanks set up like this and have also seen this layout in tank supplier’s brochures.

The set up is probably OK for garden watering and toilet flushing but not much else………………………..”So what are the Issues?”

Variable Water Quality From Top to Bottom

Even with ‘leaf screens’ and ‘first flush divertors’ there is going to be some particles in the water coming of your roof, These particles will either be lighter than water and float to the top, or heavier than water and sink to the bottom.

The smaller the particle the longer it will take to sink to the bottom.

The 2nd diagram shows how the water quality varies through the tank a few days after it has rained.

  • There are some particles floating on the surface.
  • There is some material close to the bottom which can include rotting organic matter. Sometimes called the Anaerobic zone.
  • The water between the bottom and the top gradually improves as the height increases with the best water being about 1 cm below the surface.

Problems

Because of the variable water quality problems are:

  • The outlet is close to the zone of worst water quality.
  • When it rains the turbulence from the inlet mixes the tank which then takes time to settle.
  • The overflow takes some of the better quality water.

Over the next few weeks I will provide  information about ways of improving the water quality in your tank.


For more about tank water quality see Rainwater Safety


Insulation – Heat loss Suspended Timber Floor

I have previously posted about the Heat Loss from a Slab Floor so how does that compare with a suspended timber, or particle board, floor?

Well its not as bad as you might think because the the space under the floor acts as a Buffer Zone between the room and the external temperature. (Unless you have got a pole house or a Queenslander.)

The main considerations are:

    1. The amount of external wall compared with the area of the floor, ‘ Perimeter to Area Ratio’ (PAR).
    2. The height of the floor above the ground (the calculations below are based on this height being 0.5m or less)
    3. The amount of ventilation expressed as m2/ m length of perimeter wall.

Heat loss Calculations

Perimeter to Area Ratio.

For a 10m x 10m house the PAR = 40/100 = 0.25

For a 20m x 5m house the PAR = 50/100 = 0.5

Ventilation

Low ventilation = 0.0015m2/ m length of perimeter wall

High ventilation = 0.003m2/ m length of perimeter wall.

The  table below provides some values of ‘U’ for the floor .

PAR

.2

3

.4

.5

6

7

8

.9

‘U’ low ventilation

0.4

0.51

0.59

0.66

0.72

0.77

0.82

0.86

‘U’ high ventilation

0.42

0.53

0.62

0.7

0.76

0.81

0.86

0.9

So for a typical single storey house of 20m x 10m

The PAR = 60 / 200 = 0.3

From the table ‘U’ is 0.51 -0.53 depending on ventilation

The heat loss from the slab = Area x ‘U’

= 200 x (0.51 -0.53)

= 102 -106 watts/degree C

The heat loss for this floor is 4 – 8% higher than the same sized slab on ground. The suspended floor will however have a lower thermal mass.


See Insulation for similar Posts

For Posts about Green Buildings see Sustainability


Insulation – Heat Loss Slab On Ground

Why is there less fuss about insulation under a concrete raft slab than ceilings and walls?…………well here are a few interesting facts:

  1. A thick layer of earth provides a reasonable amount of insulation.
  2. The soil contributes to the thermal mass of the structure which helps smooth out any temperature variations.
  3. The temperature of the ground below the surface varies much less than the air temperature. For Victoria a ground temperature range in the order of 13 degrees in winter to 22 degrees in summer is typical.

As a consequence the main heat loss from the slab is only from the edges of the slab rather than from the middle.

Heat Loss Calculation

When estimating the heat loss a key factor is the ‘ Perimeter to Area Ratio’ (PAR). Examples are:

For a 10m x 10m slab the PAR = 40/100  = 0.25

For a 20m x 5m slab the PAR   = 50/100  = 0.5

The  table below provides some values of ‘U’ for the total structure for various values of the ‘PAR’ .

PAR

.2

.3

.4

.5

.6

.7

.8

.9

‘U’

.37

.49

.6

.7

.78

.86

.93

.99

So for a typical single storey house of 20m x 10m

The PAR = 60 / 200 = 0.3

From the table ‘U’ is  0.49

The Heat loss from the slab  =   Area x ‘U’   =   200 x 0.49   =   98 watts/degree C

The ‘U’ value for this standard slab is similar to an Insulated  Brick Veneer  Wall.

A Waffle Pod Slab will have a slightly better insulation value but have a lower thermal mass.

If you want to install slab edge insulation see Insulating Your Slab.


See Insulation for similar Posts

For Posts about Green Building see Sustainability


West Facing Solar Hot Water System?

If you are committed to sustainability then space on the North facing roof is at premium.

One option may be to look at putting the solar hot water system on a West facing roof.

This will mean you can maximise the space for north facing Photo Voltaic (PV) solar panels.

Although the solar hot water system will not be quite as efficient there are a couple of reasons why it is a worthwhile option.

    • If you check the solar alignment post you will see that its possible to get around 80% of the maximum efficiency compared with a North Facing system.
    • For most families the time when you will be using most hot water is the evening and early morning. The West facing system will have less time to lose heat before use than the North facing system.

I’m not saying West facing is best but it can be a good compromise.


For more Green Ideas see Sustainability


Green Roof

How would you like to be mowing the roof of this house?

This is a ‘Green Roof’ something which is quite common in many Northern Hemisphere Countries but not so common in Australia.

They can work well in keeping a house warm with around 2-300mm of soil providing good insulation.

I’m not sure how well they would work in Australia on conventional houses.

  • You would probably need to water the roof in summer to minimise any bushfire risk.

Other issues would be:

  • Upgrading roof trusses for the much heavier loads from all that soil.
  • Finding the right native species to plant so you wouldn’t have to mow!


For more Unusual Houses and Fails go to What the………………….?

For Posts about Green Building see Sustainability


Solar Hot Water

With the current emphasis on building efficiency solar hot water systems are pretty much a standard option if not automatically included.

These systems incorporate either gas or electricity boosting for cloudy days.

Here are a few thoughts on the options for solar hot water:

Split System or Tank On Roof

  • Systems with Tanks on the roof are the most efficient . They don’t need a circulation pump to circulate the hot water to the storage tank and don’t have long pipe runs that lose part of the heat you have collected. If this is the way you decide to go make sure your roof has been designed to take the load.
  • Split systems are easier to service when they go wrong as everything other than the panels is at ground level. Many people also prefer the look as they don’t like the large tank on the roof for aesthetic reasons.

Flat plate or Evacuated Tube Panel

  • Evacuated tube systems are more effective. Also from comments on forums I hear 2mm evacuated tubes are stronger than flat plate collectors in the case of large hail, and are less likely to be hit square-on, due to their shape. Just make sure you aren’t getting cheap quality thinner walled tubes.
  • Modern good quality evacuated tube and flat plate systems should be essentially maintenance-free. Just make sure of the quality, it can cost $300-$400 in labour to replace a defective panel even if the actual panel is replaced under warranty.

Insulation

Some of the early Solar water systems only insulated the hot water coming from the system. This is poor practice as once the system starts running the water from the storage tank back to the panels warms up. If this cools in the pipes to the panels you will be loosing efficiency. Make sure you have all pipes insulated.

Boosting Systems

  • I think Gas Boosting is probably the best way to go even if you have the higher priced bottle gas rather than mains gas. This is because gas systems only boost the water when you want it rather than electricity where you are heating the whole tank up even if you are only using 10% of the contents.
  • If you `go for electricity its best go for an off peak boosting, but only switch it on if the forecast is for cloudy weather.


See why a West Roof Mounting may be worth thinking about

For more  information on choosing systems for your new house see  ‘Selection / Pre-Start Guide’


Why I Don’t Have Mono-Crystalline Solar Panels


Several people have commented that my panels look different to those on other houses.

Most solar PV installations use Mono-Crystalline panels, because they are smaller for the same power rating.

The panels on my roof are Kaneka Thin Film Panels.

Here are the reasons why:

Efficiency In Real World Temperatures

When you see a panel power rating it is based on laboratory conditions with a panel temperature of 25oC.

In Australia, on your roof, the panel temperature is generally somewhere around double the ambient temperature, thus most panels operate above 25oC most of the time.

Typical crystallines panels lose power @ 0.45% per degree C above 25oC.

Typical thin-film panels lose power @ 0.25% per degree C above 25oC.

This means that on a typical 25oC day with a panel temperature of 50oC

  • A 1000watt mono-crystalline system may be generating 885watts.
  • A 1000watt thin film system is likely to be generating a higher power of 935watts.

On hotter summer days when panel temperature can rise to over 80 degrees the difference will be even greater.

Shading

Thin film panels are bigger than mono-crystalline panels means that more of your roof is shaded by the panels helping to keep the house cooler.

Energy Payback

Thin film panels have much lower embodied energy than mono-crystalline panels meaning that the energy involved in the production is recovered within two years of use.

Better Performance When Partially Shaded

Partial shading effects can be quite significant in overall system efficiency. Thin film panels however are less susceptible to shading.

Cost

In spite of the above advantages for Thin Film panels the cost per installed watt is around the same as Monocrystaline panels.

More independent information about solar panels in Australian conditions can be found at the Desert Knowledge Solar Centre at Alice Springs


For similar posts see Solar Electricity in the Sustainability Tab


Block Orientation

Sponsored by Coral Homes

When looking at block orientation a key issue is using the sun to warm the house in winter and keeping the sun out of the rooms in the summer.

Typical blocks in Australia are rectangular. About twice as long as the block width, as are most home designs. This limits the way you can place the house. In my experience the order of preference of blocks is.

1. Facing East
2. Facing West
3. Facing South
4. Facing North

If you have got a block at an angle it will require a bit more thought unless you can orientate the house in one of the above preferred directions. Larger blocks and square blocks make adjustments to the house orientation easier.

My reasons for the preferences are as follows:

Facing East

This orientation allows one of the long sides to face north making the best use of the sun in a passive solar house. Usually the master bedroom is at the front so even in the summer the low sun morning sun only warms the bedroom from the chill of the night. Windows can be minimised on the west side to stop the house overheating in the afternoon and evening. This orientation also gives you plenty of roof area for the most effective location of solar hot water and solar electricity panels.

Facing West

Again like the east facing block you can have one of the long sides to face north making the best use of the sun in a passive solar house. With a master bedroom at the front you will need to take steps to keep the afternoon sun out of the room to stop overheating. Like the East facing orientation this is useful for solar panels on the roof.

Facing South

With a house facing south the best layout is to have as many rooms as possible having large windows facing north which can be difficult on a narrow block. To make the best of this orientation you may need to have plans drawn up as most standard plans don’t suit this orientation. It’s also best to minimise west facing windows.

Facing North

A north facing house is probably the least desirable on a suburban block as it makes it hard to get the sun into the house. I certainly wouldn’t want big north facing windows allowing passers by to look in.


Lots more information in the anewhouse Guide to Buying a Block for only $4

See similar posts see Choosing a Block and Passive Solar


Types of Solar Panels for Electricity

From some of the adverts you see you would think there is only one sort of solar panels…. in fact there are several alternatives.

The type of panels generally available are:

  • Monocrystalline solar panels The highest cost but the most efficient with a long history of use.
  • Poly-crystalline Similar to mono-crystalline panels, but the silicon used has a different structure which is easier to make and therefore cheaper but less efficient in watts per m2.
  • Thin-film This includes several technologies of which the latest is CIS. These panels are the usually the lowest cost panels but can be twice the area of a Monocrystalline panel for the same output.
  • Hybrids There are also a number of hybrid panels around which combine different technologies to improve all round performance.

Don’t get too confused by the marketing hype and the quoted efficiencies.

Unless you are have limited space to put the panels the best panel is the one that produces power at the smallest price per watt and will continue to do it for the longest time.

An advantage of having larger, but lower efficiency, panels is that more of the roof is shaded by the panels in the summer. This will reduce the heat gain in the roof space, saving on cooling costs.

The only times that efficiency becomes important is when;

  1. You are running the whole house off panels and you need more area for low cost panels than you have got roof area – more for off grid applications.
  2. You only have a small North-facing roof.
  3. The roof is Badly Shaded.

As well as the cost per watt you should also looking for panels from reputable manufacturers that come with a long guarantee (Up to 25 years). Additionally you would be advised to ask for a 5 year installation guarantee. 


Solar Electricity – Is It Worthwhile? (2011)

Since this post was written in 2011 there has been many changes; in subsidies, the cost of systems, and  Power Supplier charges. For the  an updated post see:  Solar Electricity – Is It Worthwhile? (2014)

There is a lot of marketing information around about Grid Connected Solar Panels but not many facts. Here’s how I evaluate a basic system for a house in a Melbourne Suburb.

  • We uses around 16kw hours (kwhr) of electricity per day which is fairly typical;
  • For each 1kw of solar panels we can expect to generate around 1300kw hours per year that’s an average around 3.5 kw hours per day;
  • For the basic 1.5kw system we should generate on average about 5.2kwhrs;
  • Our current tariffs for power is $0.2025 /kwhr regardless of time of day;
  • I Have done the evaluation assuming that any surplus power is sold back at the peak rate. Some states have attractive buy back rates that will improve your financial situation.
  • As part of going solar our tariffs will change to:
    • $0.2625/kwhr peak times (7.00am -11.00pm Monday to Friday, 80 hours per week)
    • $0.1075/kwhr off peak (all times other than peak, 88 hours per week)

How Much Will Be Saved?

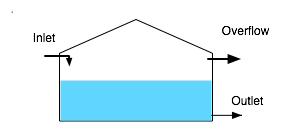
As we are out of the house for at least half the peak period the cheaper off peak power should more than offset the more expensive peak power so our average power cost should remain similar to our current tariff.

Weekdays (as we both work and the house is empty during the day) we should be able to put at least 2.5 kwhrs into the grid and use a maximum of 2.7kwhrs running fridges etc)

Income 2.5kwhr @ $0.0.265 = $0.66

Saving 2.7kwhr @ $0.2625 = $0.70

Benefit = ($0.66 + $0.70) x 260 days = $353

Weekends we probably will only put 1kwhr into the grid as we may well be at home using power for TVs, heating and cooling, etc.

Income 1kwhr @ $0.265 = $0.265

Saving 4.2kwhr @ $0.1075= $0.45

Benefit = ($0.265 + $0.45) x 104 days = $74

Total annual benefit is $427

(I believe my calculations have been fairly conservative and the actual benefits could be higher) PLUS For every $0.01 of premium rate buy back you will get another $6.24 per annum.

Is it worth it?

Well there are some 1.5kw systems being advertised now with various rebates which cost less than $3000.

If you had $3000 on term deposit it would now (Jan 2010) be returning 6% that’s $180 a year, which would then be taxed. Alternatively if you put the cost on your mortgage that will mean that you are borrowing $3000 at a rate of around 8%. That’s costing around $240.

From these figures it looks like for the basic system we could be around $187 better off. Even more if you spend less than $3000 or can get a premium buy back rate.

If you are looking to get a system you need to know that there may additional charges for things like:

  • Installation on a tiled roof;
  • Frames on a flat roof to provide the best angle for the panels;
  • Split array over two different sections of roof;
  • Lifting and access if you have a 2 storey houses;
  • and travel charges if you are outside the metropolitan area.

For similar posts see Solar Electricity in the Sustainability Tab


Exit mobile version