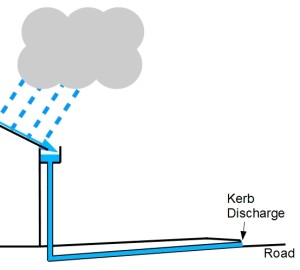
This diagram indicates a charged drainage system. These are sometimes called either a “wet” or a “pressure” system.
With this type of system a section of the pipe always remains full unlike a Conventional System.
As the pipes are under pressure it is essential all the joints in above ground and underground pipework are fully watertight
Advantages
A neater appearance than having pipes above ground.
Allows you to discharge water at a height above the ground level at the down pipe.
Disadvantages
It is more likely to block as the flow through the pipes can be fairly slow and the low points can collect silt. Silt will get deposited at flow rates below 0.6m/sec which will be the situation for most rainfall events.
It is also more difficult to unblock.
Can cost more with excavation and additional inspection fittings .
Potential for mosquito breeding in water unless appropriate screes are installed.
It’s important to make sure you are getting the right type of pipes and fittings that will be underground…..you don’t want to be digging up you garden, or paths, in case of blockages.
Pipes
Some plumbers will want to use, and bury, 90 mm diameter rainwater pipes, basically plastic downpipes.
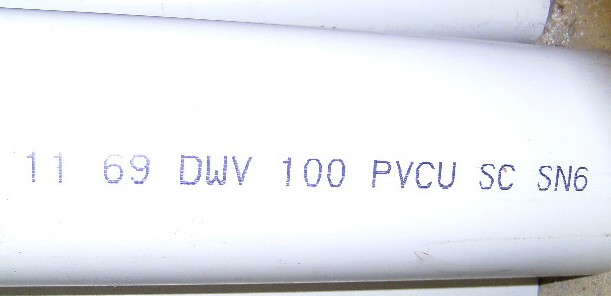
You need to make sure you are getting as a minimum 100 mm PVC pipes rated as DWV.(Stands for Drainage, Waste and Vent).
The reasons are:
The 90 mm pipe is thin walled and can be easily deformed once buried. This means you lose capacity without realising it. The DWV is a much thicker and thus stronger pipe.
Although the increase in pipe diameter is fairly small the flow capacity of the larger pipe is over 40% higher. That makes a difference in storm conditions.
Pipes are normally marked at 1m intervals with the type, manufacturer, nominal diameter, material, and the Standards reference (AS/NZS1260).
One of the problems during a new house construction is that concrete tend to fill underground pipes, causing blockage.
A hydraulic impact cutter can remove concrete in drains and sewers.
Other problems include leaking or burst pipes caused by corrosion, tree roots, and collapsed pipes.
Roots tend to grow toward the direction of the water so a loose connecting or weak point in the underground pipes triggers tree roots to wrap around them until they burst.
That’s why the design of the pipe system is crucial to ensure a problem-free plumbing.
They should be away from trees and other structures to avoid these problems.
A qualified and experienced plumber will detect common leak indicators in the underground pipes and repair them. They’ll test the repair and fill the trench.
Bends
Bend refers to a term for any change or offset of direction in the pipes, which includes elbows.
They’re fabricated as per piping specification requirement.
Elbows come in standard or pre-fabricated and are available off the shelf.
Bends are available in 4 different angles for DFW pipes as follows: 15 degrees, 30 degrees, 45 degrees and 90 degrees.
Although 90 degree bends are available, I would NOT install them underground due to the blockage risk….. If you need a 90 degree change of direction underground:
For a drain or a sewer use a junction pit.
For a charged (pressure) rainwater system use two 45 degree bends with an inspection ‘T’ in the middle.
In a post on Outlet Location I talked about improving the water quality by avoiding taking water from the bottom of the tank.
This post shows how you can keep the floating particles on the top of the water out of your supply for just a few dollars.
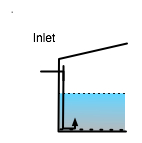
Mid Level Outlet
In order to avoid the floating particles you need to take the water from at least 100mm below the surface, and avoid siphoning the water out of the tank.
To do this you will need:
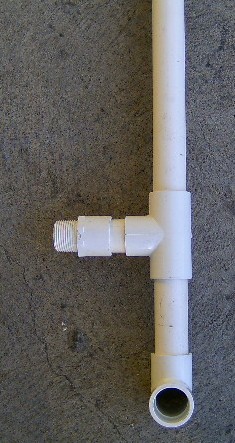
A valve socket, to be screwed into the existing tank outlet.
A 90 degree bend.
2 ‘T’ junctions.
Around 2.5 of plastic pipe.
I would recommend at least 25mm dia pipe although larger would be better if it will fit in the tank outlet.The components are assembled as shown in the photo on the right.
The top pipe should finish above the water level of the tank when full.
In normal use the water is taken from the level of the Bottom ‘T’. When the level drops to the level of the horizontal pipe the air coming down the vertical pipe will act to stop a siphon forming and sucking down the top level of water.
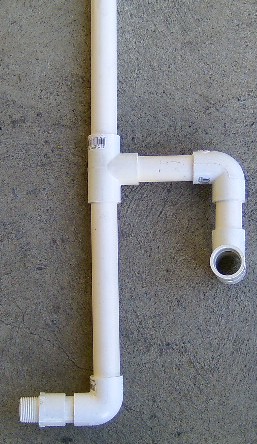
Low Level Outlet
The only additional component if you are going to improve the existing low level out let is an extra 90 degree band.
It is however assembled in a slightly different order as shown in the photo on the right.
The only problem with this arrangement is it means that the Water below the outlet cannot be accessed unless you have an extra bottom outlet. (or use a submersible pump dropped into the tank)
In Understanding Tank Water Quality I explained that the typical tank outlets is located close to the bottom of the tank. This takes the dirtiest water from the bottom of the tank,rather than the cleanest water near the top.
So what can you do?
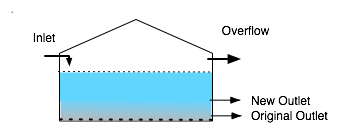
Well the simplest solution is to put a second outlet further up the tank, as shown below.
The top outlet is then used for the supply to the house, while the lower outlet is used to supply a garden tap.
The following schematic shows a typical installation.
Normal operation is with Valve 1 open supplying the pump, and Valve 2 open supplying a garden tap. Valve 3 is left shut.
The garden top would only have the pressure of the tank so it could only be used for low pressure jobs like filling a watering can. At extra cost you could add a separate pump.
When the tank level drops below the top outlet Valve 3 can be opened to supply the pump. Although this water is taken from the bottom of the tank most of the substandard water should have been drained off to the garden.
The outlet should also be on the opposite side of the tank to the Inlet.
Outlet Modification shows a low cost modification to further improve the quality
In Understanding Tank Water Quality I explained that most tank inlets mix the dirtier incoming water with the cleanest water at the top of the tank.
So what can you do?
Its not as simple as just extending the inlet pipe to the bottom…..The jet of water will create turbulence in the anaerobic zone with the most silt. This will mix this very dirty water with the better quality water higher up the tank, creating problems.
One solution to reduce turbulence is:
Put a ‘T junction at the inlet. (This will allow the falling water to draw in air to further oxygenate the fresh water.)
Install a downpipe to just below the bottom of the tank.
Put two 90 degree bends on the bottom so the flow is directed upwards with the outlet being about 150mm from the bottom. (above the anaerobic zone)
You can get a special fitting for the bottom of the pipe but my solution below will probably be cheaper and just as effective.
Put a ‘T’ at the bottom of the downpipe and have two bends so the flow into the tank from each pipe is half that of the single pipe. (See photo )
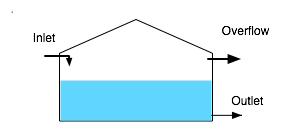
The drawing on the right shows a fairly typical rainwater tank layout.
I have seen lots of tanks set up like this and have also seen this layout in tank supplier’s brochures.
The set up is probably OK for garden watering and toilet flushing but not much else………………………..”So what are the Issues?”
Variable Water Quality From Top to Bottom
Even with ‘leaf screens’ and ‘first flush divertors’ there is going to be some particles in the water coming of your roof, These particles will either be lighter than water and float to the top, or heavier than water and sink to the bottom.
The smaller the particle the longer it will take to sink to the bottom.
The 2nd diagram shows how the water quality varies through the tank a few days after it has rained.
There are some particles floating on the surface.
There is some material close to the bottom which can include rotting organic matter. Sometimes called the Anaerobic zone.
The water between the bottom and the top gradually improves as the height increases with the best water being about 1 cm below the surface.
Problems
Because of the variable water quality problems are:
The outlet is close to the zone of worst water quality.
When it rains the turbulence from the inlet mixes the tank which then takes time to settle.
The overflow takes some of the better quality water.
Over the next few weeks I will provide information about ways of improving the water quality in your tank.