7 Maintenance Tips For Picture-Perfect Home Landscapes

Guest Post by Steph Senter

If you want your yard to be appealing and stand out from the rest, it’s crucial to maintain its landscaping to ensure it stays picture-perfect.

A clean and well-maintained landscaping will be a nice space where your family could spend time together.

It’s best to be proactive when it comes to lawn care.

Make sure to prioritize your yard with routine maintenance to keep the landscaping in good shape at all times.

Here are a few maintenance tips to ensure your yard stays attractive.

Hire A Landscape Professional

If you lack time to keep the landscaping in your yard in good shape, consider hiring a professional to work on the task.

Professionals will efficiently remove weeds, trim the lawn, and do other general maintenance tasks.

If you’re eager to learn more about landscaping maintenance services, Gardener Sydney would be a good starting point.
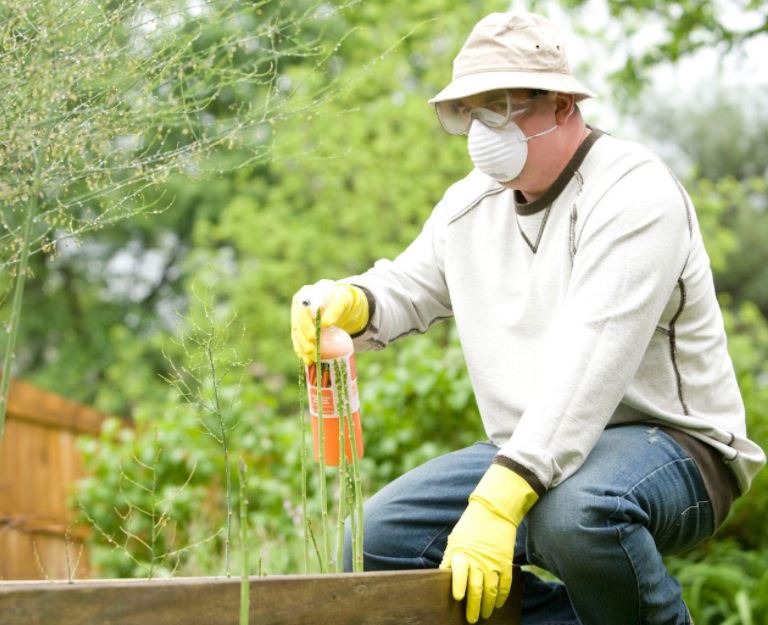
Inspect Your Yard

If you want to maintain your landscaping, it might be best to spend some time checking everything.

Take time to check the plants, trees, and soil in your yard carefully.

This will help you identify any diseases or pests before they get out of hand.

Remember that the best defence against these in your landscape is maintaining healthy soil and early detection.

Prune During Winter And Early Spring

One of the maintenance tasks for your yard is pruning.

Trim away any damaged or disfigured branches due to the snow and ice in late winter.

Don’t forget to remove any unwanted lower branches on evergreen trees and shrubs if you have any on your property.

Remember that most trees and shrubs require pruning in late winter or early spring.

The suitable time to prune a shrub will depend on when it blooms and whether it flowered in the same or previous years.

For shrubs that flower during the summer, prune them at the end of winter or early spring before any new growth begins.

For shrubs that flower during spring, prune them after the flowers fade.

Because these typically bloom during the previous season’s growth, you’ll cut off the buds and flowers if you prune too early.

Clean Up The Yard

Getting rid of any debris or piles of leaves should be a priority if you don’t want mould or decay. . .however, avoid raking into the wet ground.

The best time to clean up a yard is when the temperature reaches the 40–50 range.

If you have a compost pile or planning to start one, you can place all the leaves into the pile.

In case you have perennial beds in your yard, consider cutting down those already spent until the weather warms up.

Many beneficial insects are still hibernating in the leaf litter and eventually wake up once the weather warms up and the daylight lengthens.

If you’re eager to work on the task, you can trim the spent plant stems and set them aside on the edges of your yard.
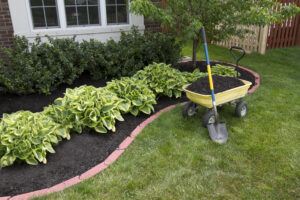
Add Mulch

The addition of fresh mulch in your yard will be beneficial.

Add an inch layer of fresh mulch around trees and in plant beds.

Don’t let the mulch come into direct contact with the tree trunks, and don’t add more than three inches of mulch at a time.

The mulch can make the planting areas look neat and help hold moisture in the soil, keep the roots cool during summer, and serve as insulation during the winter.

As the mulch decomposes, it contributes organic matter to the ground.

Maintain The Lighting

If you truly want to showcase the beauty of your yard, keep the lighting in good condition.

Ensure your property has adequate lighting for security purposes as well as to highlight the best features of the landscaping.

Make sure to replace the light bulbs when needed and check for any problems that might affect their performance.

Keep Your Grass Healthy

One of the maintenance tasks to maintain your lawn’s beauty is to keep the grass at the right height throughout the year through mowing.

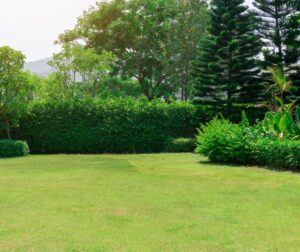
Remember, though, to avoid over-mowing as it can damage the crown of the grass or allow the roots to burn.

Make sure to amend the soil to ensure healthy grass.

If you want to know your soil’s pH level, you can take samples and have them tested.

One way to adjust the soil pH is to add lime to increase the pH or iron to reduce the level.

Most types of grasses typically prefer a soil pH of 6.0 to 7.2.

Final Thoughts

Keeping the landscaping on your property in good shape throughout the year should be your priority as a homeowner.

When you have healthy trees, plants, and grass, they’ll create the ideal outdoor space that will boost the overall appeal of your property.

With the help of these landscape maintenance tips for your yard, you’ll have an appealing outdoor space throughout the year.


Author: Steph Senter is a property manager. She’s been in the industry for 15 years and knows the ins and outs of property management. She writes blog posts and guest posts to share her expertise. In her free time, Steph enjoys gardening and playing with her dogs.

Creative Ways to Make Your Interior Decor Look More Luxurious

Guest post by John Guevara

When I was younger, I always loved decorating my room.

When I started arranging my room, it would always feel like a home to me and bring me lots of joy.

However, when you get older, and your priorities change, it’s easy to push decor away so you can focus on other things.

But in recent years, more people are becoming more interested in interior aesthetics again.

People are seeing functional spaces and artful ones that inspire them to create.

Use Curvy Shapes

Following the path of metal molding, many interior decorators choose to include curvy shapes.

These are usually more stylish, allowing them to transform a room without losing formality.

For example, you can use curvy bodies to create focal points in your home by using them as frames.

It’s incredible what a metal frame can do to enhance a photograph.

Mirrors

For many, mirrors have become more than just something used to fix your hair or to correct bad posture in the morning.

They’re now used as works of art to bring you joy when you look at them or add depth to your room.

They’re also great for those who want to observe their surroundings without letting those around know.

Led mirrors are very popular these days as well.

Especially if you’re trying to add a little bit of that futuristic and luxurious feel to your room.

Not only do they illuminate the room, but they will attract lots of attention from your guests and the people who walk by your place.

Add Metallic Items

Metallic items are great for adding a great glow to your interior.

They’re also instrumental in many decorative ways. For example, you can place them on shelves and tables.

This way, you don’t need to decorate all of your furniture for the metallic glows to shine through.

You have to think about where the lighting is strong enough that your items gleam beautifully without hurting yourself from the light’s reflection.

Fresh Flowers

Strawberries are one of spring’s absolute favorite foods. But if you live in a cold climate or are allergic to them, you still have plenty of other choices for fresh flowers.

Just make sure that whatever flowers you pick for your room have the right scent.

Otherwise, it will just smell like wilted roses to everyone who walks around your place.

Create Vignettes

A vignette is an exciting and unique way to add a little something extra to your home.

You can use this concept for simple and basic things such as putting your favorite picture on display or having it as a conversation piece.

There’s no limit to how you can incorporate vignettes into your interior design. For example, you can use them for decorating furniture and windows and decorating mirrors and walls.


Conclusion

Interior design is more than just how the rooms look aesthetically. It’s also how the rooms make you feel. By incorporating different ideas into your interior decorating, you can truly make your home a comfortable and enjoyable place to be.

Setting Up Your Vegetable Garden

Guest Post by Elena Willson

Setting up a vegetable garden at home can be a great way to save money, provide a new interest in your free time, feed your family with healthy food and get up close and personal with nature.

Growing tomatoes, zucchini and any other favorite vegetables that you like can save you all those frequent trips to the market and make your cooking much easier with all the ingredients at hand.

Moreover, you’ll discover that the flavors and textures of home-grown vegetables far exceed the ones bought at the grocery store . . . so, check out these tips on how to get your vegetable garden off to a great start.

Come up with a plan

Start your veggie garden project by making a list of your favorite vegetables and short-list it to the ones that are quite expensive at the shop but taste the best when fresh.

Start off small with a few vegetable beds that you can expand every year as you become more confident and experienced.

If the area for your vegetable garden is new, you need to decide what style of gardening and planting system you want.

It could be raised beds, square foot gardening, or traditional rows.

The general recommendation is to define the garden beds about 1.2m wide and as long as you want them to be with at least 60cm space in between them. Preferably, it should be in an area of your garden that gets lots of sunlight and is close to a water source.

Another great option is to construct and implement a greenhouse to grow plants in.

They are an excellent method as they offer protection for your plants from pests, frost and chilly weather, making your growing much easier especially if you live in a colder area.

Greenhouses come in many shapes and sizes, and with the benefits they offer, you’ll spend less time worrying about growing problems and more time enjoying your gardening!

Choose your plants

Your next step is to choose what plants to grow.

Think about what vegetables your family likes to eat the most.

The easiest ones to grow are typically tomatoes, beans, squash, tomatoes, lettuce, and various greens.

The general advice is to start growing your plants from seeds sown directly in the ground, but you could also use seedlings.

You could even grow your own seedlings indoors or purchase them at a local nursery. In early spring, just before the last frost, sow those plants that grow best in cooler weather, such as carrots, turnips, beets, parsnips, spinach, peas, radishes, and Swiss chard.

After the last frost, start planting warm-weather vegetables, such as squash, cucumber, beans, and corn.

Rely on proven tips and techniques

There are proven tips and techniques that can help your veggie garden grow more efficiently and productively.

One preferred method involves the practice of succession planting.. . .For instance, you can grow a warm-season crop like beans in the same place where you previously harvested a cool-season crop like spinach.

Interplanting is another way to get the most out of your planting space.

Combine fast-maturing crops, such as lettuce, with slow growers, such as broccoli.

You’ll have harvested lettuce by the time the broccoli requires more space.

Prepare the soil

You’ll hardly get any yield if you don’t provide the best possible soil for your plants.

When it comes to your garden, rich, healthy soil is something that’s easily recognized – it’s easy to dig and drains well.

The combination typically contains a mixture of sand, silt and clay, and their proportion will dictate the texture of your garden soil.

This texture will affect drainage and amounts of nutrients.

Luckily, any type of soil can be improved in time by using organic matter, commonly compost.

This will help connect the particles in the soil, retain moisture and nutrients, and get the plant roots the much-needed oxygen.

Regardless of the way you grow your plants, you should also be ready to tackle pests and diseases.

There are different solutions available, but basically, you need to stop the weeds in their tracks, keep any animals out, fight fungal disease and deter destructive insects.


When you decide to start up your vegetable garden, it’s important to understand the basics and take one step at a time.

Make a good plan, work at your own speed and try to enjoy the process.

Hopefully, the tips listed here will encourage you to roll up your sleeves and get started on your green thumb journey.

As you get better at it, besides your veggies, why not expand and add some herbs, edible flowers, and fruits as well?


Best DIY Affordable Home Improvement Ideas

Guest Post by Elena Willson

DIY home renovations are fun and rewarding.

If you are planning to give your home a new look, ,or even sell it, you need to think about the cost of each project.

Not all projects are wallet-friendly and some may not be enticing to potential buyers.

That’s why you need to take a look at these simple DIY home improvement ideas that can transform your home without breaking the bank.

Getting Ready

However, before we delve into the projects, let’s highlight some preliminary steps you need to take.

A.  Survey Your Home

Grab a pen and notepad and take a walk around your home.

Start with the interior and then move outside.

Take note of any fixtures that look dated, worn out, or very dirty.

Pay special attention to your kitchen, living room, bathroom, and bedroom.

Outside the home, take note of the state of your front door, sidings, and other parts of the front yard.

Remember that a poor first impression can turn off potential buyers, so you need to pay special attention to your home’s frontage.

B.  Draw Up a Budget

After moving around your home, you will have a long list of potential DIY projects. . . but don’t start yet.

Re-order your project list so that urgent and important projects come first.

Then find out what you will need to complete each of those projects and the expenses you will incur.

If one of your projects is painting your living room walls, for instance, you can write an estimate for the materials and tools you will need (paint, scrapers, brushes, rollers) and the estimated cost.

Repeat this for all the projects on your list.

C. Watch Some DIY Videos

Whether you are an experienced DIY enthusiast, with many completed projects in your portfolio, or you are a newbie,  watching home renovation videos will be of great benefit to you.

You’ll find that these days, when it comes to home improvement, just about every topic is covered by various professionals and amateurs alike.

These videos are in essence visual tutorials, and you’ll need to find the ones that are relevant to your project.

These instructional videos will help you compare various working methods as well as inform you about precautions you need to take on some hazardous tasks.

You can also discover new methods and tools to save you precious time and money.

Projects

Now, let’s see some simple and affordable DIY projects.

1. Upgrade Your Kitchen Cabinets

Kitchen cabinets form a large part of most remodeling projects. But you can transform your kitchen cabinets without spending a fortune.

In most cases, all you need to do is to repaint or change the cabinetry doors. That means you may only need to order new doors.

However, you will only spend a few hundred dollars if you do any of these three things:

      • Remove the doors to create open shelves
      • Install new molding or trim
      • Paint the old cabinet doors or add a new stain.

2. Update Your Flooring

Updating floors can be easy and affordable. Whether you have plywood, hardwood, linoleum, or tile, there are different flooring ideas that will suit your budget. Consider using one or more of these materials:

      • Vinyl floor stickers: These work well in areas of your home with minimal traffic like a laundry room that you use a few times a week.
      • Luxury vinyl plank or tile: This type of flooring floats so you can install it on top of other existing tiles without having to pull them off. They work well in kitchens and bathrooms.
      • Sheet linoleum: These modern vinyl sheets are both beautiful and affordable. You can install them in your bathroom. Simply measure the space, stretch it out and trim the edges before sticking it to the floor.

3. Renew Your Walls

Renovating your walls can be done on a shoestring budget, especially if they are not badly damaged. Try any of these ideas to spruce up your walls:

      • Fill and Repaint: Apply spackle to cracks and small holes. Then proceed to repaint your wall. A standard-sized room needs just one or two gallons of paint.
      • Get Creative With Stencils: Buy a stencil, stick it to the wall, then use fine paintbrushes to paint around the open areas.
      • Apply Wallpaper: Get wallpaper, glue, and a long ruler. Use your creativity to apply the wallpaper at wall corners, on a single wall, or on all the walls, depending on your preference.
      • Hang Fabric: Get curtain panels and fabric of your choice. Place the panel near the ceiling and hang the fabric on the wall.

4. Paint Your Front Door

Renovating the front door can work wonders in improving your home’s curb appeal.

To give your door a spotlight, select a bold accent color that blends or contrasts well with other exterior parts of the building.

In addition, you can modify the plaque of your house number and replace your mailbox with a more beautiful one.

It’s a cheap way to create a new look and feel for you or your visitors.

5. Clean up Your Vinyl Siding

If your home has vinyl siding, you can make it look new by cleaning it.

You don’t need to call in an expert or rent a power washer either.

Get a scrub brush with a long handle, a high-quality cleaning solution, and a garden hose.

With some elbow grease, you can clean the siding, and give your home a fresh look.


Renovating your home does not have to be tough and expensive. With good planning and budgeting, by applying these ideas, you can create a new look in your home without going into debt.

Choosing the Perfect Kitchen Fittings to Suit Your Style

Guest Post by Richard.Kayode

The kitchen is undoubtedly one of the most important places in the home, and that’s the reason we need to design the accessories in it for every aspect of our daily lives.

The ideal kitchen design has to do with the process of combining surfaces, appliances, design detail, and layout to create an enjoyable and easy-to-use space.

Since kitchen fittings were introduced, it’s revolutionized the market, thereby making homeowners realize that comfort and functionality can be infused into the same design.

The thing is that there is a vast array of products that fit into the category, so it can be quite daunting to choose the perfect fittings.

We have revealed some ideas that can assist you in making the perfect decision after you are done planning the space.


When selecting kitchen fittings, it would be best if you started with the sink as that’s a necessary step in allowing you to design your kitchen around it, thereby creating a functional space to use for several kitchen tasks and using the right colors, elements, and finishes for your kitchen.

Kitchen Sink

When you want to select your kitchen sink, you need to consider quality because you’d not like to replace it every couple of years.

It is the most purposeful thing you’ll buy when it comes to kitchen equipment, so your best bet is to choose well.

We’ve got some things you need to consider when selecting your sink, and it starts with your budget.

Always remember your budget and think about how you’d like to use your kitchen space.

If your kitchen space is limited, then you should choose a single basin sink so it’ll enhance style and functionality without the room being overwhelmed. . .but if you have enough kitchen space, it would be best if you opt for a double sink as it provides more flexibility, including a neater look.

One important aspect of your kitchen design is ergonomics, so select the ideal mounting options – a top-mount or under-mount sink, make sure the height is right, and make sure that there’s enough space to move comfortably around the kitchen.

If you want a modern and sleek kitchen appearance, then you should choose an under-mount kitchen sink.

For more storage options, then you can choose the top-mount sink.

Besides storage space and good design, when you choose well functional and quality products for your kitchen’s operational side, they can make you have an exciting and joyful time there.

You can also decide to add sink accessories that’ll make it easier and more functional to use.

You can get accessories that offer both safety and comfort, from soap dispensers, baskets, and drainer trays to colanders, chopping boards, and more.

Lighting

Selecting the amount and type of your kitchen’s lighting fixtures is a popular and important task recently, as homeowners are now aware of the necessity of proper lighting in the kitchen.

Ambient lighting is from the ceiling or main wall lights with central control.

The purpose of accent lighting is more specialized and will add highlights and detail to the kitchen, while task lighting is specific to a particular activity or area so that you can get ideal lighting while washing the dishes, eating, or cooking.

Hardware

The aesthetics of your kitchen is important, and every element needs to align with your style – from cabinet drawers and doors to kitchen taps.

Hardware is highly impactful on the feel and looks of your kitchen, and you can select from several different finishes, styles, and shapes till you see the one that suits the space of your kitchen.

Tapware

Maybe you have never thought about this, but a cool kitchen tap is something that can make your kitchen space design better.

You can select from a range of finishes and designs, and that can sometimes be quite overwhelming.

If your kitchen is a modern one, then you can select minimalist tapware that has clean and sharp lines and excellent shine finishes.

If your kitchen is country-style or traditional, you can choose a tap with decorative details and curves to complement the look.

Choosing the ideal finish will require you to stay true to your kitchen space’s overall décor, so search according to its theme.

Polished chrome and stainless steel are excellent choices for modern kitchens, while country-style and traditional options can go for copper and brass.

So the entire space can come together, make your tapware finishes align with that of your kitchen appliances and door hardware to create a cohesive look and elevate your interior design.

No matter the type of kitchen fitting you decide to go for, the most important thing is that it fits your style and also the overall theme of your home.

3 Tips For A Successful Concrete Driveway Installation On Your Property

Guest Post by Anello Darsen

If you’re planning to upgrade your driveway or you looking for an option to improve your house’s curb appeal, you might want to invest in installing a concrete driveway to your home.

Aside from that, it’s low maintenance because it’s durable enough to stand any vehicle in your garage.

You also have an option to customize it by employing different designs as long as you consider the size, shape, and surface material.

Moreover, a concrete driveway is considered a big investment.

You can always attempt to do the job of installing it on your own, but it’s not usually a good idea.

Since the project is large-scale and often ridden with errors, you should leave the process to the professionals.

In line with that, read below for other tips to have a successful concrete driveway installed on your property.

Estimate Budget

Hiring the right professionals that can install your new concrete driveway first needs to have a plan from you which specifies your needs and preferences.

You have to know two things which are the total square meterage of your concrete driveway and what you expect it to appear after the job.

To know more about concrete driveways’ estimated costs, Concrete Driveways Adelaide and other companies can provide you with more information.

The cost of a concrete driveway is determined via careful calculation rather than the price per square metre.

Asking the latter could get you overcharged most of the time.

Once you receive the estimated price for your new concrete driveway, make sure to review the contract and make sure you get a reasonable price.

Get to three bids before concluding your final decision.

You must note that the price should not be solely dependent on a single deciding factor.

You must consider the quality of the work, experience, and reputation before making a final decision.

Obtain Permit

A residential driveway provides car access for a single-detached house.

Before you plan to build a concrete driveway to your house, you should check your local council to see if you need to get a permit.

This depends on where you live. In Australia, there are two types of applications for residential driveways, these are self-assessment and full assessment.

The difference between the two are:

  • Self-assessment: This enables you to assess your compliance against your city council’s requirements. This should be accurate and causes no negative impacts on the environment. For more information, check your council’s ordinances.
  • Full assessment: This provides you added assistance in designing a driveway that complies with your Council’s standards. To apply, you must submit a site plan with the area of the proposed driveway and complete an online application on Council property. Your property will be inspected within 20 working days by a Council officer to complete the assessment. Be prepared for other approvals if there’s a detected impediment in the path of your proposed driveway.

As for driveways not associated with a single-detached house, you should maintain your concrete driveways are safe and comply with your local city council requirements.

This includes the curb and channel.

Plan Size, Shape, and Route

You might encounter a dilemma of how you’ll manage to install a concrete driveway due to the constrained topography of your property.

It could be difficult to pinpoint the desirable spot for the slope of your driveway.

It should neither be too flat nor too steep.

If it’s too flat, drainage will become a problem.

On the other hand, if it’s too steep, the surface will become slippery and dangerous.

Another general rule is that your concrete driveway should be around three meters wide.

If you have a huge space, you can provide a larger area at the top for additional parking when needed.

As for the shape, your decision is partly based on its aesthetic value and its functionality, such paths to consider includes:

  • Curved: It adds more impression and depth rather than a straight driveway.
  • Straight: You can opt for this if you have limited space or a very short distance from the street to your garage.
  • Circular: You should consider this if you live on a busy street because it provides the option of not having to back out.

Takeaways

Deciding to build a concrete driveway for your home is a big investment.

Whether you’re planning to improve your house’s curb appeal or upgrading your old and tattered driveway, you should always plan.

Concrete driveways are durable enough so it needs little to no maintenance. You can also customize it depending on your preferences.

You can opt for building your concrete driveway or hiring a contractor for the job.

Although, it’s usually recommended to hire a contractor because it’ll save you the hassle and avoid errors that will soon cost you money.


Anello Darsen Anello Darsen is a real estate supervisor. He’s been in the industry for 10 years. He shares his skills by training aspiring real estate agents. He also writes blog posts and guest posts. Anello enjoys hiking and camping during his free time.

6 Must-Include Items In Your Preventative Home Maintenance Checklist

Guest Post by Olivia Madison

To ensure everything in your home is in good condition and functional, you’ll need to implement preventive home maintenance.

While you can’t go all out with buying everything a hardware and home depot store has to offer, there are basic tools or equipment that are already helpful enough to get you through effective home maintenance.

Home maintenance is about practising and doing simple chores and tasks daily or periodically to avoid some of the most common household problems.

Thus, repair or cleaning tools are worth having to get the job done right.

This article identifies some of the most common tools and equipment you’ll need to keep your home well maintained.

Hammer

One of the essential tools in a preventative home maintenance checklist is a hammer.

Each type of hammer also has a different purpose.

Regardless of its type, you can do so much with it, such as for general carpentry.

For instance, you can use a hammer if you need to fix damage to your furniture, fix a protruding nail in your house, or ensure that the decorative items on your wall are hung properly.

In addition, hammers are useful in maintaining your roof.

If the damage is not that major to call for a roofing re-do, you can use a hammer to remove or fix damaged shingles.

All that’s left to do is to get the required materials from a store that offers Sydney roofing supplies to fix your roof.

Ladder

A ladder is a beneficial tool when cleaning and checking damage in your house.

With a ladder, you can reach higher areas in your home when doing the inspection and home maintenance.

For instance, a ladder is helpful when you’re cleaning your windows, repainting your walls, getting rid of cobwebs, and accessing your roof’s gutter to remove leaves and dirt.

Vacuum Cleaner

A vacuum cleaner is another item that’s very important to have in your preventative home maintenance checklist.

Every day, you may want to vacuum the high traffic areas of your home, like your kitchen and dining area, to get rid of crumbs and food droppings after every meal.

Doing so will prevent dirt build-up on your floor or carpet, allowing you to avoid ants in your house.

For the rest of the house, a vacuum cleaner is also essential, as you need to vacuum your bedrooms and living rooms at least once a week to keep them clean and ensure that your rugs and carpets are in good condition.

Hence, go for a vacuum cleaner with multiple attachments.

You can easily change the attachment according to the dusting chore you need to do for the day.

When you vacuum your home, you’re keeping it clean and free from dust or dirt.

This way, you can also keep your family healthy, as you can avoid allergies due to dust.

A Good Sponge

Sponges are very versatile and essential when maintaining your home.

You can use it to clean the interior of your home, exterior, and even small and delicate areas.

For instance, in the bathrooms, if your tiles are too delicate for a brush, using a sponge is a good alternative. Giving it that good clean can avoid the build-up of moulds and mildew, which can be damaging to your home and health.

With a tool as small and straightforward as a sponge, you can do so much in your effort for preventive home maintenance.

Wrench

A wrench is also an essential tool in your home maintenance checklist.

A wrench can be used to tighten bolts and nuts.

This item is also useful to ensure your plumbing system is functional and in good condition, as you can use a wrench to dismantle taps and unscrew or tighten your pipes and pipe fittings.

As there are different types of wrenches, get the one that fits your home maintenance needs.

Pliers

As a multipurpose tool, pliers are essential to have in your home maintenance checklist, especially when doing electrical or electronic work.

In general, you can use pliers to cut, strip, or bend wires, hold objects, as well as bend and twist thin metals.

By having pliers at home, you can easily do your basic maintenance tasks.

Conclusion

Having the right tools is crucial to keeping your home well maintained.

The list above are only the basic tools, but they’re already great to have in your preventive home maintenance checklist.

By having the right equipment, you can easily do the tasks that are required to avoid any damage to your house.

This way, you can finally be on top of keeping your home well-maintained.


Author Bio: Olivia Madison is the founder of a home repair service company. She’s been working in the industry for five years now. When she’s not helping her clients with home repairs, she enjoys writing on her home maintenance blog. She’s also passionate about helping her clients with proactive measures, going beyond fixing their homes.

A Step-By-Step Guide To Building A Pool In Your Backyard 

Guest Post by John Davidson

Building a pool in your backyard could be challenging if you don’t have the necessary knowledge, skills, tools, and equipment to construct one.

These are essential factors to ensure that its structural integrity can weather the tests of time, erosion, and other issues.

For that purpose, you may need to hire a reliable and experienced contractor.

In addition, knowing the basics of pool construction is necessary so you could observe whether or not the standards and quality of your pool construction are met.

For that purpose, here’s an article to guide you. So, read on!

1. Talk To A Swimming Pool Inspector

Before digging a hole for your pool, you may need to secure some papers to ensure that your project follows legal standards.

You need to comply with building construction requirements from your local government and the homeowner’s association you belong to.

If you’re in Victoria and its nearby areas, you may need the help of a certified swimming pool inspector like Pool Compliance Victoria and others.

They will explain to you the Australian general swimming pool construction standards including but not limited to:

      • a minimum of 1.2-metre-high fence around the pool
      • no trees and other structures near the pool
      • a self-closing gate shall be present
      • child-proof safety railings and barriers should be present

2. Choose A Space 

Although your contractor will do the work, you may need to monitor the construction regularly.

It is also your decision which area you want your pool to be constructed.

Choosing one should depend on the available space and the amount of sunlight that the area receives.

If the space is limited, you may opt to have plunge-type pools because they maximize the backyard deeper than the average pool type.

On the other hand, regular and large pools are possible if you have a vast area.

Pools in well-lit areas typically have the right temperature and are ideal for swimmers who want to dry up.

In addition, you could see the quality of water in these spaces, so you could clean immediately if necessary.

3. Design And Dig 

After identifying the area, you could start suggesting the pool design.

If the pool contractor has templates to choose from, you may select among them.

Depending on your budget, you may choose low-cost pools or more extensive types.

Also, consider the shape and slope of your space for aesthetic purposes.

You may also pick the dimensions.

Will you follow the standard sizes, such as 3 m by 6.1 m and 4.6 m by 9.1 m? . . . or will you experiment with new designs?

In doing so, keep in mind that the more complex your pool design is, the higher its cost will be.

After picking the design and finalizing the layout, the workers may start digging.

4. Constructing The Foundation 

If you’re planning for a concrete pool, ensure that the contractor has evened out the ground.

You may decide whether to have a flat or sloping bottom.

Either way, make sure that they provide steel support to the walls and floors.

Then, monitor the pouring of the concrete.

5. Install The Plumbing Fixtures 

If you want a small pool, you could install the necessary plumbing fixtures yourself.

In many cases, you’ll work on pool filtration and water circulation, so you need to install pumps, drains, skimmers, and valves.

However, larger pools may need a qualified plumber as the pipe connections may be too complex to handle.

6. Pour Concrete On The Walls And Floors 

You could rent a cement mixer to make the process easier for this step. In addition, you need to ensure that every space is filled in and every part of the concrete is consistently mixed.

Once finished, wait for a couple of days for the concrete to cure.

7. Fill The Pool With Water 

After drying up, you could rent a water truck or connect your pool to a water source on your property.

When doing this, you should check for leaks so you can patch them early and avoid further trouble.

8. Treat Your Pool 

You may also treat your water before you use your pool.

This could be a way to get rid of bacteria.

You can buy a water testing kit to know the pH level of the water in the pool.

Then, aim for a 7.4-7.6 pH range.

You may contact a water treatment company for better results, especially for bigger pools.

Wrapping Up 

Having a pool in your backyard adds beauty and value to your property.

In addition, this may be an excellent way to cool off during hot seasons.

If you plan to build one, you may start consulting a pool inspector and a pool contractor.

That way, you’re assured that the construction will be safe for decent structural integrity. T

hen, you may consider choosing among the various designs and types to make the most of your pool and backyard space.


John Davidson is a construction consultant. He shares his knowledge about building construction through webinars and blog postings. John enjoys his free time playing musical instruments and basketball.


6 Home Modification Tips for Ageing in Place

Guest Post by Sarah Bellamy

Some retirees may decide that ageing in place is the right option for them.

This involves staying in the family home, rather than downsizing or relocating to another area.

There are several reasons why you may wish to stay living in the home you know.

This may include the fact that it’s a familiar space, your social network in the area, or simply that you enjoy having the extra space.

For those looking to free up some cash to live a more comfortable life in retirement, there are financial options available.

One such option is equity release.

Equity release allows you to borrow money against the value of your home, without having to sell up and move.

This is one way to access some extra cash while still living in your home.

Of course, there are a number of things to consider before deciding whether equity release is right for you.

If you decide to stay in the family home, you’ll most likely want to make a few modifications to ensure the space is safe as you age.

Below are 5 home modification tips that you may like to implement in your home.

Remove the bathtub

Walk in shower

Those that have a bathtub and shower combined might like to consider removing the bathtub and replacing the system with a simple walk-in shower.

As we age, bathtubs can become more difficult to step in and out of, and with the combination of water it can become slippery and dangerous.

Not only is a walk-in shower safer, but it can be more comfortable, especially as you get older.

Install handrails

Adding handrails in the bathroom and around the home is a great way to provide extra stability and something to grab onto if you lose your balance.

These are especially important if you have limited mobility.

Handrails can be installed in a number of places, including bedrooms, bathrooms, and living rooms, so be sure to discuss your needs with a professional.

Increase lighting

One thing that often becomes more difficult as we age is seeing clearly.

This can be especially challenging at night or in darker rooms.

You can combat this by increasing the lighting in your home, which can be done with both indoor and outdoor lighting.

For example, you may like to consider an outdoor motion sensor light so there is no risk of coming home to a dark space after sunset.

You might also like to place lamps in key areas, such as bedrooms and living rooms.

Install a stairlift

If you’re finding it difficult to navigate the stairs, consider installing a stairlift.

A stairlift allows you to simply sit and be transported up the wall.

This will help you get up and down the stairs with ease, without having to worry about losing your balance or making the steps yourself. You’ll likely need to call in anspecialist to help you with the installation.

Replace shaggy carpet

Shaggy carpet can be a tripping hazard as we age.

Replacing the shaggy carpet with a hard surface such as wood or tiles can help to prevent trips and falls.

Not only will this be safer, but it can also be easier to clean and maintain.

If you want to keep carpet in your home, consider installing one that has shorter fibres as this should make it less of a fall hazard.

Widen doors

If you require a wheelchair or mobility scooter to get around, you may like to consider widening the doorways in your house.

This will make it easier for you to access rooms throughout the home while using your mobility device.

There are a few different ways that doors and doorways can be widened, and consulting with a contractor can help you to learn what modifications can be made to your home.

These are just a few home modification tips to help you age in place.

Making these modifications to your home can ensure that you’re able to live in the space safely and comfortably as you age.

Be sure to discuss your needs with a professional so they can provide tailored advice that will work best for you and your family.

5 Plumbing Mistakes To Avoid In A New Home

Guest Post by Gordon Anderson

Moving into a new home is a dream come true.

However, once you step into your new home, you’ll have a lot of things to work on.

Aside from going through stacks of boxes and working on the interior design and other essentials in your house, the plumbing system will also require your attention.

Encountering a plumbing-related issue will surely be an inconvenience.

In addition, dealing with it incorrectly might cause further damage, which could result in an unpleasant experience in your new home.

Before you decide to tinker with the plumbing system in your new house, here are some of the plumbing mistakes to avoid to prevent water damages, such as burst water pipes.  

Delaying Minor Plumbing Repairs 

Since there’s a lot to do upon moving in, most homeowners are likely to overlook minor plumbing problems.

In some cases, some will even delay repairing a minor plumbing issue, such as a small leak or a sink that frequently clogs up.

However, if you leave these plumbing issues unattended, they’re likely to get worse over time.

Ignoring a leak, even a small one, wastes a lot of water in the long run.

If you fail to perform the appropriate repairs, you might end up with a skyrocketing utility bill.

In addition, a sink that seems to clog most of the time isn’t always a reason for concern, but it might be the onset of a partial or total blockage in the pipes.

Always remember that any minor issues with your plumbing system require immediate attention.

Timely action can save you the hassle and costly repairs or replacements.

If you’re facing a problem that seems beyond your skills, consider hiring a professional.

Looking for a reliable plumbing services provider like Plumber Sydney and other similar companies would be a good starting point to ensure the plumbing in your new home is in good shape and functional.

Using The Inappropriate Tools Or Parts

One of the challenges when moving into a new home is that you’re still unfamiliar with the plumbing system even if you have a decent level of skill and tools.

Thus, if you’re planning to replace a plumbing component, tighten a pipe, or work on any task involving a tool, you should take the necessary precautions on the tools or parts you’ll use.

Various appliances have specific sizes and would require particular tools or unique parts to work correctly.

If you’re going to replace a part such as a faucet, toilet seat, or showerhead in your new home, you should get the correct measurements first.

Also, don’t forget to determine the brand of the component you want to replace or fix, as various brands often need specific components or repair techniques.

Leaving The Water On During Repairs Or Replacements 

Due to the excitement of getting things ready in your new home, you might forget to turn off the water when attempting to replace old fixtures such as a faucet or showerhead or repair a broken water heater.

However, you should remember to turn off your water when doing repairs to avoid structural issues in your plumbing system.

One way to avoid this mistake is to turn off the water supply before starting any plumbing project.

You may turn off the water valve or your water meter.

If you fail to do so, you’re putting your new home at risk for possible water damage.

Tightening The Plumbing Connections 

Some new homeowners take extra precautions to keep everything secure, even the plumbing system.

Thus, some are likely to overtighten the plumbing connections, which isn’t the right move to make.

When you over tighten a pipe, coupling, or elbow, you’re likely to crack the fitting.

In worst-case scenarios, you might not be aware of the damage until the fitting breaks and causes significant flooding in your new home.  

If you want to make sure the pipe connections in your home are in good shape, you can secure the connections.

However, once you sense it feels tight without any movement anymore, avoid tightening it further.

Excessive Use Of Drain Cleaner 

Any homeowner wants their new home to be clean.

Usually, homeowners use a commercial drain cleaner to ensure all the drains in their new home are free of blockages.

However, using too much drain cleaner can do more harm than good.

Most commercial drain cleaners include strong chemicals to break up clogs.

If you overuse the product, it’ll start eating away into the walls of the plumbing system, eroding both metal and PVC pipes.

Thus, make sure you know how to use the cleaning products properly to avoid damaging your drains or pipes.

The ideal approach is to watch what goes down the drain and avoid throwing food waste into your sink.

If you want to ensure the drains are free of clogs, try using a natural method such as a solution of baking soda and vinegar to loosen any blockages and follow up with a plunger to open up the drain. 

Final Thoughts 

Moving into your new home can be an exciting experience.

To settle down completely, you also need to ensure your plumbing system works well.

If you want to make the transition in your new home a smooth one, take the appropriate precautions to avoid these plumbing mistakes to avoid plumbing problems in your new home.

In addition, be prepared with the proper solution in case an issue arises. 


Author Bio: 
Gordon Anderson is a licensed plumber. He has been in the industry for more than 11 years with experience in handling plumbing in residential and commercial buildings. During his free time, Gordon enjoys hiking, fishing, and reading a good book.

Exit mobile version