Starting House Design 2 – Bubble Diagram 2

Once you have a basic bubble diagram you can then start to develop it by:

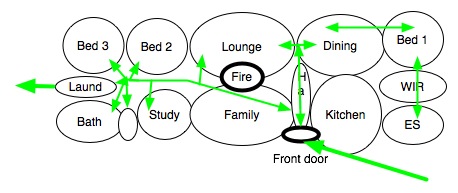
Drawing Circulation Routes

  • Think about your block how will people approach the front door.
  • What rooms do you want to overlook approaching visitors.
  • Where do visitors enter the house?
  • How do you expect people to move from room to room?
  • How will people move through the house?

Organising Spaces

  • What kind of entrance do you want and how formal you want it.
  • Do you want the kitchen and dining area linked or separate.
  • Do you want a separate WIR and En-suite or walk through one to get to the other.
  • Should the family room and the rumpus room be separated from each other or be next to one another.
  • How much space do you need? . . A lot of people have trouble relating space to a floor plan…..See These Hints to get some help

Use Scenarios

When discussing the plans talk through ‘Use Scenarios’ for example:

  • Cooking a meal while talking to the children.
  • Children doing homework
  • Watching different TV programs in different rooms
  • Family meals
  • Having visitors round for a meal
  • Bringing the shopping home
  • Doing the laundry

This is what  I came up with


Post 3, in this series, will show how this diagram was developed into a final layout


For more Posts about Design see Floor Plans

Starting House Design 3

In two other posts (Bubble Diagrams 1 and  Bubble Diagram 2) I have described how you can start a design using bubble diagrams. When you are happy with the bubble diagrams then you can start working on how the floor plan will look.

At this stage use graph paper to make it easy to  draw things up quickly and change things. Don’t get too involved with exact dimensions the nearest 200 or 250mm (or foot if you use imperial measurements) should be fine.

The plan above was based on the bubble diagrams.

The features of this house are:

  • A rectangular plan to keep things simple and economical.
  • A north facing Passive Solar House with bedrooms lounge and dining room on the north side, all having 2m high windows or patio doors.
  • A full length veranda on the North side providing Shading from the Northern Sun
  • A single small West facing window in the laundry.
  • A single narrow East facing window in the bedroom.
  • A wood burning stove in the centre of the house with solid brick chimney for thermal mass.
  • Bathroom, en-suite, toilet, study all forming a Buffer Zone on the south.
  • A car port and fernery  was proposed on the south to provide a protective Microclimate.
  • Our bedroom at the opposite end of the house to the children.
  • Being able to see approaching visitors from the kitchen window.

Once you have got a layout that you can agree on, its time to think about getting it drawn up accurately.

Postscript

Although we loved this house it wasn’t perfect . . . . here are some things we got wrong.

  1. The laundry was too small.
  2. The spa bath was hardly used in the ten years we lived there. . we would have been better off making the bathroom smaller and the laundry bigger.
  3. The connecting door between the family room and the lounge. . . we found the kids would walk in front of us through the lounge in getting from their room to the kitchen!


For similar posts see Drawings and Floor Plans


Exit mobile version