

Guest Post by Stepheny Jonson
Converting a shipping container into a tiny house can be a tedious yet exciting job. Check out this article for a detailed guide on how to do it.
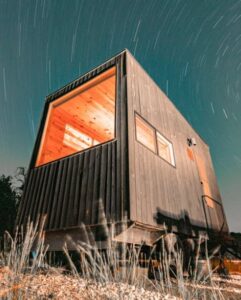

One such idea is to use a shipping container for a tiny house.
This one is very different from traditional tiny houses and needs a little more work but if you put in the right effort, the end result is going to be satisfying.
To help out, we are going to guide you on how to convert a clunky metal shipping container to a warm and welcoming house.
Why Choose a Shipping Container?
There are different ways you can adopt to create a tiny house.
If you have prior experience, then you know that some projects can be difficult.
A shipping container may look like an easy option since it already has a base and walls ready but there are still a few things you need to work with.
One of the best reasons for using a shipping container is its durability.
Shipping containers are durable, weather and water-resistant, and can also withstand earthquakes and small fires.
These houses are also scalable.
If you want to expand your tiny house in the future, you can stack one on top of another container to make it a two-storied house.
Sure, it is easier said than done but you can certainly create a modular home and add containers later when you want.
Last, by using a shipping container, you can save a lot of time since you will have the base structure of the house almost ready.
Now, if you are living in Australia and are worried about getting a suitable one, you can simply contact Tiger Containers and get a suitable container from your local depot.
Steps for Creating a Tiny House from a Shipping Container
Here are the steps you need to follow when converting a shipping container into a tiny house.
1. Create a Comprehensive Plan
While building any kind of house, you need to make a plan. And since you are creating a tiny house, maintaining a strict budget is going to be your top priority.
The second point is to fix on the design and structure of your house.
Decide how many rooms you want and how they will be connected, plan on the number of doors and windows you need, and how much space you are going to use.
Draw a floor plan and make sure to get all the sizes and dimensions correct.
It is best to get an engineer’s opinion before finalizing your plan.
The engineer can also help with details like electricity, power, waste management, insulation, and flooring.
2. Get Approval from the Local Authority
Whether it is a tiny house or a traditional one, you can not make any without legal consent.
After you complete the design of your tiny house, you need to submit it, along with a letter of approval, to your local authority.
The local council will most likely state your shipping container tiny house as a relocatable dwelling or portable construction.
You will need to pay some money for the permit depending on the location and you will be good to begin.
3. Choose the Right Container
Shipping containers take a little time to be transported to your area, so it’s best to decide the date you want the container to arrive.
As for the container itself, you can either choose a brand new, a used one, or a one-trip container.
If you are going to purchase a used container, then you need to arrange an inspection and look for damages, odd smells, rust, and other signs of red flags prior to the purchase.
And on the day of arrival, make sure you have a clear path for the container to be safely delivered to the designated spot.
4. Get Your Land Ready for the House
You can not place the container directly on the soil because once you store furniture and other heavy objects it will not be balanced. The heavier part of the container will sink deeper than the lighter area.
To prevent the imbalance, you will have to level the surface where the container will be placed.
First, you need to mark the area according to the size of the container and keep extra space around the corners and the sides to work easily.
Next, you will have to create a foundation.
To do so, dig the marked area and create a boundary with timber boards.
This area of soil has to be leveled to create a durable foundation.
Concrete slab foundations are great for tiny houses made of shipping containers but there are other types of foundations as well, like steel plates, concrete strips, concrete piers, or pile foundations.
Make sure to check with the local building authority for regulations and permits before choosing the type of foundation.
5. Make Sure the Container is Received Safely
Most of the loading and unloading tasks are taken care of by the container supplier.
Be sure to go through their terms and conditions of whether they will take care of the delivery and positioning of the container.
If you have to position it yourself then book a crane and a forklift in advance to position your container easily.
If you purchased a used container and it has not been washed, now will be a good time to make it squeaky clean.
If your plan contains multiple containers, then it’s best to attach and position them now.
You can use bolts, clamps, and welding to attach the container together.
6. Start Preparing Your Container
Before starting any major renovations, you will have to scrape out the weak elements.
If it is a used container, then there is bound to be some rust and dents you need to take care of.
7. Select Your Windows and Doors
You will have to choose the right type and size of windows and doors for your tiny house.
Small windows are easy to install but large windows welcome more natural light and air.
Full-length is more modern looking compared to traditional doors and is expensive.
So before proceeding further, make sure you select the perfect doors and windows.
8. Cut out the Openings
Now that you have the windows and doors ready, you will need to cut out openings to install them.
Start by marking the portions you will have to remove.
Your initial design should have all the details for this.
Be patient and accurate when cutting and ouble-check the measurements before running your cutting torch.
While cutting, you might accidentally remove some anti-corrosion paint so repaint those areas and also make sure that there are no gaps or cracks in the container.
9. Properly Weld the Windows and Doors
After welding the doors and windows, check to see if they fit perfectly and the entire container is waterproof.
This helps your tiny house stay safe from harsh weather conditions.
10. Change the Flooring
The floors of shipping containers are infused with harsh chemicals so it is better to add a subfloor or completely change the flooring to get rid of any chemicals.
Adding a subfloor will take up space so, get a high cube container for some extra space.
11. Add Insulation and Electricity
Metal containers will be impacted by external weather conditions more than other factors.
You need to maintain a standard temperature inside the house and therefore insulation is very important.
First, you will have to insulate the exterior walls of the container. You can use spray foam or attach insulating panels.
You can insulate the inside using panels.
Then you will have to wire the entire place. . . Engage a professional to take care of the wiring.
12. Add Partitions and Walls
Now that you have the basic structure complete, you can move on to the next stage of your plan and add walls.
One of the best choices would be to use timber claddings.
Depending on your floor plan, you can now add the partitions to your room, bathroom, and kitchen.
13. Paint Your Tiny House
You will need to apply at least three coats of paints on the walls to make the house weather and moisture-proof.
The paints should have rust and corrosion prevention features.
Choose your desired color and start painting.
14. Add All Your Furniture and Installations
Now for the final touches, add the little bathroom and kitchen fixtures.
Decorate the place with your personal touch but make sure to keep the number of furniture to a minimum.
You do not want to clutter the place and having less furniture will make the place look more elegant.
Use multi-function furniture like a sofa-cum bed and folding tables to make the most out of your space.
Final Thoughts
Converting a shipping container into a tiny house can be an exhilarating and daunting task.
But things will be much easier if you can get some professional help and plan it all beforehand.
We hope this article was helpful in giving you a clear idea of exactly what you need to do.