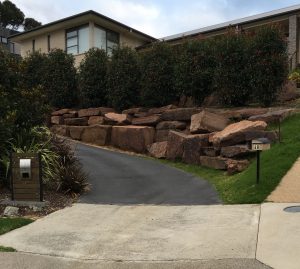
If you happen to live in Western Australia, you get to experience more sunshine hours than almost anywhere in the world,
With the outdoor lifestyle firmly embedded into the culture, you really should spend some time thinking about your outside area.
With a little creativity and a suitable budget, you could transform the most important area of the home, and make it a special area for you, your family, and your friends to enjoy.
A Comprehensive Solution
There are online companies that are dedicated to transforming outdoor areas, and for those who live in Western Australia, Perth Better Homes provide patios in Perth, and their in-house design team will help you to explore the possibilities, and whatever the outcome, they have the resources and the know how to make it happen.
They are experts at designing and creating unique outdoor areas that blend in perfectly with the home, and they can work to the client’s budget, which is ideal.
This type of company would be able to arrange landscaping, awnings, lighting and garden furniture, and if you wanted to start from scratch, they would have the resources to complete the project.
Maximise your Summer Enjoyment
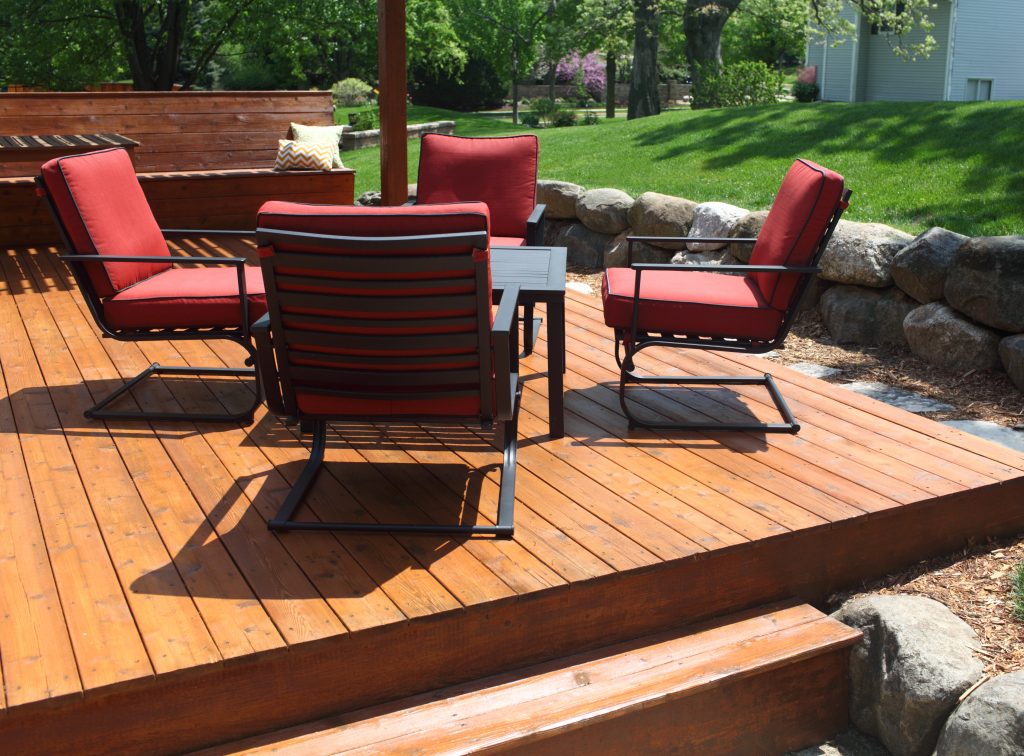
Having a nice terraced area with adequate shading and nice furniture is by far the best way to experience the long summer days and evenings, and with an outdoor kitchen, the patio is complete.
Entertaining will take on a whole new dimension, and your party dates will soon be etched on everyone’s calendar, and with some professional help at the design stage, you really can’t go wrong.
Add Living Space
If you have a very comfortable terraced area, you have effectively increased your living space, and with the right screening, the area can be turned into a room and can be used all year round.
If the patio is adjoined to the rear or the side of the property, you can install some sliding or bi-folding aluminium doors, which gives you easy access to the outdoor area.
Al Fresco Dining
There is definitely something special about enjoying a nice meal in a quiet, shaded area of the garden, and if al fresco is up your street, the perfect ambience can be achieved with the right awning and some suitable garden furniture.
This Mediterranean style is very popular in Australia, as the climate is ideal, and with the right lighting, the evenings will give you and your family a warm, inviting glow.
Complement the Property
You probably have your home just as you want it, but imagine what you could do if you added a stylish patio?
It would certainly add value to the property and with the right design,and would complement the residence, and you and your family will always have a special reason for looking forward to the arrival of summer.
With the right help, there is no limit to what you can achieve in the garden, and the unlimited design options means your garden will have a truly unique look that will be the envy of all.
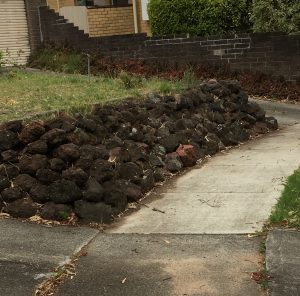
Would you believe that with strategic landscaping, you would be able to save money, increase property value, and make your place look more appealing?
Yes, you read it right, by following some of these property renovations, you will be able to conserve energy through landscaping.
6 Ways to Save Energy Through Landscaping
1. Pay Attention to the Wind
The first on the list of our property maintenance tips would be to pay attention to the wind and utilize fences or shrubs to guide direct cooling breezes to your property.
Aside from that, you will also be able to stop the sun from directly hitting your home and turning it into an oven. You should also consider planting large evergreen trees on the west side of your home, as it would effectively block the hot rays of the afternoon summer sun.
Drought-tolerant plants are also helpful, because they could decrease the effects of humidity as well.
Also refrain from directly planting thirsty plants near your home. . . Instead, put them in the corners of your garden.
2. Proper Shading Is Also Important
You also have to pay attention to where you are going to plant the trees.
Many landscapers suggest that you plant them on the west windows and the east should be your next priority.
Also, choose a tree that could be planted within 20 feet of the window, and would be at least 10 feet taller than your window. By doing so, you will have the assurance that you will get ample shade from it.
If you are thinking of planting a tree to protect you from the noon sun think again.
During summer, the sun is high at noon, which means that the tree shadow would fall directly under it, and would not be able to shade your home.
On the other hand, during winter, the shadow of the tree would fall on the house all throughout the day. Thus, it is not efficient at all.
3. Natural, Organic Mulches Are Heaven-Sent
If you’ve been doing DIY landscaping for the past few years, you probably know by now that watering flowerbeds are nothing but a necessity; since all plants need water, even the healthy ones.
However, there are also steps that could help you improve the health of your plants, and make them last longer even if you fail to regularly water them.
Not just that, it is also possible to make them heat resistant.
Organic mulches, such as wood chips are perfect for this.
You simply have to place the mulch around the roots of the trees and flowerbeds.
4. Maximize Dead Spaces
If you want to insulate your home in both summer and winter, then you should consider planting shrubs, vines, and bushes close to your property.
Make sure that as they mature they is space between them and your house as well as from each other.
5. Be Responsible When Watering
If you really want to control your energy use, it is important that you become responsible on how you use water.
According to the US EPA, its ideal to water your plants when the weather is cool, this is early morning.
Likewise, the sprinklers should be set to water only selected areas.
This would also help you prevent wasting water on other parts of the yard.
Invest in rainwater tanks and you can use the water you have collected for watering your plants.
Do not forget to check the taps, hoses, and plumbing to see if there are any leaks that need fixing.
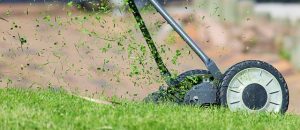
6. Go Manual Whenever You Can
During the hot summer months, it is ideal to modify and raise the mower’s cutting height to let the grasses grow long.
This would not only shade the roots, but would also reduce the occurrence of browning.
As for the equipment, use manual tools whenever possible in order to conserve energy.
If you really have to use larger equipment, then just rent or borrow one. This would prevent you from overspending.
Final Words
Having a green landscape on your property can be your first step toward a more sustainable conservation movement.
Although it might seem like it will not do much, after quite some time, you will realize that there is great potential behind it.
By making your landscape more energy efficient, you will be able to save a few dollars, which you can spend on other things.
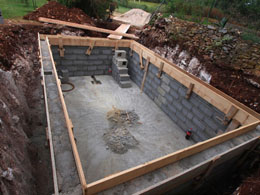
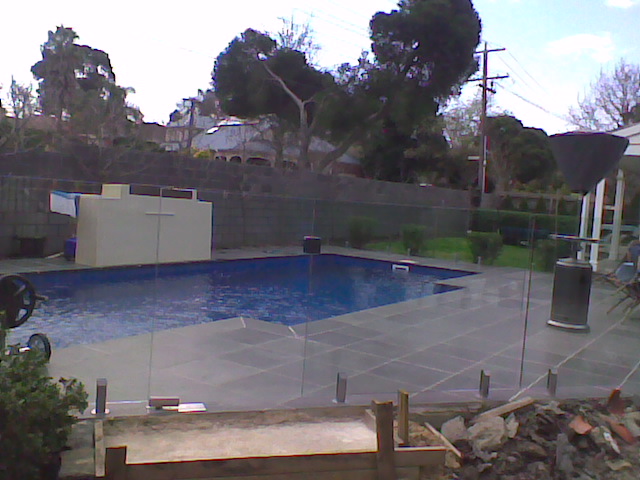
I have seen pools built before the house is built, and afterwards, so I thought I would discuss the options.
Build First
A lot of people find it very hard to visualise a finished house and it’s surrounds from drawings.
Especially when you are faced with a large empty block.
If this is you then it might be worth waiting until the house is built.
The problem is that unless you have a wide, or corner block, you are likely to cut off easy access to the site.
This means that
There will be a lot of mess around your new home during the build
The pool build will be more expensive, and take longer.
Pool First
If the pool is built first there will normally be good access to the site for large excavators and tip trucks.
There will be no need tor large cranes to lift heavy loads over the house.
As a result it should be possible to save thousands of dollars on the price of your pool.
You should also be able to take a dip in the pool as soon as you move in.
Risks
Co-ordination between Architect, House Builder, and Pool Builder is critical.
Make sure that all three agree on the location, and height, before any construction starts
A couple of problems I have heard about with pools are:
A pool was built before the house where the pool builder was given the wrong height by the owner. . . . When the builder arrived on site he realised that for the house to match the pool height would cost another $30,000 for additional fill and foundations, which was down to the owner.
The property owner decided to have the pool built after handover, but didn’t tell the builder to avid the area. The builder laid the house drainage and sewerage pipes across the pool area. . . . . Re-laying the pipes cost an extra $4,000.
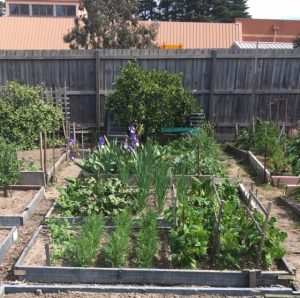
Harvesting your own flowers and vegetables from your garden backyard is one of the most rewarding endeavours for homeowners.
You need to make good preparation if you’re to avoid making costly mistakes later.
A garden in your backyard has several benefits supplying you with fresh vegetable flowers whenever you need them.
A garden enhances the beauty of your outdoor space and gives a reason to spend more time outside than usual.
Let this be the year when you start growing your vegetables and flowers and stopping running to the grocery all the time.
The success of any garden depends on the soil preparation procedures.
You will need to plan well and prepare everything before you can start growing your first plants in the garden. . . . so here are some steps in starting a garden from scratch:
Mark the area you want to create a garden
The first step is to mark out clearly the area you want to start your garden.
You can make use powder to mark it or even wooden sticks.
Saw cut small wooden stakes and hammer them into the ground around the edges of the garden.
You can then tie a string from one stake to another to mark the boundaries.
The size marked depends on with the area available and the size of garden you want.
It is always advised that you start a garden bed that is easy to maintain as starting a garden is just a tip of the iceberg, as there is much hard work in maintaining it afterwards.
The area chosen must be experiencing at least six hours of sunshine a day as this are some of the requirements of flowers and vegetables.
Clear away the grass
Most probably the area is covered by grass.
Getting rid of the grass should be your next step as these will be competing for nutrients with your vegetables.
Starting a new garden means sacrificing on some part of your lawn.
Get rid of all the grass and its roots for excellent results with your vegetables.
Dig the grass with a spade or sod cutter.
However, if you have time, you can cover the grass with several layers of thick newspapers and inches of soil compost and wait for the grass to die.
Dig up the soil
Now comes tilling your new garden to remove unwanted materials like rocks and roots.
All debris can now be removed before you can test your soils.
Tilling the garden must be done to depths of 8-10 inches deep which helps completely break up the soil and loosen it. A steel rake might be used to remove all debris that remains after tilling.
Test, and modify, the soil
You need to test the soil for pH analysis and nutrients to see if the soil as the ideal conditions for growing flowers and vegetables of your choice.
You can use a self-test kit found in almost all garden stores.
These kits come with all the directions and how to test soil and the recommended pH and nutrient levels. This will also be a good time to add some compost to your garden.
Depending on the condition of your soil after testing, you can add nutrients to modify the composition of the soil.
Acid soils can be balanced by soda ash and lime while alkaline soils can be balanced by iron sulfate.
An even layer of nutrients can then be spread over the soil before tilling them into the garden soil with a shovel or tiller.
Edge your new bed
Edging your new bed is one of the best ways to prevent weeds from crawling into your garden.
Make a trench of about 8 inches deep and some inches wide all around your garden.
You can even sink an edging material around the perimeter of your garden which will help stop even the worst invaders from crossing through to your garden.
Edging your garden is a crucial procedure that not only stops weeds crawling, but also keeps plants in the garden safe as the edge clearly defines the garden and prevents mowers and weed trimmers from affecting the plants.
Allow the soils to rest for a week or two
You don’t plant immediately after finishing with the preparation of soils.
The soils must be allowed to rest for a week or two to allow the nutrients to settle and start working.
Even before planting, you still need to rake the soil smoothly with a steel rake to give the soil the final preparation.
Site your plants
Don’t just remove your seedlings and plant them immediately.
You need to site them if you are to get the spacing right. It takes a little time to site all your plants on the garden but it is worth the effort.
You are now in the final step of seeing lovely plants in your garden and want everything to come out just fine.
This will also help you know the plants to place next to each other.
Get planting
When every plant is in the right spot, it is time to start planting.
ALWAYS loosen or tease up the plant roots before placing them in the soil.
This is very crucial especially if the seedlings were root bound.
This gives the roots space to spread out and hold into the new soils.
The vegetables or flowers must be planted according to their won specific guidelines.
Add some mulch
Adding 3-4 inches or organic mulch is one of the best ways to keep your garden healthy and well-maintained.
There are several things you can use as mulch. Shredded barks of trees, dried leaves, straw or newspapers all work fine as mulch.
Mulch is essential helping prevent the growth of weeds and keeps moisture in the soil.
The mulch decomposes over time adding more nutrients to your garden.
You will probably see the benefits of mulch during the dry season when the soil needs to retain enough moisture to keep the plants going.
Water your garden
By now your garden is planted and well-mulched.
Giving the plants a good soaking is highly recommended to give them good moisture levels.
If you used dry mulch, the mulch would absorb most of the waters before the soils.
It is always better to soak the mulch before using them or water them after spreading them in your garden around your plants.
As you can see, there are a lot of things that must be done before one experience the rewards of a garden.
There is nothing complex about starting a garden from scratch as long as you follow all the steps.
You will be able to see healthy plants growing in your garden in a few weeks.
Dianne Lampe blogs about gardening at www.igardenplanting.com She is passionate about all things related to gardening and blogs about indoor and outdoor planting as well as offering useful information about the best gardening products.
This is a guest post written by Kylie from grohelps
For anybody that is looking at starting their very own home vegetable garden there are a number of important factors that you should be looking at getting to grips with before you begin.
After all, you will want to avoid making mistakes since it then leads to it becoming harder to grow those vegetables and actually being rewarded for all of that hard work that you are then putting into action.
So, these are some of the key factors that you really need to think about before you become too involved in your vegetable garden.
1. Size and Location
It is important that you think about where your vegetable garden is going to be located as you must think about the quality of the soil, how much light it gets in that spot, and what the drainage is like.
In other words, you cannot just go and start growing vegetables anywhere that you want since that can lead to disaster.
Also, you need to plan ahead and understand what you will be growing as this then determines the size.
Alternatively, if you are aware of your limitations in the space that is available then you should then measure the space and spend time researching the different vegetables that can fit according to the space that they need in order to grow.
2. Planning Ahead.
You really do have to spend some time planning your garden and this means knowing what is going to be growing, where they have to be positioned, how they will grow together, and even when the produce is going to be ready for eating.
Some vegetables compliment one another in the ground while others fight against one another and restrict their growth.
Planning makes sure that you get the maximum number of vegetables in the smallest area possible.
3. Preparing the Bed and Soil
Vegetables are only going to grow in the correct soil and it is therefore very important that you prepare the bed correctly before you start planting.
You need to break up the soil, perhaps even turn soil over, and remove any weeds.
You might also want to also incorporate some fertilizer and work that into the soil so that the plants are able to get a real shot of those all important nutrients as they start to grow and develop as plants.
4.Selecting the Vegetables to Grow.
Next, you have to really study what you are going to grow and there are a number of deciding factors that will help you out.
First, learn about the vegetables that give you the best return for the effort that you put into getting them to grow.
Also, think carefully about what your family likes and take full advantage of those vegetables in the space that you have available.
You also have to think about what is the easiest to grow since this does also vary and if you are new to it then you do not want something too taxing.
5. The Care and Maintenance
This point is all about care and maintenance of your vegetables and the plot. As you can imagine, there are a number of things for you to think about with this and we will look at each point individually to help you to really make sense of it all.
Plant Supports for the Vegetables
You have to be aware of the fact that some vegetables are going to require some support to help them to grow.
This includes the likes of peas, runner beans and a number of other vegetables that tend to grow to a reasonable height. If you do not support them then their growth will be restricted.
Fertilizer.
If we can go back to fertilizer as it does play an important role throughout the duration of the growth and development of the vegetables.
You need to understand the kind of feeding that different vegetables prefer and also how often they need to be fed.
This will more than likely increase when they are at the part of developing the actual vegetables, so you have to be aware of the growth cycles so they can be fed at the correct moments.
Watering
Water is important if you want impressive vegetables, but you also need to understand how much water the different vegetables like when they are growing.
Some such as leeks love to have their roots soaked while others are not so happy with that.
Understanding the watering cycle for different vegetables can also make it easier for you to plan the garden in the first place.
Weeds
Vegetables hate weeds as they are just going to compete for the various nutrients that are in the ground and they can also start to fight against the roots and inhibit the growth of the plants themselves.
It is important that you weed the vegetable garden on a regular basis to keep on top of this issue.
Mulching
Mulching is something that you can use in order to boost the fertility and overall health of the soil and the best part is that you can even use old food scraps from your kitchen and throw it into the soil.
The plants are going to extract the nutrients and this will then boost their growth.
6 Protecting Your Vegetables
Protecting your vegetables is also just as important because you can easily get to a point where they have been destroyed and you are left with nothing in return for all of your hard work. Once again, we will look at several points individually.
The Problem of Pests
Different vegetables can be affected by different pests and that just means that you need to be aware of the most common issues for the plants before you go ahead and start your vegetable garden.
In addition, it is important to know that you can use organic insecticides to deal with the issue as at least then it is not going to give you any cause for concern with the health of the vegetables.
Dealing with Disease
One major problem with vegetables is that they can often be prone to different diseases.
As with the pests issue it is important that you know the main diseases that tend to affect the plants or vegetables so you know what to look out for in advance and how to deal with it.
Once again, there will be organic options for you to use that can be just as effective.
Dealing with Wildlife
Finally, there can often be a problem with wildlife and of course you then want to deal with them.
We are talking about more than just birds as well, so you might want to look at the idea of investing in some netting to protect especially the young plants.
Also, you have to think about the ways in which they are going to attack the vegetables and then counteract those problems.
As you can see, there are a series of things for you to think about when growing vegetables at home and the main thing is that you spend time getting to grips with the basics before you then go ahead and get started.
However, there is nothing complex here so keep that in mind and ultimately you should end up with some vegetables that you can be proud of.
On the other hand, a deck could possibly provide the disadvantages of:
Creating a deck will mean extra costs.
It can be time-consuming if you are building the deck yourself.
The good news is that both of the disadvantages can be taken care of with careful planning.
What to consider when picking a deck?
Once you’ve made the decision to build a deck, you need to start planning.
There are a number of things you need to consider to guarantee your deck ends up looking great and your bank account won’t feel robbed.
The most important questions to answer include:
What is my budget? Before you start, come up with a budget to ensure you don’t end up overspending.
What do I want from the deck? You need to list the things you want from your deck, including things like:
An area for barbecue
Space for plants and flowers
Enough seating space for entertaining guests
A roof to stay dry during rain
An aesthetic look to go with your house(matching paint, for example)
Please note these might not all apply to you, but the idea is to identify the things and functions you need.
What kind of material fits my needs and my budget? Once you’ve determined the above, you can start looking into deck materials. The most popular options includewood decks and composite decks.
Can I build it myself? Finally, you need to decide whether you want to build the deck from scratch, perhaps with the help of friends, or whether you’d want a professional builder to do it for you.
Do I need a permit? Don’t launch your project before you’ve checked the building permissions. A deck is a structure that often requires a special planning permit and therefore, you might end up paying a hefty fine if you forget to apply for one.
If you want to find ways to save money, your attention needs to be on the materials and the labour.
Don’t forget that while assembling a deck can be a lot cheaper if you do it yourself, the costs can mount up if you have no idea about DIY or experience in building.
With the above tips, you should get your deck-building project underway smoothly. Remember the importance of planning and don’t rush into the project before you are certain of what you want.
Most pool companies will tell you that their type of pool is the best. . . but what are the differences?
Here are some thought on various aspects of the two options:
Cost
Generally concrete pools are significantly more expensive.
An exception is if access is poor and a large crane is needed to lift the pool over 2 storey buildings which can easily add $5,000 – $10,000 to the cost.
Shape
If you want, or need, a particular shape this can be achieved more easily with concrete.
Fibreglass pools usually come as rectangular pool with a very limited range of alternative shapes.
Flexibility of Location
Because a concrete pool is a very rigid structure it can be constructed closer to a boundary than a fibreglass pool. (the sides of the pool are in effect a retaining wall.
Speed of Construction
It is quite possible to have a fibreglass pool installed in a couple of weeks.
More, weather dependant, site work and concrete curing times can make concrete pools much slower to build.
Durability
It wouldn’t be unreasonable to expect 30-40 years use out of a concrete pool although some resurfacing may be required during that time.
Although the life of a fibreglass pool is likely to be much shorter will you still want to be using the pool in 20 years?
Water Temperature
People who have owned both concrete and fibreglass pools say that the water in concrete pools is generally cooler (requires more heating) This is due to the faster heat loss to the surrounding ground.
One advantage of the cooler water in a concrete pool is that it will make algae growth less likely if you are away for a couple of months!