Rainwater Tank – Outlet Modifications

In a post on Outlet Location I talked about improving the water quality by avoiding taking water from the bottom of the tank.

This post shows how you can keep the floating particles on the top of the water out of your supply for just a few dollars.

Mid Level Outlet

In order to avoid the floating particles you need to take the water from at least 100mm below the surface, and avoid siphoning the water out of the tank.

To do this you will need:

    • A valve socket, to be screwed into the existing tank outlet.
    • A 90 degree bend.
    • 2 ‘T’ junctions.
    • Around 2.5 of plastic pipe.

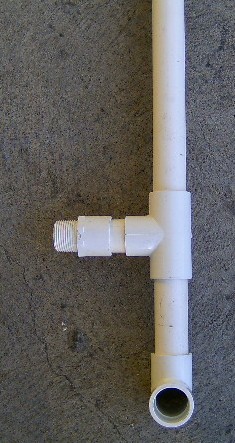
I would recommend at least 25mm dia pipe although larger would be better if it will fit in the tank outlet.The components are assembled as shown in the photo on the right.

The top pipe should finish above the water level of the tank when full.

In normal use the water is taken from the level of the Bottom ‘T’. When the level drops to the level of the horizontal pipe the air coming down the vertical pipe will act to stop a siphon forming and sucking down the top level of water.

Low Level Outlet

The only additional component if you are going to improve the existing low level out let is an extra 90 degree band.

It is however assembled in a slightly different order as shown in the photo on the right.

The only problem with this arrangement is it means that the Water below the outlet cannot be accessed unless you have an extra bottom outlet. (or use a submersible pump dropped into the tank)


For more about tank water quality see Rainwater Safety
 

Roof Choice – Risk

Something you might never have thought about when thinking about the sort of roof that you want on your new house is Risk.

Low Risk

A conventional roof which slopes to the outside can be considered to be a low risk roof.

In severe weather conditions heavy rain can exceed the capacity of the gutters and the downspouts causing an overflow. Blockages in the gutters and downspouts will also cause overflows

With a conventional roof the gutters will overflow to the outside of the building as shown in the diagram to the right avoiding damage to the inside of your home.

High Risk

A couple of other roof choices are of much higher risk.

These are:

Roof with Parapet

This sort of construction is used to give the effect of a Flat Roof, although there is actually a pitched roof behind the parapet wall.

As you can see from the diagram in severe rain, or a blockage, there is a greater risk of the overflow occurring inside the house.

Butterfly Roof

A butterfly roof is when two pitched roof panels fall to a central box gutter.

Again you can see the real risk of overflow into the house in case of problems.


What the Regulations Say

For a ‘High Risk Roof’ the regulations require the roof plumbing to be be designed for a heavier storm (1 in 100 years), rather than 1 in 20 years for a ‘Low Risk Roof’.

A ‘High  Risk Roof’ drainage system also require special  overflows to be installed.

This link will show you how to calculate the rate of rainfall used in design: Rainfall Intensity

In practice I hear of a number of non complying plumbing installations, and many of the overflows I see don’t look to have adequate capacity.

Did anyone check your roof drainage calculations? ……..If I chose a high risk roof it would be something I wanted to be checked thoroughly.


Also see Whats on the Roof

and Want a Flat Roof


Rainwater Tank – Outlet Location

In Understanding Tank Water Quality I explained that the typical tank outlets is located close to the bottom of the tank. This takes the dirtiest water from the bottom of the tank,rather than the cleanest water near  the top.

So what can you do?

Well the simplest solution is to put a second  outlet further up the tank, as shown below.


The top outlet is then used for the supply to the house, while the lower outlet is used to supply a garden tap.

The following schematic shows a typical installation.

Normal operation is with Valve 1 open supplying the pump, and Valve 2 open supplying a garden tap. Valve 3 is left shut.

The garden top would only have the pressure of the tank so it could only be used for low pressure jobs like filling a watering can. At extra cost you could add a separate pump.

When the tank level drops below the top outlet Valve 3 can be opened to supply the pump. Although this water is taken from the bottom of the tank most of the substandard water should have been drained off to the garden.

The outlet should also be on the opposite side of the tank to the Inlet.
 

Outlet Modification shows a low cost modification to further improve the quality

To help you pick a tank see Round or Slimline Tanks


Rainwater Tank – Inlet Improvements

In Understanding Tank Water Quality I explained that most tank inlets mix the dirtier incoming water with the cleanest water at the top of the tank.

So what can you do?

Its not as simple as just extending the inlet pipe to the bottom…..The jet of water will create turbulence in the anaerobic zone with the most silt. This will mix this very dirty water with the better quality water higher up the tank, creating problems.

One solution to reduce turbulence is:

  1. Put a ‘T junction at the inlet. (This will allow the falling water to draw in air to further oxygenate the fresh water.)
  2. Install a downpipe to just below the bottom of the tank.
  3. Put two 90 degree bends on the bottom so the flow is directed upwards with the outlet being about 150mm from the bottom. (above the anaerobic zone)

You can get a special fitting for the bottom of the pipe but my solution below will probably be cheaper and just as effective.

Put a ‘T’ at the bottom of the downpipe and have two bends so the flow into the tank from each pipe is half that of the single pipe. (See photo )


To help you pick a tank see Round or Slimline Tanks


Understanding Tank Water Quality

The drawing on the right shows a fairly typical rainwater tank layout.

I have seen lots of tanks set up like this and have also seen this layout in tank supplier’s brochures.

The set up is probably OK for garden watering and toilet flushing but not much else………………………..”So what are the Issues?”

Variable Water Quality From Top to Bottom

Even with ‘leaf screens’ and ‘first flush divertors’ there is going to be some particles in the water coming of your roof, These particles will either be lighter than water and float to the top, or heavier than water and sink to the bottom.

The smaller the particle the longer it will take to sink to the bottom.

The 2nd diagram shows how the water quality varies through the tank a few days after it has rained.

  • There are some particles floating on the surface.
  • There is some material close to the bottom which can include rotting organic matter. Sometimes called the Anaerobic zone.
  • The water between the bottom and the top gradually improves as the height increases with the best water being about 1 cm below the surface.

Problems

Because of the variable water quality problems are:

  • The outlet is close to the zone of worst water quality.
  • When it rains the turbulence from the inlet mixes the tank which then takes time to settle.
  • The overflow takes some of the better quality water.

Over the next few weeks I will provide  information about ways of improving the water quality in your tank.


For more about tank water quality see Rainwater Safety


Exit mobile version