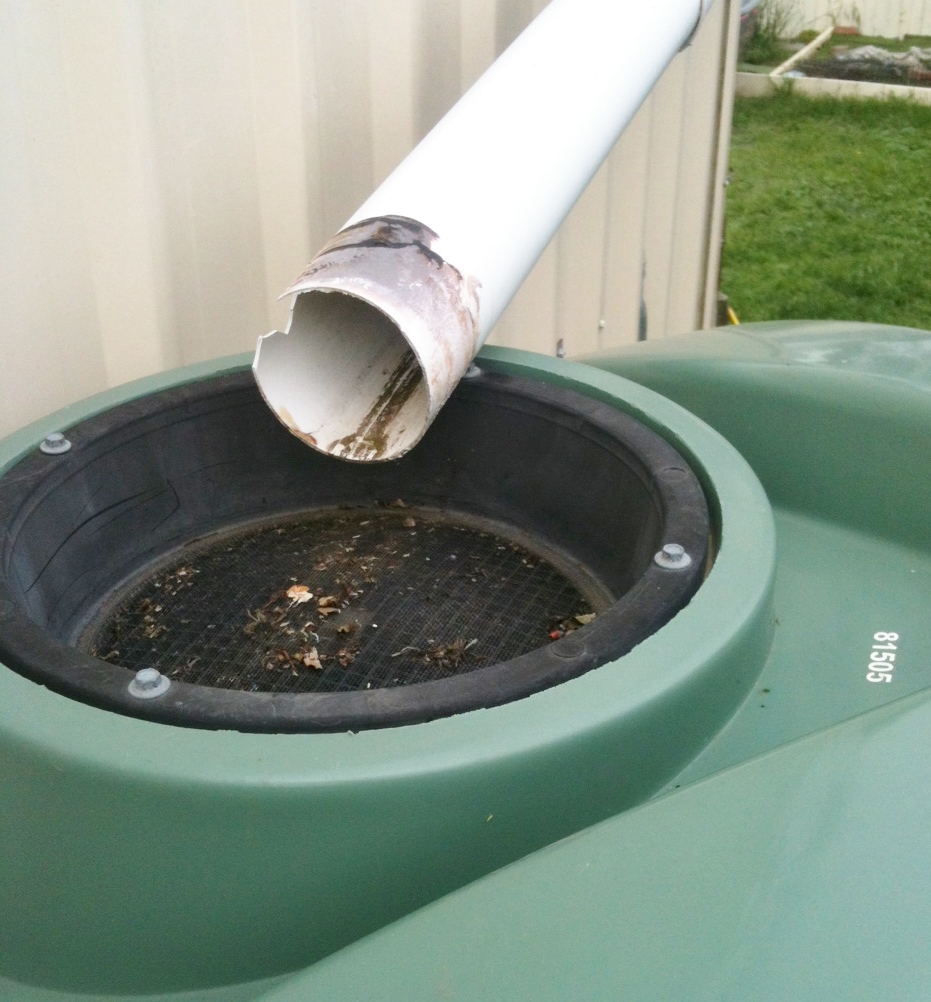
This is a fairly typical rainwater collection installation.
Gutters discharging to a pipe which discharges onto a screen fitted to the tank access point, cheap and cheerful!
I must have seen it hundreds of times . . . . . . but it has some negative implications on the water quality you will get from the tank!
Problems
Although the screen keeps leaves, mozzies, and other debris out of the tank it lets sunlight in. This will encourage algae growth inside the tank.
At the top of the tank the screen is out of view and consequently hardly ever gets cleaned. As a consequence the leaves rot and organic materials gets washed into the tank providing nutrients for that algae.
Discharging water into the top of the tank isn’t the best location (see this link: Inlet Improvements).
Solutions
Install a cover over the access point (Something like a round dustbin lid with a hole for the inlet pipe) This will keep the light out, but the issue of the rotting leaves will remain.
Screen the leaves out at the gutter discharge using a rainwater diverter with a self cleaning screen (for an example see this link: Supadiverta), and pipe the inlet flow to the bottom of the tank.
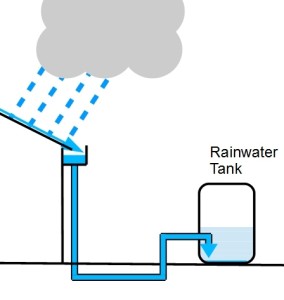
This diagram indicates a charged rainwater collection system. These are sometimes called either a “wet” or a “pressure” system.
NB. This diagram has been simplified for clarity. A leaf diverter, and an adequate overflow, must also be fitted.
With this type of system a section of the pipework always remains full.
As the pipes are under pressure it is essential all the joints in above ground and underground pipework are fully watertight.
ADVANTAGES
Allows you to discharge water at a height above the ground level at the down pipe (But not at the top of the tank – see the post: Inlet Improvements)
Neater than above ground pipework
Additional down pipes can be connected without diverting pipes along walls.
DISADVANTAGES
It is more likely to block as the flow through the pipes can be fairly slow and the low points can collect silt. (It is also more difficult to unblock.)
Higher cost than above ground systems due to trench excavation, and additional inspection fittings.
Potential for mosquito breeding in water unless appropriate screes are installed.
Harvesting additional downpipes without adequate overflow capacity can result in the tank overtopping during heavy rain.
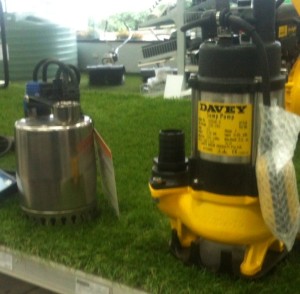
As well as the more common pressure pumps you will frequently see submersible pumps at your local supplier . . . . . So what’s the difference?
Characteristics of Submersible Pumps:
Most domestic submersible pumps come with an attached float switch which switches the pump on when the water level rises, and off before it runs dry.
They’re Quiet The surrounding water absorbs any noise.
Don’t Need Priming As the pump sitsunder the water it doesn’t need to be primed, which also improves efficiency.
Rarely Block These are centrifugal pumps, which can pass reasonably large solid particles.
Pump From Bottom of Tank/Well Useful for emptying things, but bad if you need the best water quality (The worst water is typically at the bottom of a tank see: Understanding Tank Water Quality)
Uses
Best for transferring water in constant flow rate applications such as:
Emptying tanks
In a sump to keep basements dry
Pumping Storm Water
Pumping Grey Water
Irrigation systems (make sure there is a filter smaller than any nozzles)
Make sure you get the correct size pump, see: Pump Size
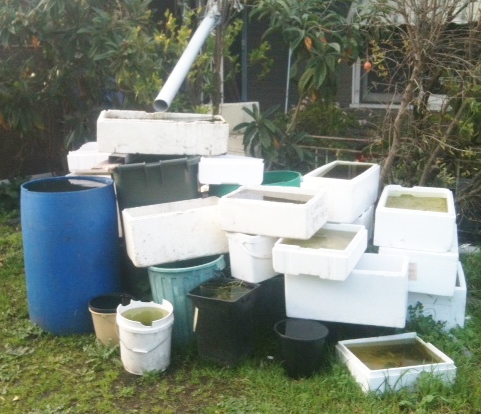
Grey Water includes all the waste water from the house with the exception of toilet waste. (Black Water)
It can includes water from; Washing Machine, Dishwasher, Sink, Wash Basin, and Shower.
A basic grey water reuse scheme sending washing machine water using a two way diverter valve to a perforated hose will cost less than $100. A top-of-the-range system, taking all the grey water, with treatment and pumps can cost $2-4,000.
Advantages
It’s available all year round whether it rains or not.
A basic system is inexpensive.
Disadvantages
You are not supposed to use grey water on root crop plants in your veggie plots because of bacterial contamination.
You shouldn’t store grey water as it is likely to go Septic and smell.
A lot of grey water contains too many nutrients for native plants.
Many common domestic soaps are high in sodium which can cause soil problems with long term use.
Summary
Because of its disadvantages I really regard grey water as a last resort rather than a main garden watering system.
If you have a veggie plot, or a lawn, one of the more basic systems will help you in times of drought, so I wouldn’t go for one of the top of the range systems.
If you are intending to use grey water make sure you use an eco friendly laundry liquid such as Earth Choice.
A better alternative is to make sure you get the right size of rainwater tank so follow this link: Rainwater Tank Size
One of the reasons why most rainwater systems use too much power is because because the pump is too big. For other reasons see Rainwater – Pump Issues
Most pump suppliers and design charts will specify a larger pump than you really need (They sell a more expensive pump, It’s less likely that the pump will be returned because it isn’t big enough, and they aren’t paying the power bill)
If you want to pick the most economic pump here is how to go about it.
Instantaneous Flow
What is the most flow you need at any one time. Here are some figures for typical house fittings.
Fitting
Flow Litres/min
Tap
10 to 15
Tap with Flow Restrictor
4 to 6
Low Flow Shower
7 to 9
Washing Machine*
4 to 10
Dishwasher
4 to 6
Toilet
3 to 5
Garden Sprinkler**
10 to 15
*To get to the lower figure you will need to close the supply valve this will add a few minutes to the wash but will help with issues like Water Hammer.
**It’s really better to irrigate the garden with a separate pump.
Add together the highest flow rate fittings that you think you will want to run together, which will give you a Total Flow Rate ‘Q’
Pressure
You need to aim for a pressure at the fitting of around 150kPa (15m of Head)
To get this pressure you need to:
Measure the height of the furthest fitting above the lowest level in the tank ‘Hs)
Calculate the Pressure Loss ‘Hf‘ due to Friction in the pipes See table below
Max Flow Rate Litres/min
Hf m head per 100m of pipe
20
25
32
40
12
10.9
3.7
1.2
0.4
24
13.4
3.9
1.3
36
8.3
2.8
The Required Pump Pressure is then calculated from:
Required Pump Head ‘P‘ m = 15 +Hs + Hf
Or Required Pump Head ‘P‘ KPa = 150 +(Hs +Hf)) x 10
Ordering
To order a pump you just need to quote the Total Flow and Required Pump Head
When you are ordering a pump think about getting a Pressure Tank
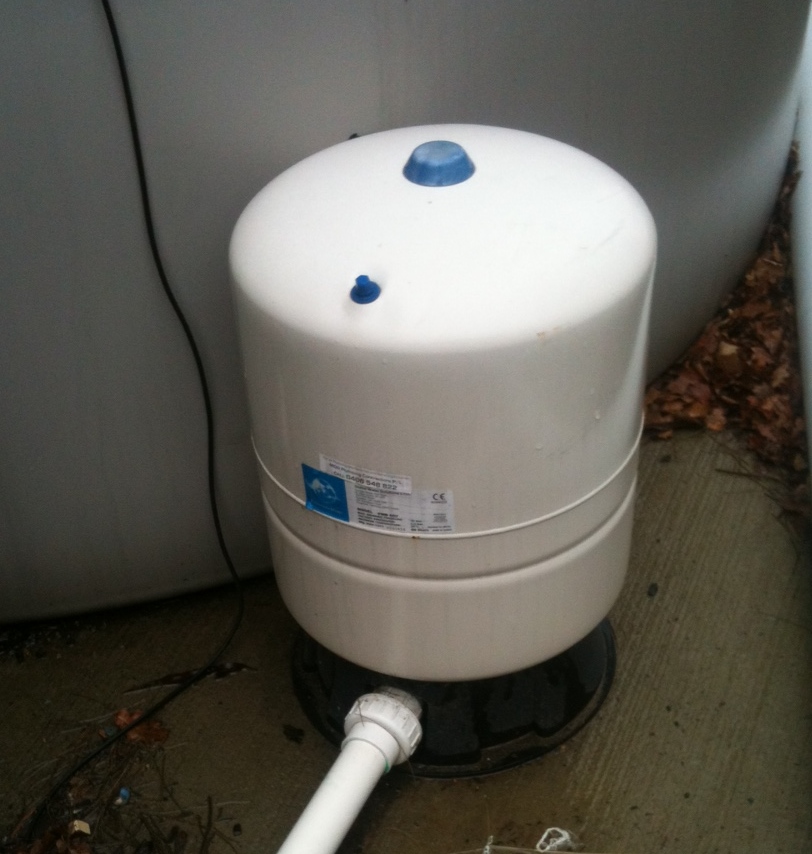
A pressure tank, which I think is the most important upgrade to a standard rainwater supply system, looks like the photo on the right.
Small tanks are mounted on the pump, larger tanks like this one are on the ground.
Key Features
What you get is a cylindrical storage tank storage tank with an internal membrane.
The top part of the tank, above the membrane, is filled with compressed air.
The bottom part of the tank will be filled with water by the pump from a connection at the tank base.
In the top half of the tank there is an air valve where you can check the air pressure and add more air if necessary.
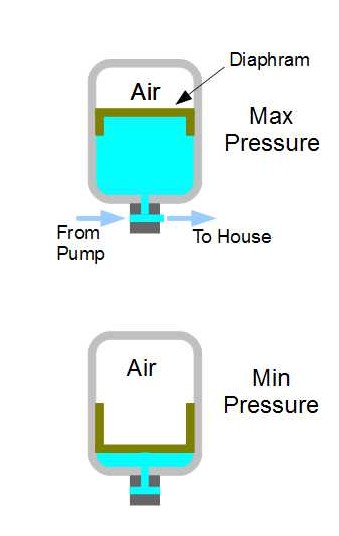
How It Works
The top of the tank is pre-charged with air to a pressure slightly lower than the ON setting of the pressure switch.
When the pump starts water is pumped into the tank compressing the air until the maximum pressure is reached.
If you turn on a tap the compressed air will push water out of the tank until the tank is almost empty (when the pressure will have dropped to the minimum level)
If you use less water than that stored in the tank the pressure doesn’t drop enough so the pump doesn’t start.
Once the pressure switch turns the pump back on, the pump fills the tank while at the same time supplying water to your system. Even if you turn the tap of the pump will continue to run until the tank reaches maximum pressure.
Tank Sizing
Although very small tanks are available about the smallest tank I would recommend would be an 18litre tank, which would give a flow volume of around 5litres between pump starts.
A 35litre tank with a flow volume of around 11litres between pump starts would ensure a toilet flush would not exhaust the tank.
Why Should You Get A Pressure Tank?
It can cost more than some pumps to buy the pressure tanks so why buy it is an important question.
To find out the problems with a standard set up see the post “Rainwater – Pump Issues”
The pressure tank should:
Double, or even treble the life of the pump, by reducing the number of pump starts and pump run time.
Significantly reduce the power usage by ensuring the pump mainly runs at the design rate.
Reduces the noise nuisance by less frequent pump runs.
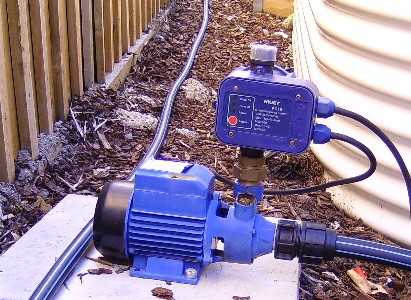
This photo shows a fairly typical pump installation.
An electric pump with pressure sensor control. It’s even got a fairly large diameter flexible suction hose between the tank and the pump.
So…..What are the issues?
Well water is an incompressible substance so every time some water leaves the system the pressure drops enough to trigger the sensor and the pump starts…………..That happens whether you are having a shower, putting a splash of water on your hands, or even a couple of drops dripping from a slightly leaky toilet valve.
This leads to Three Issues.
Efficiency
Electric pumps are designed to pump efficiently at their designed rate. If you are using water at a slower rate than the design rate the pump wastes energy trying to pump at its designed flow.
A lot more power is used to start the pump then when the pump is running for some time.
A Recent Study for the CSIRO showed that a typical domestic rainwater system used more energy than traditional centralised water treatment and distribution systems.
Pump Life
The main thing that wears pumps out is continually starting rather than running.
Noise
Because the pump runs frequently you are more likely to notice the noise. If you have got a leaking tap or toilet valve it will be starting up several times through the night.
Solutions
If you have got a large block with a slope of several metres it may be possible to install a header tank. This solution however is not normally possible for most of us.
The best solution for the average house is to upgrade by installing a Pressure Tank. Follow the link to find out more.
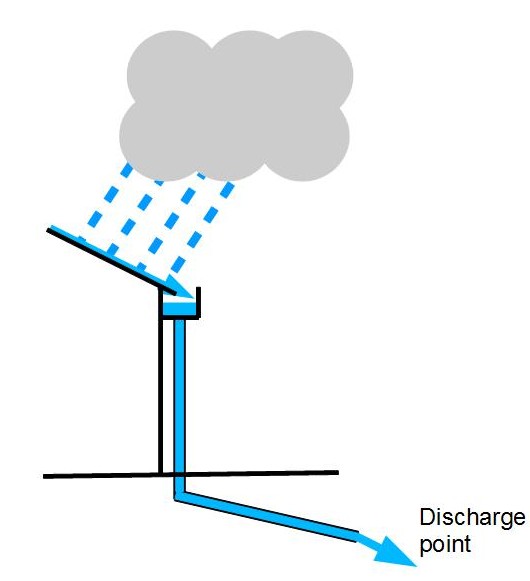
The vast majority of new houses will have a conventional (sometimes called a Gravity, or Open system) storm water drainage system discharging to either:
Public Surface Water Drain – Typically in Eastern States
Soakwells on Sandy Sites – Mainly in WA
With a conventional system like this the pipes are either vertical or at a slope towards the discharge point.
A feature of this system is that when there is no flow all the pipes are empty.
Advantages
Simple and inexpensive to design and construct.
If well designed, and constructed, the speed of flow in the pipes will prevents silting and subsequent blockage.
Disadvantages
This type of system can look very untidy when taking water to a Rainwater Tank that is some way from many of the downspouts (It results in lengths of pipes suspended in mid air)
Difficult to transfer water to a discharge point that is above the ground level of the building, although below the gutter level. A problem often encountered on demolition and rebuild projects and battleaxe blocks.
If you are planning a rainwater tank or are having problems with getting storm water to a suitable discharge point you could consider a Closed System
It’s important to make sure you are getting the right type of pipes and fittings that will be underground…..you don’t want to be digging up you garden, or paths, in case of blockages.
Pipes
Some plumbers will want to use, and bury, 90 mm diameter rainwater pipes, basically plastic downpipes.
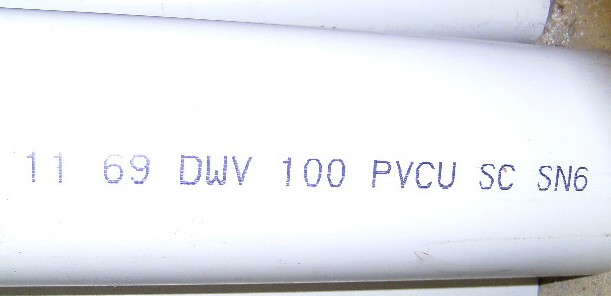
You need to make sure you are getting as a minimum 100 mm PVC pipes rated as DWV.(Stands for Drainage, Waste and Vent).
The reasons are:
The 90 mm pipe is thin walled and can be easily deformed once buried. This means you lose capacity without realising it. The DWV is a much thicker and thus stronger pipe.
Although the increase in pipe diameter is fairly small the flow capacity of the larger pipe is over 40% higher. That makes a difference in storm conditions.
Pipes are normally marked at 1m intervals with the type, manufacturer, nominal diameter, material, and the Standards reference (AS/NZS1260).
One of the problems during a new house construction is that concrete tend to fill underground pipes, causing blockage.
A hydraulic impact cutter can remove concrete in drains and sewers.
Other problems include leaking or burst pipes caused by corrosion, tree roots, and collapsed pipes.
Roots tend to grow toward the direction of the water so a loose connecting or weak point in the underground pipes triggers tree roots to wrap around them until they burst.
That’s why the design of the pipe system is crucial to ensure a problem-free plumbing.
They should be away from trees and other structures to avoid these problems.
A qualified and experienced plumber will detect common leak indicators in the underground pipes and repair them. They’ll test the repair and fill the trench.
Bends
Bend refers to a term for any change or offset of direction in the pipes, which includes elbows.
They’re fabricated as per piping specification requirement.
Elbows come in standard or pre-fabricated and are available off the shelf.
Bends are available in 4 different angles for DFW pipes as follows: 15 degrees, 30 degrees, 45 degrees and 90 degrees.
Although 90 degree bends are available, I would NOT install them underground due to the blockage risk….. If you need a 90 degree change of direction underground:
For a drain or a sewer use a junction pit.
For a charged (pressure) rainwater system use two 45 degree bends with an inspection ‘T’ in the middle.