Mild steel is used a lot in construction as it is a, relatively inexpensive, strong structural material.
It does however have an issue in that it can be susceptible to corrosion in certain locations such as:
Buried in the ground. (for example retaining walls)
Subject to regular wetting. (roofing sheets)
High humidity locations. ( for example above heated pools and spas)
Salty atmosphere. (such as near the sea)
One way of protecting the steel is galvanising, which is the application of a layer of zinc over the steel.
Here are the galvanising options you may be offered:
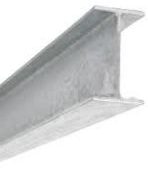
Hot Dip Galvanising
With this process the prepared section of steel is dipped into a bath of molten zinc.
When the section is removed a fairly thick layer of zinc encases the steel providing a durable corrosion resistant layer.
The appearance is of a dull grey material with a crystalline look.
Electro Galvanising
This is an electoplating process where a layer of zinc is bonded to the steel.
The item is dipped in a saline zinc solution and an electrical current is passed through the solution into the steel.
Although it results in a thinner layer of zinc, than hot dipping, the bond between the zinc and the steel is stronger so the effectiveness is comparable.
Cold Galvanising
Cold galvanising is the application of a zinc rich paint to the steel.
Although not as effective as true galvanising it is a better solution than paint alone.
One of the main uses is to provide complete zinc cover after site cutting, drilling, or welding of galvanised products.
Warning
Welding of galvanised steel is hazardous as the welding process releases toxic fumes. . . not a DIY exercise!
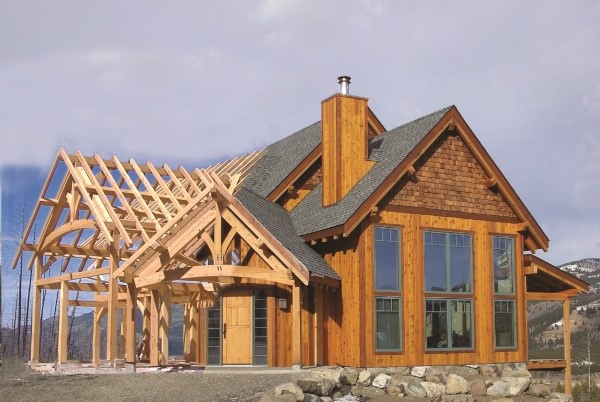
Traditional timber frame home plans can be a wonderful way to build while being environmentally conscious, because they’re efficient, long-lasting, and strong.
Many timber frame houses standing today in Europe date back to the 12th century, and some date back to the 17th century in North America.
This is a testament to the longevity of timber frame homes and their solidity throughout the ages – what this really does, is help reduce waste throughout time.
However, even a solid timber frame left neglected and exposed to the elements over centuries can start to deteriorate.
If you find a century-old timber frame home (or even an old barn) here is how to restore it to make a new home.
First, you need to assess if you have a structural problem or a superficial one.
If the structure is a little rotten or if the bones of your home have been shredded by termites, you’ll need a timber frame home plan, whether it’s a full or partial, to help you renovate or build a new, while being respectful of the environment.
Superficial Damage
If the problems with your home are largely superficial—for instance, if the siding is ripped up or the doors are eaten through—than your solution is fairly simple.
Peel off the layers of the house to get it down to the bones.
Then salvage the wood that you can, replace the wood that you can’t, and reconstruct the parts that are damaged with new, clean wood and siding.
Structural Damage
If your problems are structural—if, for instance, your house has been eaten through by termites—then your solution will need to be more complex.
First, identify any wood that can be salvaged, because you’ll be reducing your construction-based foot print.
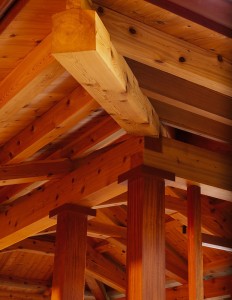
New structural timber frame pieces are expensive for two reasons.
First, they are large: a small structural piece is 150mm by 150mm, while larger timbers can be 300mm x 400mm with lengths of up to 9m.
Second, timber frame homes aren’t kept together by nails. They are put together using wooden joinery crafted to exacting standards by skilled craftsman.
When deciding what to keep and what to discard, it is recommended that you first hire a qualified firm or engineer to assess what can be repaired or what needs replacing.
Although it’s better to err on the side of caution, you don’t necessarily have to scrap every piece of wood that has damage.
Structural epoxy can sometimes be used to rebuild pockets of rotten wood in the timber, as long as these pockets aren’t too large. . . . they should be, at a maximum, as large as a softball.
You can also use steel straps to strengthen joins, rather than ordering a new piece of wood. , , ,not ideal, but can be an option.
When it comes to replacing the timber, you need a qualified supplier.
Many companies can replace damaged timber in old homes by using new structural-graded timbers that are shaped and distressed to match the timeless look of the timbers in the rest of house.
Carefully Plan Your Method Of Attack.
One element that’s overlooked when beginning a project like this is the importance of having a well-organized site.
Mark out a large, flat site next to your house to work.
If there’s not one, you may even consider clearing one in order to be more efficient.
Number every piece of wood, so your pieces don’t get confused with others. . . Timber frame homes make this easy, because even in the 19th century they tended to be built along similar lines; so you can easily mark, for instance, all the right front corner posts.
Numbering every piece will make your life a lot easier when it comes time to replace damaged wood with new pieces.
Before you start removing timbers it’s important to make the building stable.
Your house is already damaged, and you’ll be ripping out siding and even structural pieces, so you need to take precautions to ensure that the entire thing doesn’t collapse on top of you.
Cribbing is an excellent idea, but as with everything else, you need to have an organized timber frame house plan.
You need to lay out a plan pre-emptively for your cribbing so that it supports the areas that need support, without impeding your ability to maneuver.
Building a stack of cribbing right in front of the chimney that needs to be ripped out, for instance, may not be the best idea.
Finally, you’ll need to deconstruct the structure, ripping off the old and worn wood to replace it.
What that involves will depend on the scope of your problem.
Preserving Your Timber Frame Home
The last step is to strengthen the wood so that weathering is less damaging in the future.
SANSIN water-based sealers, for instance, are an environmentally friendly option that can toughen the outside of the wood.
Textured finishes can also strengthen the wood while giving your timber frame home a rustic appearance.
Finally
A timber frame house plan isn’t easy, but it can be much better than losing your treasured 17th or 18th century timber home to damage.
If you decide to tackle this project yourself, these tips should get you started.
If you’d like to hire someone to help, there are many excellent firms out there that have plans that are adaptable to any type of needed renovations.
Regardless of whether you hire help or renovate your house yourself, you’ll end up with a structure that’s beautiful, historic, pays tribute to the environment, and as strong as anything built today.
Tyler Linden is a blogger for Hamill Creek. He has a background of structural engineering and he loves to spend most of his time playing in the great outdoors. You can find him on Google+ and on Twitter.
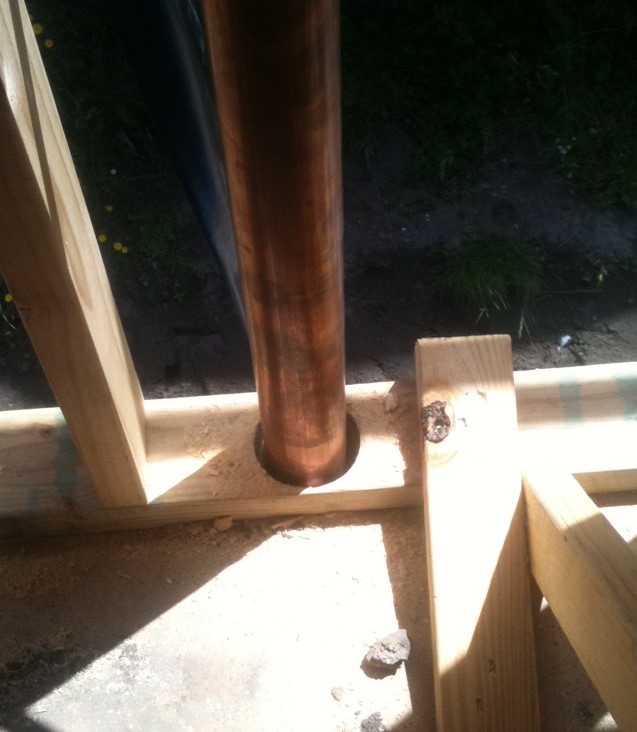
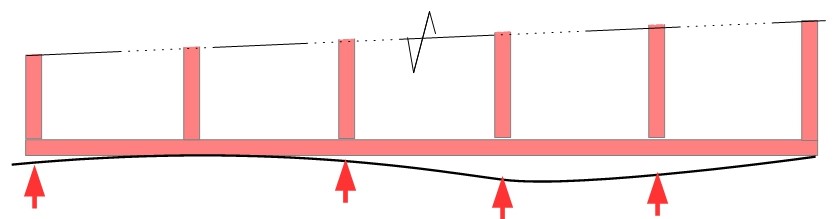
An issue with timber frames is making sure that the frame is bedded securely on the floor slab. . . . You don’t want movement of the frame when the house is completed!
Flatness of the Slab
You may think the building slab looks flat but in practice very few slabs are perfectly level.
The Guide to Standards and Tolerances states “Generally the floor shall be within + or- 10mm of the finished floor level in any room and within +or- 5mm in a 3m length.”
So when the frame is put on the floor it could look something like the exaggerated sketch below.
Making Sure The Frame Is Stable
The key issue is to make sure that the frame is fully supported under the stud positions otherwise the studs can move vertically.
That means that packing will need to be fixed under the bottom plate at the locations shown by the red arrows above.
Packing can be made from hardboard, MDF, Plywood, metal, formica, or specialised plastic packers (sometimes called shims).
It is important that the packers should be secure and non compressible.
They should also not project beyond the bottom plate, otherwise they may affect the later secure fastening of plasterboard and skirting boards.
Openings in a Timber Frame Wall Panel usually mean that the Bracing Straps of the Basic Frame can’t be installed.
The following diagram shows typical panel details.
Bracing Panels
The bracing panels replace the bracing straps to keep the frame square and ensure the panel resists sideways forces. They are a sheet material that is nailed to the studs top plate, bottom plate, and noggins.
Usually the panels are ply although I have seen other materials such as particle board.
Lintel
The lintel carries loads from above to the studs either side of the opening. The size of the lintel will depend on the width of the opening
Jam Stud
The jam stud in normally the last full height stud before the opening
Secondary Jam Stud
As well as assisting the jam stud to carry the lintel load the Secondary Jam Stud also provides extra stiffness to counteract the fact that there is only one noggin.
Sill Trimmer
This forms a fixing point for a window frame, and also the top fixing point for any Jack Studs.
NB for a small window a Head Trimmer may be used between the lintel and the top of the opening
Jack Stud
The jack stud is a short vertical stud. It can be between:
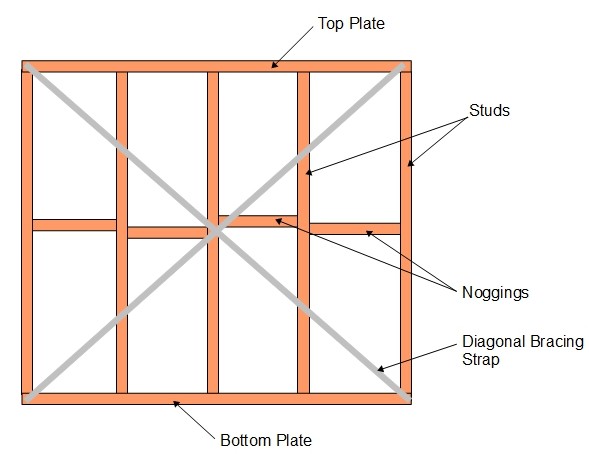
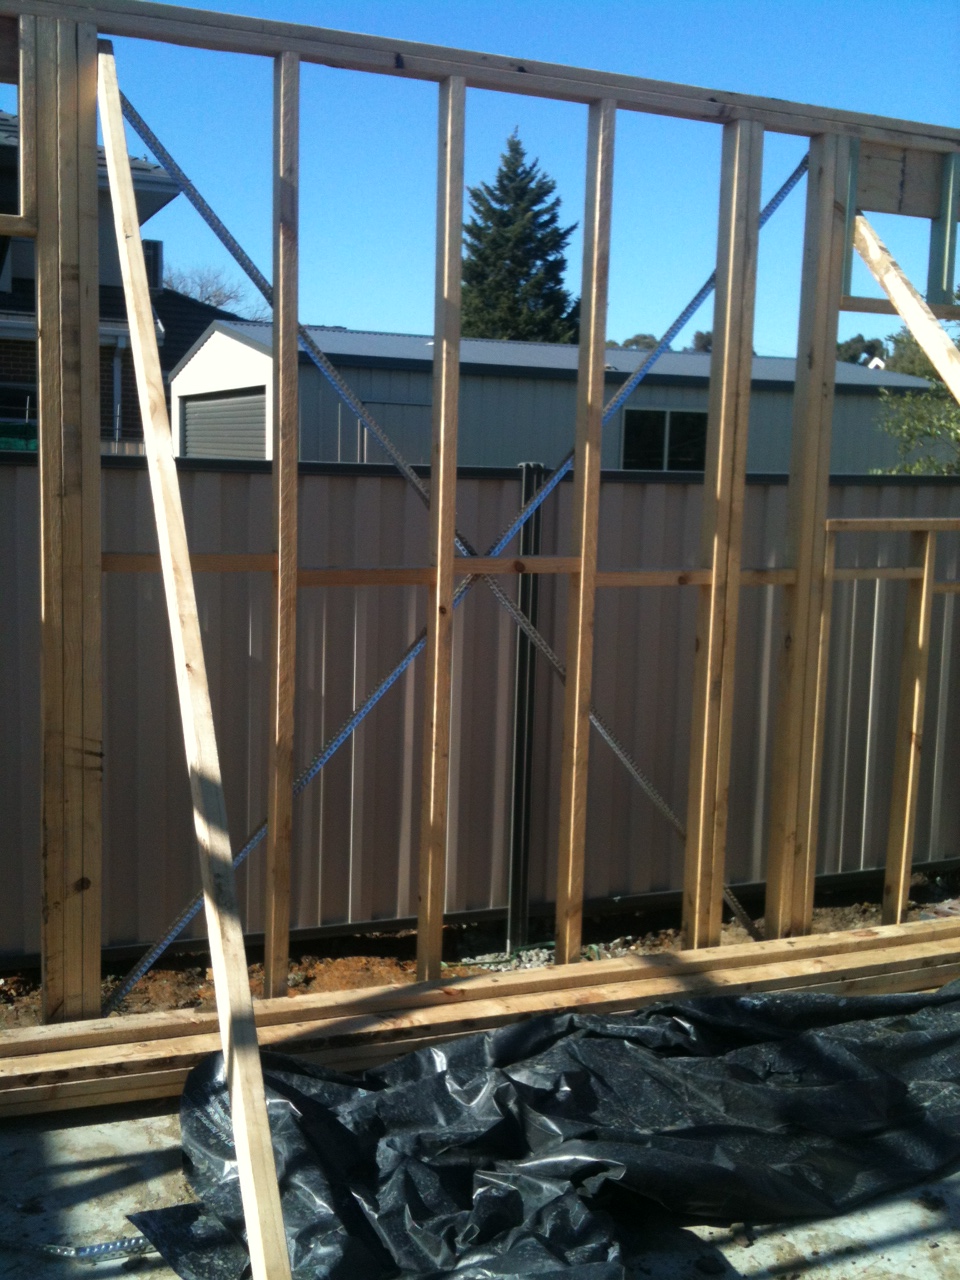
The drawing below shows a typical standard wall frame
Minimum timber size will be 95mm x 35mm although this may increase for the following reasons:
Additional wall insulation may increase the depth of the frame to 125mm
If the wall requires more structural strength that may increase the timber thickness from 35mm to 45mm.
Studs
Studs are the main structural component as they support the main vertical load of the roof and and upper floors.
Normal spacing is at 450mm centers for external walls and 600mm for internal walls unless specified otherwise for structural reasons.
Top Plate
The top plate fixes the top of the stud in position and acts as a mounting point for the structure above the frame.
A single top plate does not have the strength to carry major loads, such as roof trusses or upper floor beams so these should be fixed directly above the studs.
To increase the strength, if required, a second timber can be added during erection to make a double top plate. This additional timber is fixed to overlap adjacent frames, junctions, and corners, and increases overall ridgidity
Bottom Plate
The bottom plate holds the frame to the base and fixes the bottom of the stud in position .
It needs to be firmly fixed to the base. If the base is uneven packing needs to be installed under the stud positions to prevent any vertical movement of individual studs.
Noggings
Noggings are the individual short pieces of timber between the studs. They are there to prevent the studs bowing under the load or warping. It is important that they fit exactly into the space.
Maximum spacing between noggons and top and bottom plates is 1350mm. For walls up to 2.74m high a single noggin meets the standards. Taller rooms and you will need 2.
Diagonal Bracing Strap
The diagonal bracing straps are typically galvanised steel strip which is nailed to each strut. The bracing is the part of the frame that resists any sideways deformation of the frame, such as wind loading.
Although these braces seem insubstantial compared to the struts and plates they are vital to the overall strength. If you find a brace has been cut during construction ask for it to be replaced!
The Internal Frame is the key structural element in most Brick Veneer House Construction.
In more lightweight structures such as timber cladding and lightweight render it takes on an even more of the structural loads.
The overall frame is composed from a number of individual wall panels, which when fixed to the base, and fastened together, form a rigid box like structure.
Structural Loads
The frame carries several main structural loads:
It takes the load of the roof, and any upper floors, down to the foundation.
It resists the wind trying to push the whole building over.
It provides lateral support for the brick walls.
Holds the windows in place.
It gives a secure fixing point for the internal wall and ceiling lining boards.
In the case of weatherboard or lightweight render construction it supports the outer skin of the building.
Additional Functions
Provides a route and fixing points for cables and pipes.