Winter Sun

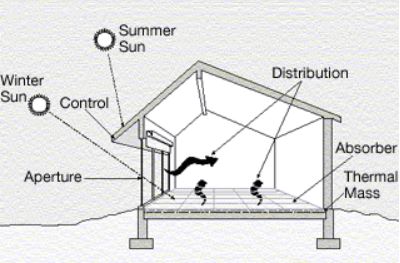
If you are going to get as much winter sun inside your house you want to minimise shading.

That could be from neighbour’s houses or even and boundary fences/hedges.

Here is how to check…………………..

Ideally you should be aiming for around 6 of hours of sunlight into your house on the shortest day (21st June).

To get the exact angle for your location you can get solar calculators on the net that will give you the suns angle for every hour of the day for any day of the year.

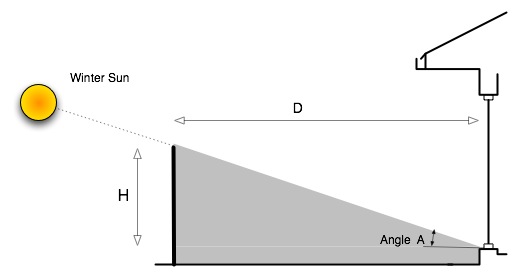
The diagram below shows the how to begin working out the effects of shade from a 1.8m fence to the North of a window


I have provided a TABLE that shows approximate midwinter shade angles ‘A’, and shade slopes ‘H/D’ for various positions of latitude.


Latitude Locations

Noon

9.00am -3.00pm

Slope H/D Angle Slope H/D
38 Melbourne 29.5 0.57 16 0.29


  1. The Bottom of the window is 0.15m above ground level
  2. The top of the fence ‘H’ is 1.65m above the bottom of the window(1.8m -0.15m)
  3. To make sure you get 6 hours winter sun in the window, divide the height of the fence above the bottom of the window by the ‘9.00am -3.00pm’ Slope (0.29).
  4. D = 1.65/0.29 = 5.7m. The fence needs to be 5.7m from the window for full sunlight for 6 hours.
  5. If the fence needs to be closer than 5.7m it worth checking if any sun gets to the bottom of the window. To check divide 1.65 by the ‘Noon’ Slope (0.57)
  6. D = 1.65/0.57 = 2.9m. If the fence is closer than 2.9m you may be better reducing the window size by raising the base.


This information also applies to Solar Panels for Heating and Power Generation

To provide summer shading see Shading Northern Windows


Passive Solar – What Does It Mean?

Do you want a house that is filled with natural light in the summer without overheating, and minimises your heating bills in winter? ……….If you do, then a passive solar house is what you need.

Here are some of the things you consider.

Get The Winter Sun Into The House

From Wikimedia Commons

This means having most of the main living rooms facing North with lots of windows.

It also means making sure the Windows aren’t shaded by fences, trees etc.

Maximising Thermal Mass

This means having dense absorbent materials like concrete  and brick inside the house.

  • In winter the thermal mass heats up during the day and releases the heat during the evening.
  • During summer if you open the house in the evening/night the thermal mass cools and helps keep the house cool the next sunny day.

Ideas for increasing thermal mass include:

  1. Have the house on a concrete slab rather than stumps.
  2. Have tiles or a slate floor especially in front of the north facing windows.
  3. Brick feature walls and or brick fireplaces.

Keeping the Summer Sun Out

  • Minimising West and East facing windows. These windows are the worst for heating up the house with the low morning and evening sun.   (In winter they hardly get any benefit from the sun)
  • Shading North Facing Windows.
    Typically the shading will be in the region of 1 m from the outside wall. It can be either deep eves, a veranda, or a pergola.

Minimise Heat Transfer

That’s transfer of heat from outside to inside in Summer days, and inside to outside in Winter.

To minimise heat transfer:

  • Provide good insulation to walls and ceilings.
  • Have small windows on the South Side.
  • Closing curtains at night in winter.

The first house we built in Australia was built according to these principles. Although we lived in it for 10 years we never felt the need to fit air conditioning. We didn’t require awnings on the windows or wanted to shut the curtains on hot days.

The above advice applies to Australia and other Southern Hemisphere Countries such as New Zealand and South Africa. If you live in the Northern hemisphere you need to have the Large windows on the south side of the house.

What Passive Solar ideas have Worked for you?

For more Green Ideas see Sustainability


Rainwater – Safety

Millions of people have lived long healthy lives drinking rainwater . . . . but that’s doesn’t mean that rainwater is entirely pure, or completely safe for everyone.

Composition

The following Chemicals are commonly found in rain: Hydrogen, Ammonium, Calcium, Magnesium, Potassium, Sodium, Suphur Tetroxide, Nitrus Oxide, Chlorine, Fluorine, Lead, Iron, Bromine, Manganese, Vanadium, Aluminium.

These chemicals are generally in safe, extremely low concentrations.

Acidity

Rain pH is typically acidic, with a pH in the range around 5.0 – 5.6 9Neutral water is 7).

With local thunderstorms the pH can drop as low as 2.0.

The acidity is primarily due to the presence of the two strong acids in dilute form, sulfuric acid (H2SO4) and nitric acid (HNO3).

Although some of these contaminants are from pollution many of them are as a result of natural processes.

If nothing is done to reduce the acidity you can corrode the copper in your pipes. (See this link: ABC)

If you have concrete tanks the water should be neutral as the concrete leaches lime, which raises the pH.

However if you have plastic tanks you might like to consider adding a bag of limestone chippings to the tank, which also help to raise the pH.

Bacteria

Rainwater tanks are also likely to contain low levels of bacteria as a result of contaminants on the roof.

People who regularly drink this water will rapidly build up a resistance to the bacteria.

When people, who have no resistance to the bacteria, drink the water however there is a real chance of developing a gastro problem.

This is a particular concern if that person in very young, old, or already unwell.

Precautions

Precautions you should take include

  • Rinse a new roof
  • Keep the roof clean and clear of leaves including removal of overhanging branches.
  • Screen the inlet and overflow of the tank with fine mesh to prevent birds, animals and insects getting in.
  • A well maintained leaf trap will reduce the amount of organic matter that enters the rainwater tank through the inlet.
  • The tank should be covered to prevent light from reaching the water as it will encourage the growth of algae and bacteria. The cover to allow access to the tank for cleaning and inspection should have a tightly sealed manhole.
  • Use only “food grade” plastic pipe and fittings.
  • Clean the gutters and tank inlet every three or four months.
  • Remove the sludge in the tank bottom every two to three years.

For cleaning and disinfection of tanks see Rainwater Problems

For Similar Posts see Sustainability


Insulation Basics – Calculating R Values

A previous post –introduced R and U values

In this post we will demonstrate how to calculate R values.

Well it all starts with the thermal conductivity of the building material. The ‘k’ value. This is a measure of how fast heat travels through a material.

k values are usually stated as Watts / m2 / degree C.

Tables of typical values for ‘k’ have been provided in Design Tables. Actual values may vary from these values depending on material density and manufacturing techniques.

For any component of the building R = Thickness in metres /‘k’ (The units are square metre, degree C per watt [m²·°C/W]).


An example of the calculation follows:

Material is single skin brick with a density of 1800kg/m2 (protected from rain)

R = 0.110m / 0.71( from  Design Tables.)

= 0.155

Remember that when calculating R values the thickness counts, so if you have insulation batts that are compressed they becomes less effective.


Cavities

When it comes to cavities there are generally accepted R values as follows:

Cavity Width

Heat flow

Horizontal or Upwards

Heat flow

Downwards

5mm

0.11

20mm or more

0.18

1.06

Typical loft between tiles and ceiling

0.11

Between roofing material and sarking

0.12

0.12

Behind tiles (or shingles on wall)

0.12


The effects of reflective finishes and weather will be discussed in future posts.

See Insulation for similar Posts

For Posts about Green Building see Sustainability


Insulation Basics – ‘R’ and ‘U’ Value

R Value

R1.5 Batts, R2.0 Batts……. all the way up to R6.0 Batts, but what does it all mean?

The R value is a measure of the thermal resistance of the component of the material. In other word how hard it is for heat to pass through that component.

U Value

Once you have the R value  you can calculate the Heat Transfer Rate, the U Value.

The calculation is U = 1/R (The units are watts/degree C for each square m)

To get the R value of a structural element, for example a ceiling, you add the total of all the R values of each of the components.

The following table shows the effect on the value of ‘U’ for various levels of Insulation for a ceiling.


Table 1. Ceiling ‘R’ and ‘U’ values

Batts

Total R value

U value

No insulation

0.36

2.78

R1.5

1.86

0.54

R2.0

2.36

0.42

R4.0

4.36

0.23

Examples

So how do you use these figures?

The following two examples are for a house of 150m2, which you want to keep at 22 degrees C

  1. On a summers day the temperature in the roof space is 50 degrees C (not unusual in Australian summers) and you want to cool it to 22 degrees C, a difference of 28 degrees C.

Heat transfer through ceiling = 150 x 28 degrees x ‘U’

  1. On a winters day the temperature in the roof space is 5 degrees C and you want to heat the house to 22 degrees C, a difference of 17 degrees C.

Heat lost through the ceiling = 150 x 17 degrees x ‘U’

The results of the heat gains and losses for the various R levels of ceiling insulations are shown in Table 2 below.


Table 2. Heat Gain / Heat Loss Through Ceiling.

Insulation

Summer Heat Gain

=

Cooling Required

Winter Heat Loss

=

Heating Required

No insulation

11.6kw

7.1kw

R1.5 Batts

2.3kw

1.37kw

R2.0 Batts

1.8kw

1.1kw

R4.0 Batts

0.97kw

0.6kw

You can see from the above table that by providing insulation you will need considerably less cooling in summer and less heating in winter.


See Insulation for similar Posts

For Posts about Green Building see Sustainability

Induction Hobs

Why we wanted an induction hob

About a year ago we started thinking about going all electric.

We had previously gone from gas ducted air heating to reverse cycle units and installed photo voltaic solar panels.

After installing a heat pump hot water system the final stage was a kitchen refurbishment.

Although we liked the control ability of gas I had seen several good reports about induction cooking so we thought we would give it a try.

The Unit

We had a look around and found this white induction unit at Ikea for under $800 dollars.

For that price we got a high specification unit with several additional functions such as timers and bridging functions.

Our experience

After several weeks use we are very pleased with the hob, particularly:

  • It is more adjustable than gas.
  • It starts immediately, none of that trying to get the ring to light.
  • Minimal stray heat, it all goes directly into the pan.
  • Take a pan off the hob and it shuts down, it displays a ‘HOT‘ warning but its not really that hot.
  • It heats up our steel wok faster, and hotter than the gas ever did.
  • With the gas meter gone we are saving almost $6 a week in gas service charges.

Disclaimer: I have not been paid for this post and did not receive any other benefit or discount on the purchase of the hob.


Making The Most From Your Solar Panel

To get the best value from your solar panels you need to maximise your use of power when the panels are generating, and avoid taking grid power during that time.

This limits the kW you generate that are paid at the low Feed In Tariff.

Here is what we are doing.

Extend Generation Time

We have done this by having the solar panels facing two different ways to extend the time we are actually generating.

8 panels face North and 5 panels face West.

Plan Power Usage

With modern controls its quite easy to plan run times for various electrical items so that they are typically operating when the panels are generating.

Its also important that they don’t operate at the same time as the higher demand means that you could be taking power from the grid at peak rates.

Here are the steps we take:

  1. Straight after breakfast use the automatic washing machine. The early start also means we can then hang the washing on the line for most of the day.
  2. Run the dishwasher after the washing machine has stopped.
  3. Our hot water is by a ‘Heat Pump’ which runs for up to an hour starting at 1.00pm. As the tank is well insulated this provides enough hot water for the rest of the day and morning showers.
  4. If its a hot day by the time the heat pump is finished the house could be warming up . . . . but there is time to run the air conditioner to get the temperature down for the evening.


Coffee Makers

I see some display homes with expensive built in espresso machines costing thousands.

I’m afraid I’m for the inexpensive, and easy life, so I am happy to use a Nespresso machine which cost me less than $200 (My milk frother came from Aldi)

Being a keen environmentalist I make a point of always returning the aluminium pods for recycling.

Recently however I have been using these ‘Green Ring TM‘  biodegradable coffee pods.

After use I throw them in my worm farm.

I just emptied the bottom tray of compost and though the pod still seemed intact in the compost it crumbled to dust as soon as I touched it, so they really are biodegradable.

I got these pods from STREAT a charity which I support.

Why not save some money with a basic capsule machine, with some biodegradable pods, and help the environment?

Rendered Foam Walls

This addendum was added to an original Post from 2014 as there has been a lot of publicity recently (late February 2019) about foam panels and certification has been removed from certain types of panels.

A particular issue for apartment blocks has been related to high speed spread across the surface of the panels to other flats.

On a standard house the render should protect the insulation from external flames. (If flames penetrate the plasterboard, from the inside, it is likely that the occupants will either have already evacuated, or be dead before the insulation ignites) n

Nevertheless you should review whether the potential risks from foam panels are acceptable to you.

Original Article

Rendered Foam walls are becoming much more common, particularly in the upper floor of 2 storey homes. They offer a real advantage in situations where it would be difficult to provide adequate suppport for a heavy brick wall (For example when the upper floor needs to be set back from the ground floor)

If you are worried about strength you need to be aware that the real strength of the house is in the frame. (see: House Construction – The Frame)

Construction

  • The Foam boards, which are manufactured with an external mesh face, are fixed to the frame with special galvanised screws that incorporate spreader washers.
  • Joints are sealed with a polyurethane foam and have mesh jointing tape.
  • External corners are reinforced with metal strips.
  • A minimum of 5mm of  acrylic render  is applied, normally in a three layer system.

Polystyrene Foam

There are 2 different types of foam used in this construction method:

  • Expanded polystyrene( EPS) – Good thermal performance but limited impact resistance/structural strength.
  • Extruded polystyrene (XPS) – Similar thermal performance and looks similar  but the production method is different which results in increased impact resistance and structural strength. Higher cost

Insulation values for the various board thicknesses are:

  • 50mm    – R 1.2
  • 75mm    – R 1.8
  • 100mm – R 2.4

Final Thoughts

Although there are some advantages in this system it does require careful detailing and construction otherwise leakage can occur damaging your house.

The advantage of masonry on the lower part of the house is that it is less likely to be damaged by the bumps and bangs of daily life. Once the wall is above head height damage becomes less of an issue and the rendered foam board should be fine.

I’d prefer XPS to EPS.

Although the insulation values are good the builder will most likely want to save the cost of the insulation batts in the frame. If you ask for the wall to include insulation batts you will have an exceptionally well insulated wall at very little extra cost.


For similar posts see Insulation

For more about house design see Choosing a House . . . A new E-book for only $4 to help plan your new house


Ancient Air Conditioning

I’ve just returned from the City of Yazd in Iran and as usual I have been looking at houses and buildings,

I bet you thought air conditioning is a fairly recent invention but that is what these wind tower structures have been doing for thousands of years.

Yazd is a desert city with a large variation in temperature between day and night.

During the time I was there it was around mid 20’s during the day and below 5 at night

A windcatcher can work in three ways,

  • pushing airflow downward using direct wind pressure.
  • pulling airflow upwards using a wind-assistance.
  • pulling airflow upwards with a solar-assisted temperature gradient.

Often at the base of the wind tower there is a pool or fountain to help cool the air.

For more information about windcatchers check the article in Wikipedia


Interested in travelling to Iran? . . . . there is more information on my new website www.TravellersHacks.com

Exit mobile version