Concrete Paving – Key Joints

I have previously talked about the importance of Well Designed Concrete Paving so here is a product that will help you achieve that.

It’s  called the Connelly Key Joint

A galvanised steel strip forms a keyway in the vertical face of the joint which means that reinforcement isn’t needed across the joint in footpath slabs.

In driveway slabs dowel bars can be used to provide additional support across the joint.

Installation

The ‘Key Joint’ is fixed installed on the base to form contraction and construction joints, and ensures that  the concrete cracks at the joint in preference to in the middle of the slab.

The concrete is then laid and finished to the top of the ‘Key Joint’.

As the concrete ‘Cures‘, and shrinks, it breaks cleanly away from the ‘Key Joint’ to form a suitable joint surface.

Photographs

(NB as these photos were taken the day before concrete was to be poured so Bar Chairs had not been installed )

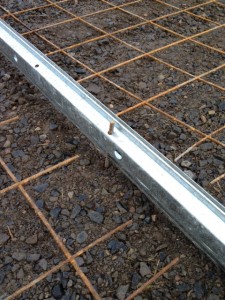
Photo 1 – Contraction Joint

This shows an unreinforced contraction joint which will occur in the middle of the pour to ensure that the concrete will crack at the joint.

You can see that the reinforcement has been stopped approx 40mm from the joint.

The pegs which are driven into the base to hold the ‘Key Joint’ in place can also be seen.


Photo 2 – Construction Joint

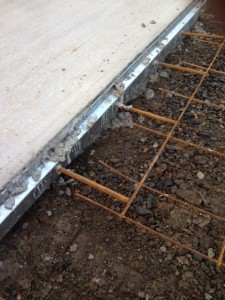
This shows  construction joint with dowels for additional joint support, after placing of the first slab.

Again you can see that the main slab reinforcement has been stopped approx 40mm from the joint.

The dowels are pushed  through ‘Knock Outs’ in the ‘Key Joint’. (N.B the dowel spacing is greater than the mesh spacing)

Although it has not been done in this case I prefer alternate ends of the dowels to be painted with bitumen to reduce the grip of the concrete on the dowel. (This helps reduce the risk of shrinkage crack other than at the joint)

Edge Formwork

The Key Joint can also be used as a permanent form work at the edge of slabs, preferably with the key on the outside.


N.B, I have received any financial benefit for this posting or am in any way connected with the manufacturers or suppliers of this product.


For more posts see Concrete


Reasons to Re-Build

Knock Down and Rebuild, or Renovate?

It may be the only house you can find in the area you like is dilapidated, like this one.

You may already live in the house but it no longer suits your family’s needs.

If the house is un-renovated, and over 40 years old its going to need a lot of effort to incorporate modern features that people now expect.


Renovate

If the existing house has a preservation order, or the area has a heritage  overlay you may have no choice but to renovate.

Some older houses that have a lot of  character  means renovating and extending may be a better way to go. Examples would be some California Bungalows, Victorian Cottages and Federation Homes.

Just remember that you will probably want to include things like:

  • En Suites
  • Walk In Robes
  • Large Island Kitchens
  • Air Conditioning
  • Good Insulation
  • New Electrical Installation

Costs can easily reach $3,000 per sq m as access will be extremely difficult and the renovation often involves reducing the existing house to little more than a shell.


Knock down and Rebuild

If the house has few redeeming features and the existing layout makes it almost impossible to reach a great outcome then maybe your money would be better invested in a Knock Down and Rebuild.

You may find a project home builders can build a new home for $1,500- $2,000 per sq m. Even using a custom builder you may find the cost cheaper than the cost of renovations with fewer compromises.

You really have to spend some time on research before you make a decision.

A Final Thought

A house is about Your Heart, the Block you buy, or own, is about the Location.

Unless I really loved the house with all its foibles I would rebuild.


See Blocks for more posts


Birthday Celebrations!

It’s the anewhouse Blog‘s 4th Birthday!

Over the journey I have

  • Published over 570 posts
  • Sold  over 1,700  of my anewhouse Guides
  • Increased the monthly site visits to 9,000.


To all of you blog followers . . . . . and especially those who have bought a anewhouse Guide……


THANK YOU

It  makes me feel that what I’m doing is worthwhile.

Brian


To find out more information on the blog, and me, see ABOUT

Architect or DIY

A guest post by Adrian Savi

In my over 10 years of experience as an architect, I have seen more and more people thinking about doing an  architect’s, an engineer’s or a trades mans’s work.

It might be a whole house, a house addition, or just changing the bathroom tiles and they are doing it for two main reasons:

  • To get it cheaper; or
  • Because they think “If you want something done you have to do it yourself.”

I am not saying that you can’t do most things, but for a whole house you will need professionals.

For instance you will need a sign off from a registered professional for the following parts of a build.

  • Structural design.
  • Electrical Installation
  • Plumbing

But  you may be thinking “Who is going to do a better job for you than you?”. . .  Am I right?

Before you set off on your project remember that those professionals have had lots of training and experience  so:

  • Do extensive research to see what others have done in your situation.
  • Don’t hesitate to ask for advice. There are plenty of places online where you can  ask for advice so don’t be shy, it doesn’t matter what others may think of your questions.
  • If you are looking to do trade work practice on some part of the job that won’t be too obvious

Thank you for reading and please leave any comments or question.

Good luck with the house

Adrian.

Adrian Savi  is an architect from Romania.   As well as working full-time as a freelance architect for clients in the United States,  Canada,  Australia,  Denmark  and Norway he blogs on design and architecture . The house in the picture is from his Portfolio at www.saviadrian.daportfolio.com

Dangerous Number


I saw this house number a couple of weeks ago.


Wondered what that white backing to the numbers was.


Got a bit closer and the photo below is what I saw


Looks suspiciously like asbestos cement!


Sometimes I think that you people need to provide a certificate of sanity before being allowed to do DIY work!


For more Unusual House Photos, Wins, and Fails, have a look at: What the………………….?


Design – Controlling Costs

When you are planning a custom home costs can quickly run away with the initial budget!

Just watch a few episodes of ‘Grand Designs’ and you will see people with costs out of control!

If you are planning a custom home here are a few thoughts.

Expensive Main Features

  • Overall Size If you buy Bigger Than You Need its not just the house cost, but the extra rooms you need to furnish
  • Lots of Different Shapes – Irregular Floor Plans, Unusual Shaped Rooms , Other Than 90 Degree Corners, Complex Roof Shapes (see Photo), all mean that prefabricated components can’t be used and increase both labour costs and risk of mistakes.
  • Site Slopes – Even with split level houses there will be additional foundation costs and extra area for stairs.
  • Underground Garages – Structures below Ground Level have to be much stronger and consequently are more expensive.
  • Large Open Spans – Extra Engineering Design Costs and more complex structures.
  • Masonry Internal Walls – More expensive than timber frame walled and add to the cost of installing services.
  • Bushfire Protection – The lowest level of Bushfire Risk can add $10,000, build in the Flame Zone and  $100,000 may not be enough.

Expensive Details

  • Ceiling Corners – Square set or shadow line corners look good but are more expensive than traditional cornices.
  • Lighting – Downlights everywhere, especially in lighting bulkheads can add thousands.
  • Expensive Appliances – Some of the kitchens I see have more appliances than a commercial kitchen but are only used for warming up take away food.

What do you think adds to the cost?


All this and much more in the Guide to Choosing a New House


Post Boxes & Security

Do you think the people at this house are away?

Is this overflowing post box telling a thief that they are unlikely to be disturbed?

It used to be easier when I was young as we knew our neighbours and we could ask someone to check the mailbox.

Otherwise we could get a family member to call round every 2-3 days.

These day people seem more mobile and may not live in the same state, or in my case, the same country as relatives.

Working long hours and driving everywhere many people don’t really know their next door neighbour!

Rather than get the cheapest and smallest post box when you move in perhaps you should think about a box Big Enough for several days post (and Junk Mail)


See Letter Boxes and Numbers for more posts


What’s With Spiders


I thought most people didn’t like spiders!


I know a few people who are scared of them!


So why are spiders, and spiders webs such a common motif on the outside of houses, and in gardens?T


These three  examples are only the most recent of many ‘Spiders’ I have seen on and around houses in Melbourne!


For more Unusual House Photos, Wins, and Fails, have a look at: What the………………….?


Sustainability Modifications to a Standard Design

Lots of people say you can’t get a sustainable house from a standard builder . . . . but I disagree!

As an example I have started with this standard floor plan from the ‘MYPAD’ design of HomeStart, Perth first home buyer grant specialist.

Here is how I would look to get most sustainable performance from this layout.

Orientation

The best Orientation will be with the house facing East.

That means the Family Room, Dining Room, and Kitchen will all face North and be able to look out onto a garden.

The Bedrooms, Bathrooms, and Laundry will all face South and act as a ‘Buffer Zone‘.

If your block faces East you will be able to get similar performance by asking the builder to ‘Hand’ the floor plan (build it as a mirror image)

Shading

In order to keep the Summer sun out of the house, while letting the winter sun in, I would look to provide approximately 1m of Shading to the north facing windows.

This could be either by having the house built with eaves or building a pergola after you move in.

Window Locations

Windows that face East, and especially those that face West, can be a real problem as they get too much sun in summer and hardly any in Winter.

The window in Bedroom 3 would be best relocated to the other external wall.

The Family Room window at the end of the house would be better deleted altogether. There will still be plenty of window area and with one less window the layout will actually be more flexible!

Although the Master Bedroom windows will face East the application of a reflective film, after you move in, will prevent the room overheating in summer.

Window Sizes

Both bedroom windows would be best with a sill at least 1m from the floor level. This will give adequate light but the Smaller Window, and more solid wall will result in better thermal performance.

Laundry Door

The Laundry door in this design is a patio door. By changing to a solid wall with window and conventional door you will significantly reduce the heat transfer.

Overall Effect

Making alterations like these to a builder’s standard design allowed me to increase the energy rating of my last home by the equivalent of 1.5 Stars!


See Passive Solar for more Posts


Exit mobile version