Gas Plumbing

Most people who have mains gas available will have gas connections for hot water and central heating automatically provided by the builder.

But what else do you need to think about?
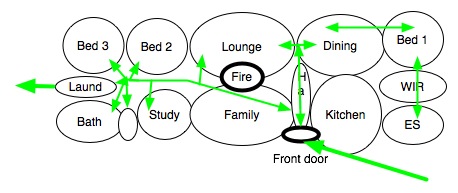
Meter Location

You will need the meter somewhere where it can be read from the front of the house but is not an eyesore.

Sounds simple but our last builders proposed location was behind a proposed gate that would have been an issue when reading the meter.

Oven and Hob

Our oven and gas hob are together so we have a gas line to that point.

Even if you have all electric cooking it may be worth running a blanked off line to that point if you have an eye on selling the house in the future.

Future Gas Fires

A lot of display houses feature gas log fires.

If you like the idea but can’t afford it now it could be worth getting a gas line put in for the future.

Hot water

If you have thought about the issues with long  Hot Water Pipe Runs you may want a different location to the builders standard for your boiler.

You may even prefer two separate instantaneous hot water units which will affect gas lines.

Barby

As previously mentioned in the External Plumbing post its worth considering a mains gas supply to your barbeque if you use it regularly.

What gas plumbing issues concern you?


For similar posts see Plumbing


More plumbing information and 24 pages of Check Lists in the

‘Selection / Pre-Start Guide’


How Much Can You Afford

So you want a new house?

Before you start going around display houses the first thing you need to figure out is how much you can afford. Get this wrong as a couple and it can damage your relationship, and you could finish up with a Ghost House.

Don’t let the marketing convince you to be too ambitious. Its better to get a smaller house and no financial stress than a big house and be struggling for the next ten years. After all its nice to be able to have some money left over after the bills have been paid to enjoy yourself.

The Barefoot Investor talks a lot of sense when he talks about the 20 -10 – 30 Rule. That’s have a 20% deposit, be prepared for a 10% interest rate rise, and don’t have mortgage repayment’s of more than 30% of your wages.

When we started off our approach was that we would borrow no more than I could pay off from my wages while leaving enough for living expenses. We also had mainly second hand furniture.

My wife’s wages went on buying new furniture, home improvements, holidays and luxuries. This meant that if she got pregnant or any other problems occurred we could still keep the house without major stress.

This meant that our first house was a small two bedroom house. Very much at the lower end of the housing ladder, but we were on the ladder, and building up equity for that next step. The running costs of the smaller house were also lower which certainly helped us pay off the mortgage faster before our next house.

Even if you already own a house and are looking to trade up the same financial considerations apply to your next house!

How big was your first House?


Budget has more posts about finding a house the right size for you


Block Orientation

Sponsored by Coral Homes

When looking at block orientation a key issue is using the sun to warm the house in winter and keeping the sun out of the rooms in the summer.

Typical blocks in Australia are rectangular. About twice as long as the block width, as are most home designs. This limits the way you can place the house. In my experience the order of preference of blocks is.

1. Facing East
2. Facing West
3. Facing South
4. Facing North

If you have got a block at an angle it will require a bit more thought unless you can orientate the house in one of the above preferred directions. Larger blocks and square blocks make adjustments to the house orientation easier.

My reasons for the preferences are as follows:

Facing East

This orientation allows one of the long sides to face north making the best use of the sun in a passive solar house. Usually the master bedroom is at the front so even in the summer the low sun morning sun only warms the bedroom from the chill of the night. Windows can be minimised on the west side to stop the house overheating in the afternoon and evening. This orientation also gives you plenty of roof area for the most effective location of solar hot water and solar electricity panels.

Facing West

Again like the east facing block you can have one of the long sides to face north making the best use of the sun in a passive solar house. With a master bedroom at the front you will need to take steps to keep the afternoon sun out of the room to stop overheating. Like the East facing orientation this is useful for solar panels on the roof.

Facing South

With a house facing south the best layout is to have as many rooms as possible having large windows facing north which can be difficult on a narrow block. To make the best of this orientation you may need to have plans drawn up as most standard plans don’t suit this orientation. It’s also best to minimise west facing windows.

Facing North

A north facing house is probably the least desirable on a suburban block as it makes it hard to get the sun into the house. I certainly wouldn’t want big north facing windows allowing passers by to look in.


Lots more information in the anewhouse Guide to Buying a Block for only $4

See similar posts see Choosing a Block and Passive Solar


Starting House Design 1- Bubble Diagram 1

A big mistake in designing a house is to get involved in detail too quickly.

Rough sketches of a floor plan, which you can easily change, are the best way to start. . . . Much better than using a computer drawing tool which can  ‘Lock You In’ and stop you considering different ideas.

  1. Decide what rooms you need and the approximate size of the house (see How Much House?)
  2. Draw some bubble diagrams. . . . These are drawings where each bubble represents a room, or a feature of the house.
  3. Work quickly, while thinking, and discussing, how you want the various rooms to relate to each other.
  4. As you develop the plans try to draw the bubbles to roughly represent the room sizes, but don’t try to be too accurate.
  5. Because the drawings are done quickly you can easily do new ones as your ideas develop.
  6. Don’t throw the old one out though! You might want to go back to a previous idea.

The collection of diagrams will be a demonstration that you have gone through a process of developing a design rather than infringing someone else’s Copyright.

The above illustration is a tidied up version of the initial bubble diagram for our first Australian house. It was based on certain things we wanted in the floor plan. These were:

  • A rectangular plan to keep things simple and economical
  • A passive solar house with the main rooms facing North
  • A wood burning stove in the centre of the house
  • Our bedroom at the opposite end of the house to the children.

Next  I will show how we developed the initial bubble diagram to a refined version which we could then use to develop the final floor plan.


For more Posts about Design see Floor Plans


Starting House Design 2 – Bubble Diagram 2

Once you have a basic bubble diagram you can then start to develop it by:

Drawing Circulation Routes

  • Think about your block how will people approach the front door.
  • What rooms do you want to overlook approaching visitors.
  • Where do visitors enter the house?
  • How do you expect people to move from room to room?
  • How will people move through the house?

Organising Spaces

  • What kind of entrance do you want and how formal you want it.
  • Do you want the kitchen and dining area linked or separate.
  • Do you want a separate WIR and En-suite or walk through one to get to the other.
  • Should the family room and the rumpus room be separated from each other or be next to one another.
  • How much space do you need? . . A lot of people have trouble relating space to a floor plan…..See These Hints to get some help

Use Scenarios

When discussing the plans talk through ‘Use Scenarios’ for example:

  • Cooking a meal while talking to the children.
  • Children doing homework
  • Watching different TV programs in different rooms
  • Family meals
  • Having visitors round for a meal
  • Bringing the shopping home
  • Doing the laundry

This is what  I came up with


Post 3, in this series, will show how this diagram was developed into a final layout


For more Posts about Design see Floor Plans

Mission Control

Although we have a study in our house most of the organising the household, paying our bills, writing letters and using the laptop happens on the kitchen counter. So do we really need the study?

If I was going to build again I would probably look to organise the kitchen area differently and set up a ‘Mission Control’ next to the kitchen bench. This would consist of a filing cabinet, with some shelves on top for:

  • A computer printer.
  • A rack of filing trays for printer paper, and envelopes.
  • A stand for bills to be paid.
  • A cordless phone charger (perhaps with mobile and Skype there is now no need for the cordless phone!)
  • A cup with some pens and pencils.
  • A phone point for the wireless router.

I would also want a drawer near the counter for sticky tape, more pens, blue tack staples, paper clips etc. Next to the filing cabinet would be the shredder which could then be emptied into the kitchen compost bin.

All this would save the cost of having the study and be far more convenient for the everyday paperwork around the house.

The only trouble with this idea is you could be too close to those jars of tempting biscuits! . . . . . (See this link:  Is Modern Kitchen Design Making Us Fat?)

If you had a Mission Control what would you want in it?

For other posts on planning your home see Design


Starting House Design 3

In two other posts (Bubble Diagrams 1 and  Bubble Diagram 2) I have described how you can start a design using bubble diagrams. When you are happy with the bubble diagrams then you can start working on how the floor plan will look.

At this stage use graph paper to make it easy to  draw things up quickly and change things. Don’t get too involved with exact dimensions the nearest 200 or 250mm (or foot if you use imperial measurements) should be fine.

The plan above was based on the bubble diagrams.

The features of this house are:

  • A rectangular plan to keep things simple and economical.
  • A north facing Passive Solar House with bedrooms lounge and dining room on the north side, all having 2m high windows or patio doors.
  • A full length veranda on the North side providing Shading from the Northern Sun
  • A single small West facing window in the laundry.
  • A single narrow East facing window in the bedroom.
  • A wood burning stove in the centre of the house with solid brick chimney for thermal mass.
  • Bathroom, en-suite, toilet, study all forming a Buffer Zone on the south.
  • A car port and fernery  was proposed on the south to provide a protective Microclimate.
  • Our bedroom at the opposite end of the house to the children.
  • Being able to see approaching visitors from the kitchen window.

Once you have got a layout that you can agree on, its time to think about getting it drawn up accurately.

Postscript

Although we loved this house it wasn’t perfect . . . . here are some things we got wrong.

  1. The laundry was too small.
  2. The spa bath was hardly used in the ten years we lived there. . we would have been better off making the bathroom smaller and the laundry bigger.
  3. The connecting door between the family room and the lounge. . . we found the kids would walk in front of us through the lounge in getting from their room to the kitchen!


For similar posts see Drawings and Floor Plans


Types of Solar Panels for Electricity

From some of the adverts you see you would think there is only one sort of solar panels…. in fact there are several alternatives.

The type of panels generally available are:

  • Monocrystalline solar panels The highest cost but the most efficient with a long history of use.
  • Poly-crystalline Similar to mono-crystalline panels, but the silicon used has a different structure which is easier to make and therefore cheaper but less efficient in watts per m2.
  • Thin-film This includes several technologies of which the latest is CIS. These panels are the usually the lowest cost panels but can be twice the area of a Monocrystalline panel for the same output.
  • Hybrids There are also a number of hybrid panels around which combine different technologies to improve all round performance.

Don’t get too confused by the marketing hype and the quoted efficiencies.

Unless you are have limited space to put the panels the best panel is the one that produces power at the smallest price per watt and will continue to do it for the longest time.

An advantage of having larger, but lower efficiency, panels is that more of the roof is shaded by the panels in the summer. This will reduce the heat gain in the roof space, saving on cooling costs.

The only times that efficiency becomes important is when;

  1. You are running the whole house off panels and you need more area for low cost panels than you have got roof area – more for off grid applications.
  2. You only have a small North-facing roof.
  3. The roof is Badly Shaded.

As well as the cost per watt you should also looking for panels from reputable manufacturers that come with a long guarantee (Up to 25 years). Additionally you would be advised to ask for a 5 year installation guarantee. 


What Will It Cost?

When you are setting your budget for a new house, it’s not only the cost of the house and land, but all the other things that you might not have thought about.

If you haven’t considered these you might find that as well as a big mortgage your credit cards are all maxed out.

Here are some of the things you will need to consider based on Melbourne Outer Metro prices (say 35-40 km from CBD) in late 2010.

The costs are based on a small house with the builders basic fit out, say 15 square (140m2):

LAND

Cost of land $150,000 PLUS

Stamp duty say $5,000 PLUS

Legal fees say 2% $3,000


BUILDING

Basic cost of building say $150,000

Building cost are in the range $6,000 to $8,500 a square. Smaller houses have higher costs per square with cost per square reducing as the house gets bigger.

Site Cost say  5%  $7500

Excavation to level the site (See this link: Steeper Sites) and/or additional foundations (See this link: Poor Ground ) and costs can quadruple.

Extras say 5% $6,500 plus

Can includes extra electrical fittings, washing line, garden paths. If you want premium kitchen and bathroom units it could be $50,000 or more. (see this link: Love the Display Home)

Legal fees say 2% $3,000

Fence say $2,000

Light fittings, picture hooks, curtains, blinds and other bits and pieces say $5,000

Garden say $10,000 plus

Additional Furniture say $5,000 plus

Removal say $1,000


TOTAL

Land and House $348,000 plus

Remember even if you get a house and land package for $300,000 you will need to allow for at least another $40,000 before you have finished.

A big cost is the land. This cost will drop as you go further from the city.

When I first bought a house the rule was you could only borrow two and a half times your annual salary! If you were to go back to that rule the only way to go in the future would be to fit houses on smaller blocks.


Just Starting Off . . .  Check out the: anewhouse Guides

For similar posts see Starting Off


Solar Electricity – Is It Worthwhile? (2011)

Since this post was written in 2011 there has been many changes; in subsidies, the cost of systems, and  Power Supplier charges. For the  an updated post see:  Solar Electricity – Is It Worthwhile? (2014)

There is a lot of marketing information around about Grid Connected Solar Panels but not many facts. Here’s how I evaluate a basic system for a house in a Melbourne Suburb.

  • We uses around 16kw hours (kwhr) of electricity per day which is fairly typical;
  • For each 1kw of solar panels we can expect to generate around 1300kw hours per year that’s an average around 3.5 kw hours per day;
  • For the basic 1.5kw system we should generate on average about 5.2kwhrs;
  • Our current tariffs for power is $0.2025 /kwhr regardless of time of day;
  • I Have done the evaluation assuming that any surplus power is sold back at the peak rate. Some states have attractive buy back rates that will improve your financial situation.
  • As part of going solar our tariffs will change to:
    • $0.2625/kwhr peak times (7.00am -11.00pm Monday to Friday, 80 hours per week)
    • $0.1075/kwhr off peak (all times other than peak, 88 hours per week)

How Much Will Be Saved?

As we are out of the house for at least half the peak period the cheaper off peak power should more than offset the more expensive peak power so our average power cost should remain similar to our current tariff.

Weekdays (as we both work and the house is empty during the day) we should be able to put at least 2.5 kwhrs into the grid and use a maximum of 2.7kwhrs running fridges etc)

Income 2.5kwhr @ $0.0.265 = $0.66

Saving 2.7kwhr @ $0.2625 = $0.70

Benefit = ($0.66 + $0.70) x 260 days = $353

Weekends we probably will only put 1kwhr into the grid as we may well be at home using power for TVs, heating and cooling, etc.

Income 1kwhr @ $0.265 = $0.265

Saving 4.2kwhr @ $0.1075= $0.45

Benefit = ($0.265 + $0.45) x 104 days = $74

Total annual benefit is $427

(I believe my calculations have been fairly conservative and the actual benefits could be higher) PLUS For every $0.01 of premium rate buy back you will get another $6.24 per annum.

Is it worth it?

Well there are some 1.5kw systems being advertised now with various rebates which cost less than $3000.

If you had $3000 on term deposit it would now (Jan 2010) be returning 6% that’s $180 a year, which would then be taxed. Alternatively if you put the cost on your mortgage that will mean that you are borrowing $3000 at a rate of around 8%. That’s costing around $240.

From these figures it looks like for the basic system we could be around $187 better off. Even more if you spend less than $3000 or can get a premium buy back rate.

If you are looking to get a system you need to know that there may additional charges for things like:

  • Installation on a tiled roof;
  • Frames on a flat roof to provide the best angle for the panels;
  • Split array over two different sections of roof;
  • Lifting and access if you have a 2 storey houses;
  • and travel charges if you are outside the metropolitan area.

For similar posts see Solar Electricity in the Sustainability Tab


Exit mobile version