Why I Don’t Have Mono-Crystalline Solar Panels


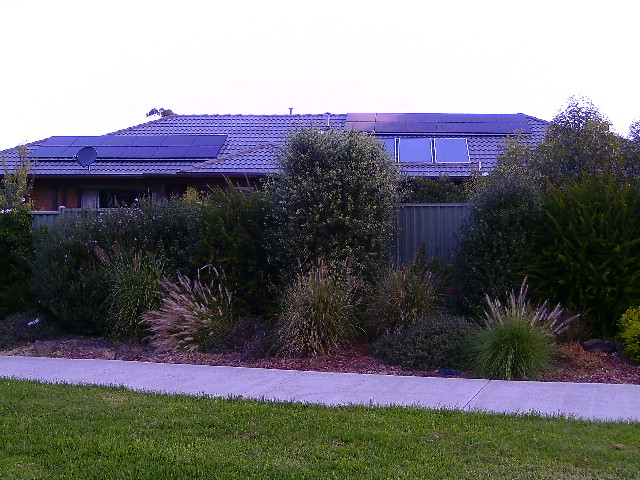
Several people have commented that my panels look different to those on other houses.

Most solar PV installations use Mono-Crystalline panels, because they are smaller for the same power rating.

The panels on my roof are Kaneka Thin Film Panels.

Here are the reasons why:

Efficiency In Real World Temperatures

When you see a panel power rating it is based on laboratory conditions with a panel temperature of 25oC.

In Australia, on your roof, the panel temperature is generally somewhere around double the ambient temperature, thus most panels operate above 25oC most of the time.

Typical crystallines panels lose power @ 0.45% per degree C above 25oC.

Typical thin-film panels lose power @ 0.25% per degree C above 25oC.

This means that on a typical 25oC day with a panel temperature of 50oC

  • A 1000watt mono-crystalline system may be generating 885watts.
  • A 1000watt thin film system is likely to be generating a higher power of 935watts.

On hotter summer days when panel temperature can rise to over 80 degrees the difference will be even greater.

Shading

Thin film panels are bigger than mono-crystalline panels means that more of your roof is shaded by the panels helping to keep the house cooler.

Energy Payback

Thin film panels have much lower embodied energy than mono-crystalline panels meaning that the energy involved in the production is recovered within two years of use.

Better Performance When Partially Shaded

Partial shading effects can be quite significant in overall system efficiency. Thin film panels however are less susceptible to shading.

Cost

In spite of the above advantages for Thin Film panels the cost per installed watt is around the same as Monocrystaline panels.

More independent information about solar panels in Australian conditions can be found at the Desert Knowledge Solar Centre at Alice Springs


For similar posts see Solar Electricity in the Sustainability Tab


Gas Plumbing

Most people who have mains gas available will have gas connections for hot water and central heating automatically provided by the builder.

But what else do you need to think about?

Meter Location

You will need the meter somewhere where it can be read from the front of the house but is not an eyesore.

Sounds simple but our last builders proposed location was behind a proposed gate that would have been an issue when reading the meter.

Oven and Hob

Our oven and gas hob are together so we have a gas line to that point.

Even if you have all electric cooking it may be worth running a blanked off line to that point if you have an eye on selling the house in the future.

Future Gas Fires

A lot of display houses feature gas log fires.

If you like the idea but can’t afford it now it could be worth getting a gas line put in for the future.

Hot water

If you have thought about the issues with long  Hot Water Pipe Runs you may want a different location to the builders standard for your boiler.

You may even prefer two separate instantaneous hot water units which will affect gas lines.

Barby

As previously mentioned in the External Plumbing post its worth considering a mains gas supply to your barbeque if you use it regularly.

What gas plumbing issues concern you?


For similar posts see Plumbing


More plumbing information and 24 pages of Check Lists in the

‘Selection / Pre-Start Guide’


How Much Can You Afford

So you want a new house?

Before you start going around display houses the first thing you need to figure out is how much you can afford. Get this wrong as a couple and it can damage your relationship, and you could finish up with a Ghost House.

Don’t let the marketing convince you to be too ambitious. Its better to get a smaller house and no financial stress than a big house and be struggling for the next ten years. After all its nice to be able to have some money left over after the bills have been paid to enjoy yourself.

The Barefoot Investor talks a lot of sense when he talks about the 20 -10 – 30 Rule. That’s have a 20% deposit, be prepared for a 10% interest rate rise, and don’t have mortgage repayment’s of more than 30% of your wages.

When we started off our approach was that we would borrow no more than I could pay off from my wages while leaving enough for living expenses. We also had mainly second hand furniture.

My wife’s wages went on buying new furniture, home improvements, holidays and luxuries. This meant that if she got pregnant or any other problems occurred we could still keep the house without major stress.

This meant that our first house was a small two bedroom house. Very much at the lower end of the housing ladder, but we were on the ladder, and building up equity for that next step. The running costs of the smaller house were also lower which certainly helped us pay off the mortgage faster before our next house.

Even if you already own a house and are looking to trade up the same financial considerations apply to your next house!

How big was your first House?


Budget has more posts about finding a house the right size for you


Block Orientation

Sponsored by Coral Homes

When looking at block orientation a key issue is using the sun to warm the house in winter and keeping the sun out of the rooms in the summer.

Typical blocks in Australia are rectangular. About twice as long as the block width, as are most home designs. This limits the way you can place the house. In my experience the order of preference of blocks is.

1. Facing East
2. Facing West
3. Facing South
4. Facing North

If you have got a block at an angle it will require a bit more thought unless you can orientate the house in one of the above preferred directions. Larger blocks and square blocks make adjustments to the house orientation easier.

My reasons for the preferences are as follows:

Facing East

This orientation allows one of the long sides to face north making the best use of the sun in a passive solar house. Usually the master bedroom is at the front so even in the summer the low sun morning sun only warms the bedroom from the chill of the night. Windows can be minimised on the west side to stop the house overheating in the afternoon and evening. This orientation also gives you plenty of roof area for the most effective location of solar hot water and solar electricity panels.

Facing West

Again like the east facing block you can have one of the long sides to face north making the best use of the sun in a passive solar house. With a master bedroom at the front you will need to take steps to keep the afternoon sun out of the room to stop overheating. Like the East facing orientation this is useful for solar panels on the roof.

Facing South

With a house facing south the best layout is to have as many rooms as possible having large windows facing north which can be difficult on a narrow block. To make the best of this orientation you may need to have plans drawn up as most standard plans don’t suit this orientation. It’s also best to minimise west facing windows.

Facing North

A north facing house is probably the least desirable on a suburban block as it makes it hard to get the sun into the house. I certainly wouldn’t want big north facing windows allowing passers by to look in.


Lots more information in the anewhouse Guide to Buying a Block for only $4

See similar posts see Choosing a Block and Passive Solar


Starting House Design 1- Bubble Diagram 1

A big mistake in designing a house is to get involved in detail too quickly.

Rough sketches of a floor plan, which you can easily change, are the best way to start. . . . Much better than using a computer drawing tool which can  ‘Lock You In’ and stop you considering different ideas.

  1. Decide what rooms you need and the approximate size of the house (see How Much House?)
  2. Draw some bubble diagrams. . . . These are drawings where each bubble represents a room, or a feature of the house.
  3. Work quickly, while thinking, and discussing, how you want the various rooms to relate to each other.
  4. As you develop the plans try to draw the bubbles to roughly represent the room sizes, but don’t try to be too accurate.
  5. Because the drawings are done quickly you can easily do new ones as your ideas develop.
  6. Don’t throw the old one out though! You might want to go back to a previous idea.

The collection of diagrams will be a demonstration that you have gone through a process of developing a design rather than infringing someone else’s Copyright.

The above illustration is a tidied up version of the initial bubble diagram for our first Australian house. It was based on certain things we wanted in the floor plan. These were:

  • A rectangular plan to keep things simple and economical
  • A passive solar house with the main rooms facing North
  • A wood burning stove in the centre of the house
  • Our bedroom at the opposite end of the house to the children.

Next  I will show how we developed the initial bubble diagram to a refined version which we could then use to develop the final floor plan.


For more Posts about Design see Floor Plans


Starting House Design 2 – Bubble Diagram 2

Once you have a basic bubble diagram you can then start to develop it by:

Drawing Circulation Routes

  • Think about your block how will people approach the front door.
  • What rooms do you want to overlook approaching visitors.
  • Where do visitors enter the house?
  • How do you expect people to move from room to room?
  • How will people move through the house?

Organising Spaces

  • What kind of entrance do you want and how formal you want it.
  • Do you want the kitchen and dining area linked or separate.
  • Do you want a separate WIR and En-suite or walk through one to get to the other.
  • Should the family room and the rumpus room be separated from each other or be next to one another.
  • How much space do you need? . . A lot of people have trouble relating space to a floor plan…..See These Hints to get some help

Use Scenarios

When discussing the plans talk through ‘Use Scenarios’ for example:

  • Cooking a meal while talking to the children.
  • Children doing homework
  • Watching different TV programs in different rooms
  • Family meals
  • Having visitors round for a meal
  • Bringing the shopping home
  • Doing the laundry

This is what  I came up with


Post 3, in this series, will show how this diagram was developed into a final layout


For more Posts about Design see Floor Plans

Mission Control

Although we have a study in our house most of the organising the household, paying our bills, writing letters and using the laptop happens on the kitchen counter. So do we really need the study?

If I was going to build again I would probably look to organise the kitchen area differently and set up a ‘Mission Control’ next to the kitchen bench. This would consist of a filing cabinet, with some shelves on top for:

  • A computer printer.
  • A rack of filing trays for printer paper, and envelopes.
  • A stand for bills to be paid.
  • A cordless phone charger (perhaps with mobile and Skype there is now no need for the cordless phone!)
  • A cup with some pens and pencils.
  • A phone point for the wireless router.

I would also want a drawer near the counter for sticky tape, more pens, blue tack staples, paper clips etc. Next to the filing cabinet would be the shredder which could then be emptied into the kitchen compost bin.

All this would save the cost of having the study and be far more convenient for the everyday paperwork around the house.

The only trouble with this idea is you could be too close to those jars of tempting biscuits! . . . . . (See this link:  Is Modern Kitchen Design Making Us Fat?)

If you had a Mission Control what would you want in it?

For other posts on planning your home see Design


Exit mobile version