Construction Locks

Have you ever thought about who has keys for the locks on the doors of your new house?

After all there are lot’s of tradies working on the house after ‘Lock Up’ stage.

Well these days most builders use Construction Locks, sometimes called Project, locks. These are a special type of lock which comes with two types of key:

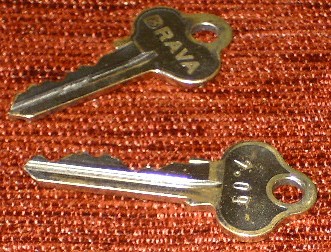
The Construction Keys

Standard pattern ‘master’ keys which are given to all the tradies, who can with a single key enter any of the builders houses under construction
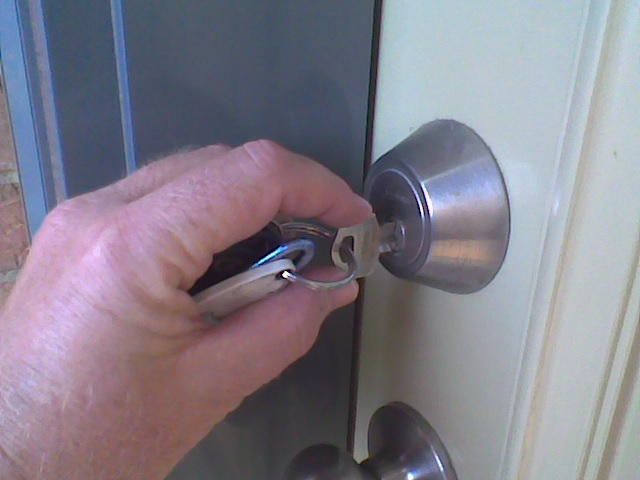
The Final Key 

These are the keys which is given to you at handover. Once you use this key it displaces some ball bearings in the lock which should mean the Construction key will no longer work.

Some of the things you should know about Construction Locks are:

  • Before the end of the handover you should make sure you use the Final Key in every door lock in the house. check each lock with all the keys you are given. This will ensure that:
  • Every lock will be changed to only open with the final key. (It’s worth borrowing the site supervisors key to make sure his key no longer works)
  • All the locks, and keys work properly.
  • The  locks the builder uses are unlikely to be expensive/high quality.
  • Although the construction key won’t work there will be a limited number of final key combinations for this type of lock. If you want in increased level of security it could be worth getting a locksmith to re-key the locks as soon as possible. The cost is going to be around $60-80/lock plus a call out fee.

Would you go for better locks?


The Settling In Section contains lots of advice on what to do after

you have moved in your new house


Removing Labels

Just moved in, and all the new appliances have those stickers on them.

Not just appliances but some of the plumbing fittings.

Water Rating, Energy Rating, and even more.

So how do you remove them without damaging the paint, or breaking your nails?

Well I use a plastic card, in this case an old gift card.

With the edge you can just scrape the label off.

The card will remove the label and most of the glue.

A wipe with a rag dipped in methylated spirits should remove the final glue traces.


Check this link for more uses of Old Plastic Cards.


Removal Boxes

Some people have enough money when they move to pay for someone to do the removals including packing up all the stuff.

Most times when I have moved (18 times) I have spent a lot of money on the house and want to save cash for the garden so I have moved myself.

Even when I have had professional movers I have packed boxes to save costs.

That means that I need plenty of boxes,……………………………. so how many boxes? what size? and where do you get them?

Well there is only two of us and our last move was to downsize to a two bedroom place.

We still needed over 30 boxes, plus we had a lot of bedding already in big plastic boxes.

Say 40 boxes in total. If you have got children with lots of toys you could easily be needing 60 -70 boxes.

If you are going to be filling boxes with books or tighly packed crockery about the maximum size I would recommend due to the weight would be about 30 litres .

Any larger and the box will get too heavy to lift safely ( the last thing you want during the move is to injure your back).

Bigger boxes are fine for moving lightweight items such as clothing, bedding, and towels.

You can see if you can get boxes from the supermarket or the DIY superstore but the problems are:

  • You will finish up with boxes in a range of sizes that makes them hard to stack.
  • A lot of boxes are also fairly lightweight as they are only made for single use of products that exactly fit them. This means they offer limited protection for your valuable china and can easily rip.

To avoid these problems we bought our boxes from one of those self storage places.

Buying in quantities of ten or more usually means a discount so 10 heavy duty 40 litre boxes cost us $29.

We could have saved around about $0.30 a box by getting thinner card but we preferred the extra protection and easier stacking of the thicker card.

After the move most companies will buy back the used boxes for around $1 each.

You can also get

  • Wardrobe cartons that come with a hanging rail
  • Boxes for large paintings that may also be OK for your flat screen TV
  • Boxes with partitions for bottles and vases
  • Packing materials such as Bubble Wrap and Butchers Paper. . . . . much cleaner than old newspapers.


Don’t forget a couple of rolls of packing tape to seal the boxes top and bottom!


Electrical Planning – Outside

A lot of people forget all about outside electrical work. . .  but it can make a big difference to how much easier it makes things.

I have listed some of the electrical things you might like to think about.

Weatherproof Lights

    1. Light at the front door. ( A good security feature Time switch control is best)
    2. Light to illuminate the driveway. (Sensor or time switch)
    3. Light at the back door.
    4. Lights on the deck/alfresco dining/patio/barby/pool deck/garden
    5. Light for the washing line.

For lights at the side and round the back of the house I generally find bunker fittings work well. They are inexpensive, not as harsh as floodlights, and can be fitted with a low energy bulb.

Weatherproof Outlets

    1. Back door (double socket)
    2. Deck/al-fresco dining/patio/barby/area (at least one double socket)
    3. Driveway (single socket or have a convenient double at the front of the garage)
    4. Pressure pump for water tank (single switched outlet should be OK)
    5. For Low Voltage Garden lights (double socket in a weatherproof box which can also house the transformers)
    6. Shed or separate garage.
    7. Underneath the front eaves. (Only if you are going to want to put up Christmas Lights, one double at least)

Other

    • Door Bell/ Security system
    • 15 Amp socket for spa/pool
    • 15 Amp switched Outlet(s) for future split system air conditioning outdoor unit.
    • 15 Amp switched Outlet(s) for Heat Pump
    • Conduits under driveway/ paths for future garden lights, and fountains.
    • TV aerial point in the Alfresco dining area for a grand final or Melbourne Cup Barby.

What’s the best outside electrical fitting in your house?


For similar posts see Electrical

More Electrical Planning including 24 pages of Check Lists in the ‘Selection / Pre-Start Guide’


Anti Perch

Birds perching onthe top of balustrades and guardrails can be a real nuisance.

At the very least you can get bird poop all over the place.

If there are parrots around I have known them to start chewing the wood.

Some of the solutions such as plastic spikes or non drying slimy paint aren’t always sutable solutions.

When I saw this solution at a house I visited I had to share it on this blog.

Basically 4 lengths of fishing line are stretched between staples driven into the uprights to provide an almost invisible but effective barrier to any birds wanting to perch on the rails.

For short distances between uprights you won’t need intermediate supports.

For longer lengths this simple support of two galvanised brackets seems to work well.

Wheelbarrows

Unless you have enough money to pay someone to do the gardening I would recommend that you think about buying a wheel barrow.

You will have top soil, compost and plants to move. You might even be moving concrete if you want to build some paths.

Its certainly worth spending a bit of money and buying a good one. Probably the best barrow in my opinion is a builders barrow with a large heavy duty plastic tub like this and solid tyres:

I have had this barrow for about 20 years now and its been used at three houses for:

    • Barrowing large amounts of concrete for paths and patios.
    • Mixing small quantities of concrete to avoid staining paths.
    • Moving huge amounts of topsoil.
    • Spreading mulch.
    • Moving tonnes of gravel and pavers for paths.

In spite of being stored outside for most of the time the tub is still watertight and the barrow is always ready for use.

The advantages of the plastic tub over steel are:

    • No rust problems.
    • Lighter
    • Because of the flexibility of the tub concrete that has set in the barrow can be loosened by tapping with a hammer.

A few hints when using a barrow are:

    1. If you are pushing a heavy barrow over rough ground put a couple of planks down.
    2. If you are moving concrete don’t overfill the barrow.
    3. Keep the load as much as possible over the wheel.
    4. If the site is really muddy wrap the tyres in duct tape so bits of mud don’t get stuck in the tread and then fall out on your clean paths.


The Settling In Section contains lots of advice on what

to do after you have moved in your new house


Pools – Don’t Forget The Extras

Just because a pool supplier gives you a price for a pool doesn’t mean that will be the final cost.

I have heard than an extra $20,000 – $30,000 is not unusual.

Here how the extra costs can mount up for a small pool:

  • Plans and approvals $2,000 plus . . . more if there is a sewer easement close to the pool.
  • Rock excavation $100 plus  per cubic metre
  • Carting dirt off site 30-40 per cubic metre
  • Fencing $5,000 plus
  • New Electrical circuit $1,000 plus
  • Cover $500
  • Landscaping and paving $8,000 plus


Liquid Limestone

You might have heard of Liquid Limestone as an alternative paving material…….But what is it?

Really its just a different type of concrete.

It is much more common in West Australia than other states.

The differences between conventional concrete and Liquid Limestone are:

  • Instead of standard Portland ‘Grey’ Cement it uses White Cement.
  • It uses crushed limestone rather than other types of rock gravel and sand.
  • Quite often a plasticiser is added. This means the mixture can be poured without having to add too much water.

Various patterns can be applied to the surface as the concrete sets. (see above photo)

As well as the standard limestone appearance the supplier can add various pigments. If you want a strong colour I think you would be better off  just going for coloured concrete.

Because it can be laid in large slabs like concrete there are less joints than in conventional brick or concrete slab paving. (There will still need to be some joints. For joint spacing see: Concrete Joints 1)

With the lighter colour it can be cooler underfoot than other pavements.

To maintain its appearance liquid limestone will need to be sealed around a week after laying.

Thanks to Concept Concrete WA. for these two great examples of  Liquid Limestone Paving

For  posts on on getting your paths and driveways correct see Concreting


Nail Pops

‘Nail Pops’ are those irritating little bumps that can occur on your flat walls and ceilings after you have moved in.

Why Nail Pops Occur

Basically either the nail moves and the plasterboard doesn’t, or the plasterboard moves and the nail doesn’t.

There are a few reasons why pops occurs Including:

  • Movement of the wall frame.
  • Flexing of the plasterboard (particularly near junctions between walls and ceilings and wall corners)
  • Damage to the plasterboard when the nail was hammered in.
  • Too much adhesive when the plasterboard was installed. (As the adhesive cures it shrinks pulling the board towards the frame.

But what about the Builders 25 year Warranty?

As you will see in the above link it only covers the first 3 months

What You Can Do

If it is a single nail pop it can be easiest to remove the nail and fill the hole.

If there is a number of nail pops I would install plasterboard screws at least 50mm from the existing nails, then use a punch to knock the nail heads through the plasterboard, Unfortunately it does mean that you are going to do more filling, on top of the screws and also the nail holes.


Emergency Planning – What Is Important To You?

Bush Fire Season is with us again . . . . so if you live in an area that is at risk its time to think about what would you do if a fire came through.

What would be the things would break your heart to lose?

  • Old Family photographs.
  • Mementos of your children’s early years.
  • Expensive paintings or artworks.
  • Important documents.
  • Jewelry from your partner.
  • The clothes you wore at a significant event.

After every bushfire the news programs show shots of people searching through piles of ash.

Why not think about protecting these keepsakes now.

Option 1 – Using a fire resistant safe

If you are going this route it might cost more than you expect.

You might need a large safe which is not only fireproof but water proof too.

You also need to check the fire rating. . . . the cheapest one at Bunnings may only give a short protection period at a low fire temperature.

Option 2 – Being ready to go

Have a box ready to go, preferably already in the car . . . it’s no good it being next to the door, if you aren’t home when the fire starts!

Option 3 – Off site storage

You could store the valuables with a family member or even in those self storage places.

For a suitcase, or similar sized box self storage costs are quite reasonable.


Perhaps the best solution is a combination of two or more of the options.

Exit mobile version