Energy Through The Windows

Ever wondered how much actual benefit you get from the sun shining in?

How The Sun’s Energy Warms Your Home.

Basically when the suns energy (which includes both visible and invisible energy such as Infra Red and Ultra Violet [UV] radiation) hits your window three things happen to the energy:

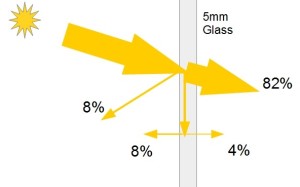
  • Reflection – Plain glass will reflect around 8% of the total energy.
  • Absorption – 5mm plain glass (the minimum thickness for most domestic windows) will absorb around 12% of the total energy. (Typically around 1/3rd of the energy that is initially absorbed is re-radiated to the inside of your house)
  • Transmission –  The remaining energy, 82% of total energy for 5mm glass will be transmitted into your home.This is known as the RAT Equation

    Solar Heat Gain Co-Efficient (SHGC)

    Rather than have to keep working through the RAT Equation the glass industry has come up with a Solar Heat Gain Co-Efficient which makes calculations easier.

    Values of the SHGC range from 0.82 (5mm float glass) to around 0.15 (double glazing with reflective coatings.

    There is more information including SHGC values for a wide range of glazing types at www.nationalglass.com.au

    To find the amount of energy coming in through a North facing window you multiply the radiation from the sun by the SHGC.

    Winter Example Calculation

    For a sunny winters day in Melbourne that the average angle of the sun on the window will be around 20 degrees, so around 800 watts of energy will be  falling on each square metre of glass.

    The Solar Heat Gain = 8oo watts/m2  x  SHGC 0.82  =  652 watts/m2

    Assuming that on that sunny winters day the outside temperature is 10 degrees and the internal temperature is 22

    Heat loss through the window = 12 degrees x ‘u’ value of 5.8 = 70 watts/m2

    Net heating benefit of the window =  652 – 70 =  582 watts / m2.

    Summer Evening Example

    For a summer evening in Melbourne  the average angle of the sun on a window facing the sun will be around 10 degrees, so around 900 watts of energy will be  falling on each square metre of glass.

    The Solar Heat Gain = 900 watts/m2  x  SHGC 0.82  =  738 watts/m2

    Assuming that on that summer evening the outside temperature is 35 degrees and the internal temperature, with air conditioning, is 22

    Heat gain through the window = 13 degrees x ‘u’ value of 5.8 = 75 watts/m2

    Net heating gain of the window =  738 + 75 =  813 watts / m2. (no wonder the air conditioning is working hard!)

For more see Sustainability


Garage Door Insulation

Most garages are too hot in Summer and too cold in Winter.

If you want to use the garage as a workshop . . or even a man cave, it will be much more comfortable if its insulated.

Maintaining a comfortable temperature in the garage also means  it makes a better Buffer Zone for the rest of the house

For most garages that are built as part of the house  it is relatively easy to put some insulation batts in the roof, but that still leaves the garage door!

Here is  how I insulated the garage door on the last house I built, in an afternoon.

DIY Garage Door Insulation

  1. Measure the door width and the height of the steel ‘C’ sections that make up the door. You will need enough Foil Board to fill all the sections. Foil Board can normally be ordered at your Big Box DIY store.
  2. When you pick up your Foil Board buy 3-4 cans of expanding construction foam.
  3. Cut the Foil Board into strips that are wider than the opening in the ‘C Section’ but can still be inserted into the section and drill holes in the foil board approx 1m apart. (Putting some masking tape around the holes will make cleaning up easier)
  4. Place the sections in the ‘C Sections’, foil facing outwards and hold them in place against the edges (I used duct tape.)
  5. Following the instruction on the cans of foam insert the nozzle through the holes and start to fill behind the foil board until foam comes back out of the holes.
  6. WARNING. Make sure you keep the foam away from any moving parts.
  7. Leave the garage door shut for a few hours to allow the foam to cure and then clean up and remove the duct tape.
  8. Even though the Foil board and Foam is light the door will now weigh several kgs more. This shouldn’t be an issue if you have an electric opener but with manual opening you will probably need to get the lifting spring reset. As this spring is under a lot of tension this is not a DIY job!

After doing this job I found the garage was much more comfortable . . . and the beer fridge didn’t have to work as hard!


For more posts see Insulation


Tank House – Win!

For all you water collecting enthusiasts can you beat this home?

Two sides of the house are lined with plastic rainwater tanks!

Not surprisingly its called the ‘Tank House’ and is located in Port Melbourne.

Although there are a considerable number of tanks that are plumbed for water storage there are some ‘dummy tanks!

The Photo on the left shows the kitchen window and the one on the right shows the ‘Gate’ complete with letter box.

You should also be able to see some tanks with the tops cut off used as planters around the roof top area.


For more Unusual House Photos, Wins, and Fails, have a look at: What the………………….?


Energy From Sun.

Have you ever wondered why it gets so HOT in the roof space on a sunny day?

Well there is a lot of Energy coming from the Sun . . . .approximately 1.37 kw /mshines on the Earth

By the time the solar energy gets through the atmosphere to the ground it’s about 1kw/m2  for a flat surface square on to the Sun.

Even in Melbourne on an average day the typical 200m2 house will get around 8ookw hours of heat radiation onto the roof.  In January it can be almost twice as much!

Some interesting Solar Exposure Maps, like this one, are available on the Bureau of Meteorology website at this link: Solar Exposure, if you want to check the solar radiation for your location.

This shows the solar energy received in Mega Joules (MJ) on a horizontal surface. (to convert MJ to kwh multiply by 0.28).

The maps are based on measured values so they includes things like times of cloud cover.

If you follow the above link you will be able to find a map of values for each month.


See Sustainability for more posts.


Sustainability Modifications to a Standard Design

Lots of people say you can’t get a sustainable house from a standard builder . . . . but I disagree!

As an example I have started with this standard floor plan from the ‘MYPAD’ design of HomeStart, Perth first home buyer grant specialist.

Here is how I would look to get most sustainable performance from this layout.

Orientation

The best Orientation will be with the house facing East.

That means the Family Room, Dining Room, and Kitchen will all face North and be able to look out onto a garden.

The Bedrooms, Bathrooms, and Laundry will all face South and act as a ‘Buffer Zone‘.

If your block faces East you will be able to get similar performance by asking the builder to ‘Hand’ the floor plan (build it as a mirror image)

Shading

In order to keep the Summer sun out of the house, while letting the winter sun in, I would look to provide approximately 1m of Shading to the north facing windows.

This could be either by having the house built with eaves or building a pergola after you move in.

Window Locations

Windows that face East, and especially those that face West, can be a real problem as they get too much sun in summer and hardly any in Winter.

The window in Bedroom 3 would be best relocated to the other external wall.

The Family Room window at the end of the house would be better deleted altogether. There will still be plenty of window area and with one less window the layout will actually be more flexible!

Although the Master Bedroom windows will face East the application of a reflective film, after you move in, will prevent the room overheating in summer.

Window Sizes

Both bedroom windows would be best with a sill at least 1m from the floor level. This will give adequate light but the Smaller Window, and more solid wall will result in better thermal performance.

Laundry Door

The Laundry door in this design is a patio door. By changing to a solid wall with window and conventional door you will significantly reduce the heat transfer.

Overall Effect

Making alterations like these to a builder’s standard design allowed me to increase the energy rating of my last home by the equivalent of 1.5 Stars!


See Passive Solar for more Posts


Light Bulb Comparison

In a previous post on Lighting Levels I talked about using lumens to plan lighting. . . . . but which type of bulb should you use?

There are now 3 types of bulbs in common use

  • Halogen (A more efficient version of the old incandescent light bulbs)
  • Compact Fluorescent Lamp (CFL)
  • Light Emitting Diode (LED)

Light Output

Typical values of light output are:

  • Halogen – 15 Lumens/watt of power
  • CFL – 54 Lumens/watt of power
  • LED – 90 lumens/watt of power

Actual values will vary from manufacturer and also depending on the  colour temperature of the light.

From the above figure it can be seen that a LED provides a significant power saving, even compared with a CFL.

Initial Cost

For an output of around 450 lumens enough for something like a desk lamp you can expect to pay:

  • Halogen – $3
  • CFL – $6
  • LED – $20

Bulb Life

  • Halogen – 2,500 hours
  • CFL – 10,000 hours
  • LED – 50,000 hours

The long life of LEDs meant that though the initial cost of $20 seems expensive over the life of the bulb you would have needed 5 CFL bulbs ($30) or 20 Halogen bulbs ($60)

Other Issues

CFL lamps do contain a small amount of the toxic element mercury, and do take several seconds to Warm up to full brightness.

Both halogen and CFL lamps tend to have limited durability if subject to vibration or rough handling.

A dimmable LED is around 40% more expensive than a basic LED.


For more posts see Electrical or Light Fittings


Solar is Winning

Electricity demand has dropped so much that Australia currently has at least 3 major coal fired power stations more than it needs! (This year the surplus capacity at peak demand is estimated to be around 8,000 megawatts)

In early July this year there was actually zero demand for power station generation in Queensland, mainly due to an estimated power output of 600 megawatts from rooftop solar.

A report by the Australian Energy Market Operator have warned that the electricity generation market is close to breaking point.

Electricity demand, which has been dropping since 2009, will continue to drop for at least the next three years. The closure of major industries such as aluminium smelting and car manufacture is only likely to further decrease demand.

Why Aren’t Power Prices Dropping?

In most ‘Free’ markets when demand drops so do prices.

While demand has been over the past few years electricity prices have doubled . . . . and don’t think that’s mainly the Carbon Tax!

Over 51% of your bill is for Network costs (Federal Treasury Estimates)

When the Goverments’ privatised electricity they allowed the Power Companies to recoup their investment in network upgrades by increasing their charges.

The networks have spent over $45,000,000,000 in the last five years to meet an ‘Increasing Demand’ which we are all now paying for in our bills.

The ‘Joke’ in all this is by increasing their prices the electricity companies have made their ‘Main Competion’, Roof Top Solar, more attractive!

What Now

So after 5 years of getting everything wrong are the power companies interested in doing the right thing? . . . . Like investing in generating power from renewable resources that work when the sun isn’t shining?

No they are lobbying the government to wind back the renewable energy target!

It’s no wonder that some people with solar panels are talking about disconnecting from the grid!

For more informaton click on this link from the ABC: The Price of Power


Sisalation or Sarking

Sarking is the sheet material which can be put over the roof trusses before the final roof covering is installed.

It’s normally standard on a metal roof as it prevents condensation on the underside of a roof from dropping onto the ceiling below.

In the case of a tiled roof it helps with weatherproofing and keeps dust out of the roof space.

In bushfire zones it is mandatory for a tiled roof to have sarking.

The reflective sarking (installed reflective side facing down) does help in reducing summer heat being radiated into the roof space and can help to keep the house warmer in winter. (See Reflective Finishes for more information)

In addition to plain sarking you can get an insulation blanket with sarking attached. This offering some sound insulation, for rainfall, and extra thermal insulation.


See Insulation for more posts


Solar Power – No North Facing Roof

Conventional wisdom has been that you needed a North facing roof to mount your solar panels . . . . . . but it might be time to re-think!

Cost of Panels

In the early 1990 when people first really started looking at solar power for the home the cost of  pv panel alone was in the order of $7-8/watt and installation efficiency was very important.

Now with panels costing less than $1/watt, installed, adding a few extra panels isn’t as big an issue as it used to be.

Efficiency

The efficiency drop  off from moving away from a North facing roof is not as much as you might think.

For instance panels on a roof facing either East or West can still produce more than 80% of the power of a North facing panel. (see Solar Alignment for more information)

More Effective Spread Of Power

A few years ago we were paid for every watt we put into the grid, at more than it cost to buy a watt from the grid. This meant that systems that produced lots of power when we weren’t using that power (typically around noon) had real advantages.

For new systems you are now typically paid less for every watt you produce than a watt costs to buy. It therefore makes sense to be generating power when you need it across the whole day so you use as much of the solar power yourself.

A couple of options are:

  1. Split the panels evenly between say Westerly and Easterly facing it you are looking for an even spread of power across the day.
  2. Concentrate on westerly facing if your main power use is in the afternoon and evening.

A Few Final Points

  • Although this post has been mainly written for grid based systems there will be some benefits for more even power generation for stand alone systems, as it could reduce the battery discharge cycles,
  • In the past, to maximise efficiency, systems were built with mechanical trackers to follow the sun. With the current low cost of panels I don’t think trackers can be justified due to cost and increased complexity.

Also see West Facing Solar Hot Water

Build A Sustainable House & Save Money

When the stricter energy standards came in the big builders all complained that it would make houses more expensive.

Well a recent CSIRO report ‘The Evaluation of the 5-Star Energy Efficiency Standard for Residential Buildings‘ has found it can actually be cheaper to build a sustainable house.

Here are three reasons why a more sustainable house can be cheaper to build:

  • Smaller Windows Plain brick walls are more energy efficient than single glazed, or even double glazed windows. The plain brick will be about a third the cost of double glazing. (See this link: Smaller Windows for more information)
  • Shape A more rectangular shape is simpler and cheaper to build and can have 10-15% less wall area for a given floor area. See how the walls and floor areas change for variations on a basic house shape in the sketch below:


  • Right Sizing Builders try to sell you the biggest house they can and you often find there are rooms that you will hardly use. With Project Builder cost/sqm ranging from $1,100 – $1,600 saving one room can drop the cost by $10,000 – $15,000. See How Much House to plan how much space you need

Don’t forget that the sustainable house will also be saving you thousands of dollars every year!

Exit mobile version