After The Deposit

If you decide that you want a house built by a builder you will normally be given a budget price and asked to pay a deposit.

What happens next?

These are the steps that follow in progressing to a full contract:

1. Survey

A survey of your site need to be completed if one hasn’t already been done.

This will allow the builder to work out if there is any additional excavation, or fill required over the standard allowance.

2. Soil Test

A Soil test needs to be done.

From this the builder will work out if there is change in foundation requirements, over the standard allowance.

3. Initial Meetings With Builder

This has two parts

Initial Contractual Discussions

      • Being informed of the cost implications of the survey and soil investigation
      • Making any changes to layout and elevations
      • Agree the position on the Block.

Selection  (sometimes called Gallery.)

Items selected typically include:

          • Bricks
          • Roof tiles
          • Heating and cooling
          • Electrical fit out
          • Floor tiles
          • Wall tiles
          • Kitchen units
          • Oven and hob
          • Bathroom and toilet fittings
          • Paint colours.

NB. Sometimes Builders do this meeting after Signing of Contract when it is normally called Pre-start

Much more information is included in my  Selection Guide 

4. Finalisation meeting with Builder

This will be to sign the Contract Documents.

Before the meeting:

        • All the details should be confirmed together with the final price.
        • The council approvals should have been obtained.

You need to make sure that all the changes you want are included both in the words of the specification and in the drawings. My advice would be to ask for the contract documents a few days before the meeting so you have plenty of time to check them.


You then have to wait until the builder is ready to start Construction which hopefully won’t be too long.
 

For similar posts see Selection and Contract Documentation

Brickwork – Mortar Joints

During your Selection or Pre-Start meeting It isn’t just Picking a Brick. You also have to pick a mortar colour and a type of mortar joint.

Mortar Colour

If you have been to a Brick Display Centre check what colour mortar they use in the test wall of the brick you like. This will probably be the best colour for your house.

Joint Types

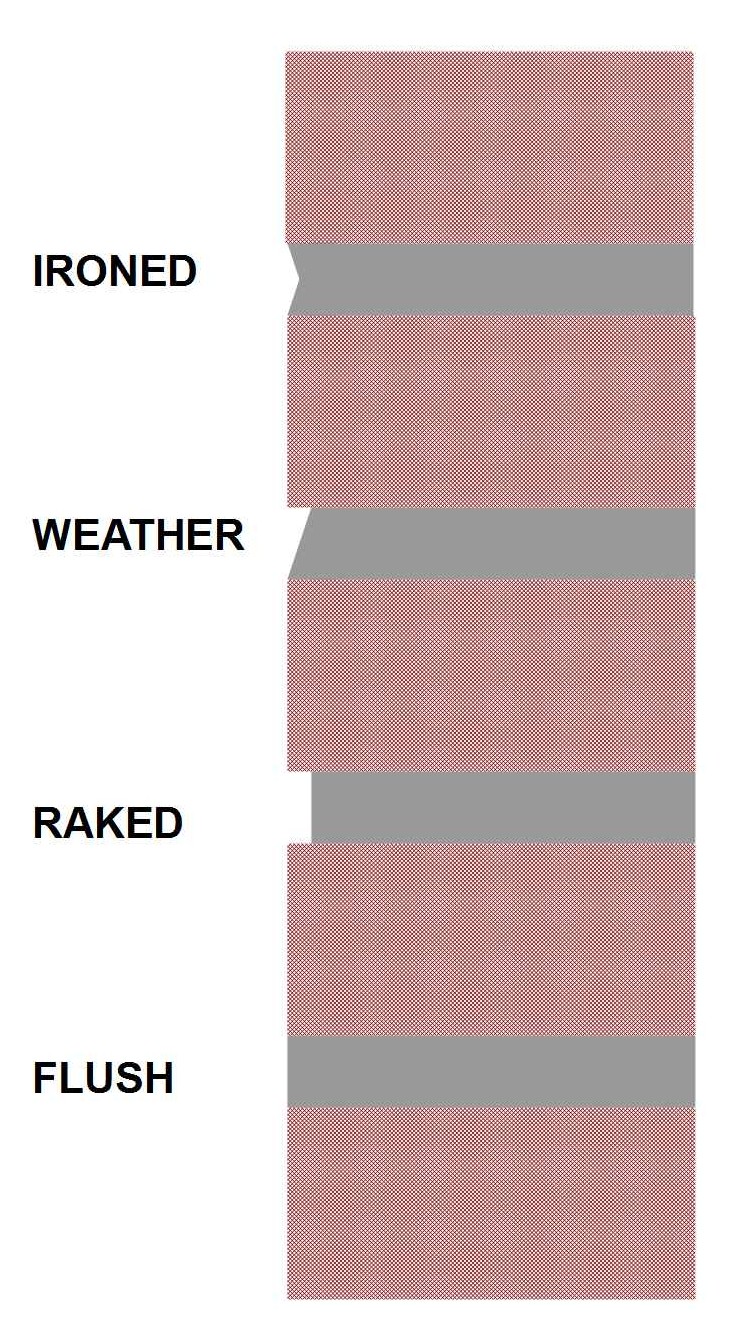
Below are the more common types of brick joints:

  • The ‘Ironed’ or ‘Rounded’ joint is quite common and helps to keep the water out of the brickwork
  • The ‘Weather’ joint, which is not so common in Australia, also helps to keep the wall dry.
  • The ‘Raked’ joint does give an interesting texture to the wall, but is the least moisture resistant joint. Best choice for beveled edge, or tumbled, bricks. It is unsuitable for bricks that only have a surface coating on the sides as the body colour will be exposed at the joints.   Because the mortar is almost always in shade it will look darker than you expect.
  • A flush joint is reasonable weather resistant but can look uneven. It is unsuitable for rustic or rounded edged bricks. Another issue is it is more likely to result in staining of the brick face.

My E book Guide to Selection/Pre-Start includes lots more information and checklists to help you choose the details that will make your new house a home.


Internal Doors

Most internal doors these days are of lightweight composite construction. Basically a light timber framework with two hardboard ‘skins’ and a cardboard honeycomb filler.

Not the best thing is you have got teenagers who love slamming doors !

These type of doors are really inexpensive……………..

I recently replaced a damaged door and the door cost less than $50 and came primed, complete with hinge plates. and with a latch already fitted.(Many builders now buy door frames with hinge plates already fitted and the doors are installed by just pushing a hinge pin into place.)

The question for you when specifying your new house is:

“Although the standard internal door is cheap is it the best door for me?”

Appearance

Here are a just 3 of a wide range of doors available at my local DIY store.

A couple of low additional cost alternatives to the basic painted door that I believe are worth thinking about are:

  • A veneer face, typically maple.
  • A formed panel skin.

Strength
Getting a stronger internal door such as a solid door can have the following advantages.

  • Lower noise transmission…………good for home theaters and to isolate the laundry noise.
  • Fire Safety……….good for kitchen doors and internal doors to the garage.
  • Storage……….easier to install hooks on.

Just remember though that if you want a particular look you can get it, but the cost could be $300 or more per door which can add up if you upgrade every door in your new house.

What type of internal doors do you like ?


Want all the information about Pre-Start/ Selection, with handy printable checklists?…….  Why not buy my E-book ‘Guide to Selection’ for just $4


Pre-Start (Selection) Meeting

Some builders call it Selection, some call it Pre-Start, if you are having a custom built new house it will be Detailed Design.

Whatever it’s called this is the stage of the pre-construction planning when the basic floor plan and the structure have been settled.

Its now time to move on to all the details that finish the home off.

Spending some time thinking about the details can make a real difference to how you will feel about the new house you have built.

Cost

A word of warning, its easy to get carried away and add tens of thousands of dollars to the price of your new house so do some research and think about how you intend to use your house. (I have seen some houses with built in European Ovens costing thousands of dollars that hardly get used)

Choices

Some of the things you need to be thinking about at this stage are:

  • Roof and Walls – If you haven’t already chosen them you will need to select bricks and roof materials.
  • Electrical Planning – Have you got enough power sockets, are the light switches in the right place.
  • Kitchen Benchtops and Cupboards – The kitchen is the most expensive room in the house and the most used.
  • Plumbing – After Kitchens the next most expensive room. An expensive toilet can be ten times the cost of an acceptable builders standard toilet, so its worth thinking about costs not just the look.
  • Tiles and Splashbacks – A tile from the builders range won’t add much but choose hand made tiles and expensive glass splashbacks and the costs can rocket.
  • Floor Covering – There is a wide range of choice, or you could wait until the house is yours!
  • Doors – First impressions count so make sure your front door looks good.


Want all the relevant information from this blog and more in one place, with handy printable checklists?…….  Why not buy my E-book ‘Guide to Pre-Start / Selection’ for only $4


New E Book – GUIDE to PRE-START / SELECTION

Once you have paid the deposit on your new house the next big step is the Pre Start or Selection Meeting. (some builders call it the ‘Gallery Meeting’, if you are having a custom built house it may be called ‘Detailed Design’)

This is normally the day when you sit down with your builder and select all the details that turn an empty house into a home.

There is lots to think about on the day……………..and its difficult and expensive to change things later.

The builder will be trying to up-sell you expensive upgrades and all you want is another opinion!

To help prepare for this big day I have brought out the :

98 pages of advice and opinions including:

Electrical planning;

Plumbing;

Painting;

Heating and Cooling;

And much more with 24 PAGES of CHECK LISTS

And only $4.


For more information CLICK HERE


Another E Book from the author of the ‘Guide to Pre Completion Inspections’ 


Exit mobile version