All new house building contracts will have a section for Provisional Sums.
These are used for work that MAY be required, but the builder can’t provide an accurate estimate at the time of signing of the Contract.
The main area for provisional sums is related to foundations where the limited information obtained during the Site Investigation may not truly represent the conditions found over the whole foundation.
A coule of examples are:
A rock item may be included even if the site is clay. This caters for any large boulders that may need to be removed.
An amount may be included for concrete piers if the amount of fill on site is hard to determine.
So the total contract price reflects the cost of building the house the builder will put in his best estimate of the overall cost of the build.
The provisional sum will reflect the direct cost of those items to the builder only. (Overheads are included elsewhere in the contract price)
For example with a typical provisional sum item for removal of rock…… The builder will often include a figure of say $2,000 for excavation, and removal, of rock.
If there is no rock the contract will be reduced by $2,000.
Alternatively if the cost of excavator, labour and transport was $3,000 the final price will be increased by $1200. ($1,000 extra plus overhead percentage on the extra, typically 20%)
The builder is only allowed to add any overhead for profit and administration, to provisional sum expenditure items where they are above the original estimate.
Did you have any issues with Provisional Sums on your build?
More often than not, focusing on finding ways to increase a home’s resale value leads to obvious alterations and upgrades, such as furnishings that freshen up the interior and landscaping that gives the outdoors a nice finishing touch.
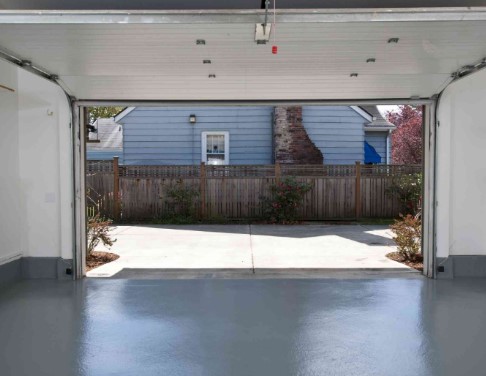
And yet, something as simple as treating the concrete floor of the garage with a little TLC could be the change that brings about the biggest impact.
In addition to the functional purpose this home’s feature has, which is handling the pressures from heavy-duty use from your vehicles or machinery, it also has an undeniable aesthetic role which may be somewhat understated.
To avoid deterring future buyers, or even an eyesore for yourself that could also be dangerous and risky for you, your vehicles, your machinery, tools, and what is not present in the space, it’s time to make some improvements.
You’ve got a range of versatility available, differing not only in price but carrier agents too, giving you the chance to choose from solvent, solid, and water based.
Is It a Good Idea to Put Epoxy On the Garage Floor?
It’s a type of coating that’s meant to last for years and years, and it truly can with proper floor maintenance.
If it’s good for commercial purposes in industrial applications that require the best of the best in terms of floor protection, why should it be any different from residential applications?
When applied, there’s a specific permanant chemical reaction happening which gives this material some exceptional qualities for the surface it’s added to.
To give you an idea, the following are just some of the benefits you can expect to reap once you treat your floors with the suitable resin and hardener mix.
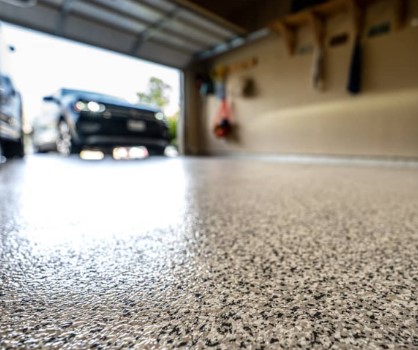
The Smooth and Shiny Appearance
The floor can make or break the space’s appearance, and all it takes to get it from drab to fab is a nice layer of epoxy coating for concrete to get smooth and seamless elegance.
Even though elevated aesthetic may not be your goal, least of all for a utilitarian area like the garage which serves as a parking area, workshop, and storage for your seasonal equipment or home-brewing equipment, the sleek and elegant touch would surely increase the overall curb appeal.
And, you can have fun choosing the coating – for a polished ambience, why not pick one of the eye-catching metallic mixes?
A mixture with details from mica or quartz equally makes for a unique aesthetic that additionally doubles for better traction of the floor too, so you amp the look without sacrificing the function or convenience.
The Increase in Protection
Instead of serving as the base, the garage floor epoxy is a layer added over the already sturdy concrete floor, taking up the role of protector for the underlying surface, shielding it from impact as well as wear and tear that might result in cracking and crumbling.
Since there’s more than one layer added, usually you get a thick coating that covers your precious concrete flooring, giving it an increase in durability.
This explains why upon application the possible defects of the floor might have magically disappeared with each and every layer of the coating, offering a sleek and smooth finish.
It’s exactly this that gives you peace of mind since usually defects can be the opening points for moisture to make its way through and damage the concrete little by little.
The Increase in Strength
Impacts, shocks, extra weight – you name it, the coating can handle it all.
Unlike other coatings, epoxy stands out from the rest with its incredible tensile strength, and the secret lies in the addition of the hardener, specifically the polyamine material.
Depending on the type of epoxy and hardener you choose, you can significantly increase the concrete’s ability to stand up to all the pressure you’d put it through.
If the bonding with the underlay surface is good, you can expect there to be strength in the resistance to peeling and tearing too so you won’t have to worry about those heavy loads.
The Increase in Safety
The garage that doesn’t have windows or proper illumination can easily become a place that compromises the safety of anyone going inside, but this too could become a thing of the past with the simple addition of a few layers of an epoxy concrete floor coating of your choice.
This is due to the material’s ability to reflect the light, which results in the brightening up of the whole area.
Moreover, with certain mixes of epoxy and hardener, it’s possible to increase the safety to reduce the danger from slipping accidents.
If a slick surface isn’t your thing, and you wish to further boost the safety, you could add your own ingredients to the mix, including polymer grit, gravel or sand.
The Resistant Properties
It is more than resistance to water and moisture.
It is also resistance as well as heat, chemicals, and even impact, it’s an investment that more than pays off in the long run.
The thicker the layer of coverage, the more of these incredible properties you can expect.
The Long-Lasting Result
As mentioned, this is a covering option that keeps on giving time and time again if we keep its resistance properties, strength, and durability in mind.
As such, it’s a much more reliable and convenient option than other covers in the likes of concrete paint, or tiles, especially if we consider the lack of need to redo the epoxy layering for many years.
The Eco-Friendliness
Sure, it’s a chemical, but that doesn’t mean it can’t be eco-friendly in its own way.
As it’s not that difficult to install, needing only a few essentials, and it doesn’t need to be recoated that often, it’s more helpful for the environment than other alternatives.
If you think about it, it’s quite cost-effective too so your budget won’t be significantly impacted once you take care of the proper installation.
How Do You Take Care of Epoxy Floors?
We’ve already discussed the outstanding properties of epoxy, including its durability, but it wouldn’t hurt to get in the habit of maintaining it to ensure it lasts as long as you expect it to, or even more.
Sweeping to get rid of dirt, dust, and debris is the basic step you should implement, followed by mopping.
Getting rid of stains should be done immediately after they occur, with an emphasis on using epoxy-suitable products, from cleaners to the right tools for the job, to avoid scratching the coating yourself.
Also, remember that prevention is better than cure, and in the case of the coating, it’s advisable to protect it from heavy objects by using the appropriate mats and furniture pads. A little care goes a long way!
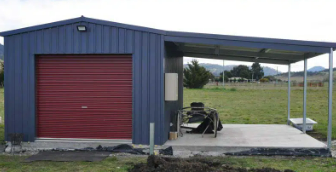
Having a shed provides extra storage space, reducing clutter in your main living areas.
It can secure tools, lawn equipment garden furniture.
Many types of sheds and homes can can also provide workspace for hobbies and DIY projects, or provide additional living space.
Purpose of the Shed
Storage Sheds that are only used for storage can be faily basic with little need for windows, power supply or insulation.
Don’t skimp on the size including the door as you want to make it easy to get your stored materials in and out.
Workshop. If you are going to use the shed as a workshop you need to think about light and comfort.
Natural light will make your work easier and things like insulation will make the space more usable in the hight of summer and the depths of winter.
ou will also have to think about a power supply and perhaps organise for a sink
Living/ Leisure Space This can be for relaxation and entertainment and may even incorporate outdoor shaded areas.
Other uses include home offices and even accomodation such as ‘Granny Flats’..
Higher standards of fit out and services will be required for living spaces.
Choosing the right location for your shed
Relationship to the house
A well-paved path with good lighting is essential to provide safe access at all times during the day and evening.
A location close to the house may be convenient for providing services.
You also need to consider the appearance of the shed from inside the home.
An attrative leisure space shed may look good; but you might want to screen a workshop or storage shed.
Exposure To The Weather
Picking a shady spot will make the inside of the shed much more comfortable in summer
Drainage and Land Slope
Many sheds have limited roof drainage so the run off falls to the ground.
If this is what you propose make sure the shed is not in a low spot or the whole area around the shed is going to get waterlogged.
Sizing Your Shed
Space availability
Space availability is a crucial aspect to consider, a shed that takes up a large part of your garden is likely to negativly affect your property value!
Planning Laws
Planning laws include planning permissions, and building codes, may affect what you can do.
A small shed at the back of the house is unlikely to be a concern but a large shed or a livable room may require a trip to the council offices..
Materials for the Shed
Metal Sheds
Metal sheds are durable, low-maintenance storage solutions which are a popular choice in Australia/.
Wooden Sheds
Wooden sheds are generally chosen in Australia for their rustic appearance and are available in many styles and sizes.
They often can be attractive garden features while offering functional storage.
One disadvantage is that wood does require more maintenance than other materials.
Masonry
Brick or block sheds are very durable but as they are usually considerably most expensive they are rarely used in Australia.
Plastic Sheds
Plastic sheds are a durable, weather-resistant storage solution for your garden or yard.
They are typically a small convenient option for storing tools and outdoor items.
DIY or Professional Installation?
DIY installation can result in significant saving but requires careful planning and the right tools.
Always ensure accuracy in measurements to avoid costly mistakes.
Follow instructions diligently, prioritize safety, and don’t rush the process as persistence and patience often lead to the best results.
Professional installation benefits include guaranteed quality of work, time-saving, expert knowledge of best procedures.
Perhaps you agree with most builders, who seem to think a couple of power points in the bedroom is fine………….. Well I think that’s nowhere near enough and here’s why:
Starting on my side of the bed I have:
Bedside reading light
Clock/Radio alarm,
A wireless phone charger pad
Lap top charger (useful for us to chrome cast to the bedroom TV).
On my wife’s side its:
Bedside reading light
A wireless phone charger pad.
Power for the electric bed
Next is the TV that’s mounted high on a wall.
Don’t forget the aerial socket as well.
We don’t like to use the main light too much so we have a simple ‘oyster’ fitting to provide low intensity background lighting in the evening.
We have a reverse cycle air conditioner.
You might also want power for electric blankets!
As we want somewhere to plug in the vacuum cleaner its a good job all the sockets are doubles, so we have still got convenient sockets.
Light are another matter.
We have a three way set up for the main light so we can control it from the door and either side of the bed. the bedside switches are set to be 300mm above the bedside cabinet height.
You might like to think about bedside wall or ceiling mounted lights (personally I prefer table lights)
In the walk in robe we have a motion detector switch so we don’t have to worry about leaving it on all day (This works very well a long as you have a door to the WIR. The dog sleeps under the bed and if the door is open and he walks round the room in the night the light goes on)
Don’t forget the smoke alarm outside the bedroom door.
When it comes to personal landscaping, removing tree stumps is any arborist’s nightmare.
There’s a lot involved in making sure you can execute the job properly and without injury.
But what is the safest way to remove a tree stump from your property using your own tools?
Well, if you’re handy with a chainsaw, the job may be as simple as heading to Jono & Johno for chainsaw spares and then getting started.
For those seeking a little more direction, we’ve gathered some helpful tips that will give you the confidence in planning that you’ll need to rid your garden of that pesky stump.
Reasons you might need to remove a tree stump
Whether it’s a safety hazard or merely an eyesore, there are many reasons to prioritise the removal of a tree stump.
Even so, many homeowners are still hesitant to take on such a big job, namely because it can be labour-intensive. . . but there are a few reasons why you don’t want to leave this job at the bottom of your list.
Firstly, rotten tree stumps can attract and grow fungi spores which may become toxic to other plants in your garden or even attract pests.
Rotten root systems can also corrupt the soil quality making your garden a hostile place for other plants.
It’s also important to maintain a tidy garden to prevent any bushfire hazards.
Professional or DIY
With any DIY project, there’s always the question of when to try yourself and when you should leave it to the professionals.
If you’re planning on removing a tree stump, the answer really depends on your own personal situation.
Removing a tree stump can be simple and straightforward as long as you’re prepared to plan.
Here are a few reasons why you might want to call in a professional
Big job
If your pesky tree stump is wider than a metre, it may require a skilled team of workmen to ensure that it’s safely removed.
Type of tree
Some trees have root systems which are fairly simple, but others may spread further down or even around.
For this reason, it’s important to know what tree species you’re dealing with prior to attempting to remove the stump.
If this is something you’re not sure of, it may be best to call a professional.
Confidence with tools
Operating heavy machinery is not something to be taken lightly and we don’t recommend tree stump removal to be your first project using a chainsaw.
If you don’t have much confidence using a chainsaw, it’s best to enlist the assistance of someone who does.
How to prepare for the removal of your tree stump
One of the most important steps to removing a tree stump is to assess the surroundings.
If the stump is on a hill, or surrounded by other foliage, or if the ground is muddy, all of this could have an impact on how successful your stump removal will be.
It’s important to make sure that you’re aware of any potential slip hazards as you will be handling hazerdous machinery.
Get the gear
Whilst having the proper set of tools is important, any landscaping DIY project should be handled with appropriate personal protective gears. For a stump removal we would recommend having
A heavy pair of gardening gloves
Safety goggles
Safety footwear
Hearing protection
It’s also important to consider sun protection as uprooting a tree stump is no quick task.
Get the tools
There are a variety of tools that may help with tree stump removal but the basics that we would recommend would be:
Chainsaw
Wheelbarrow
Shovel and/or Garden trowel
Shears
Machete or handsaw
Removing the tree stump
Begin to cut
There’s no simpler way to put it, the first thing you’ve got to do is make some initial cuts.
You want to make sure you’re cutting down the trunk into more manageable pieces.
Remember to be slow and precise with your cuts.
Get to the root of it
Once you have cut the trunk down to size, begin to slice through the roots of the stump.
It’s good to have them as exposed as you can so be sure to dig deep around the trunk to get the cleanest cut possible.
Remove the debris and cover
Now that you’ve finished all your slicing and dicing, it is time to remove all of the dead roots and bits of trunk that are leftover.
Remove as much of the tree as possible and then fill the hole with dirt using a shovel or a dingo loader depending on the size of your project.
Enjoy your new garden
With your tree stump finally removed, you can be free to enjoy your garden with peace of mind.
Perhaps you could use the space for a veggie patch or as an entertainment area.
Take pride in knowing you’ve undertaken one of the trickiest garden home improvement tasks.
Originally posted in 2023 but revised following the announcement of Federal Government Battery rebates in 2025.
I got my Electricity Bill the other day which set me wondering if I should invest in a battery for our house.
Our Situation
We live in a retirement unit which is reasonably compact.
As a result our 3.25 kW of Solar Panels takes up most of the available roof space.
The advantage of having a small house is that although we are all electric our daily usage is quite small.
The below graph shows our daily usage and solar export.
From the figures above it would appear that with a battery we should be able to store, and then use overnight 3kw of power almost every day, or an average of say 5kWh.
Power Company Rates
Our current rates from Red Energy are:
$0.25718/kWh Consumption Charge
$0.045/kWh Feed in Tariff
Annual Savings
The annual savings by installing a battery will be:
Consumption Charge minus the feed in Feed In Tariff multiplied by 5kWh multiplied by 365.
$(0.25718 – 0.045) x 5 x 365 = $387.22/year
NB There will be some efficiency loss in the battery but this may be compensated by the battery partially discharging and being recharged during summer days.
Conclusions
Recent industry figures (May 2025) indicate the installed cost of batteries is $1,000 to $1,200 per kW.h
This gives a full cost for a 5kWh of $5,000 to $6,000.
With the potential election rebates announced in 2025 these prices could drop down to the $2,500 – $3,000 amount
With a battery payback at $380/year is going to be around eight years, by which time the battery will have gone through over 3,000 charging cycles.
It is starting to look as though batteries are starting to be more cost effective.
Home should be a place of sanctuary for all, invoking a sense of safety, comfort, and familiarity.
This is especially true of seniors, who might be considering downsizing, but want a new house
Living spaces play a vital role in overall well-being.
Thus, it is integral to ensure that homes of seniors cater to their specific needs and provide a sense of peace.
In order to ensure that seniors are living in a safe and comfortable environment, we have provided a list of simple ways to transform a new house into a home.
1. Enhance Accessibility and Safety Features
The foundation of a safe and comfortable home can be created by improving accessibility. Installing simple modifications suited to senior citizens’ needs can make their daily lives far easier and reduce the chance of incidents happening.
Household modifications that are commonly utilised in senior houses are:
Handrails
Grab bars in bathrooms
Ramps in inclined areas
Significant lighting
Switches are within easy reach
Obstacles and clutter barring mobility are removed
These safety measures give peace of mind for both seniors and future caregivers.
2. Adapt the Living Space to Accommodate Mobility Needs
Although on purchase mobility can be good as you age thinngs can change.
Beyond integrating safety and mobility accommodations in a household, you can ensure a more comfortable home environment for seniors by keeping their most commonly used spaces accessible.
Specifically, adapting living spaces to accommodate any hobbies and interests and king sure there is a space to relax when needed.
Living spaces can be made to be more accessible by:
Reorganising furniture for more open pathways
Choosing furniture that is comfortable and supportive
Adjusting the layout to reduce the need for excessive movement
Placing commonly used items in easy-to-reach places
Making these simple adjustments will reduce strain on seniors and promote independence.
3. Create a Relaxing and Serene Atmosphere
Engaging in a serene environment is known to significantly support the comfort and mental well-being..
To create a soothing environment indoors, it is best to incorporate:
Soothing colours
Comfortable seating
Soft lighting
Musical options
Nature is also known to greatly improve mental health across all ages, including seniors.
Bringing in elements such as plants or other greenery can reduce stress and anxiety.
This soothing atmosphere can be further heightened by adding personal touches to remember what matters most.
Cherished photographs or sentimental items can support the sense of familiarity and comfort within a home.
4. Encourage Social Interaction and Engagement
For everyone, regardless of age, social interaction is essential for mental and emotional well-being.
Encourage social interaction by specifically making spaces that suit family gatherings, hobbies, or group activities.
Over time, a greater sense of connection and belonging can be created within the elderly.
Social interactions can also become a more regular affair and more accessible by incorporating technology into the home.
Help stay in communication with family and friends who may not be able to visit regularly by thinking about where to take video calls.
This will allow you to stay connected and engaged with loved ones, staving off any sense of loneliness.
5. Regular Home Maintenance and Supportive Networks
Taking the time to ensure all necessary repairs are addressed will prevent safety hazards.
Meanwhile, having access to support networks, such as trusted caregivers, neighbours, or community services, is invaluable for seniors’ well-being.
This network grants help whenever needed, keeping seniors able-bodied and more connected to others.
Furthermore, regular check-ins from neighbours, or routine visits from professional home or health assistance can ensure any issues or concerns are addressed promptly.
However, if a senior is showing signs of being unable to maintain their independence, consider moving to an aged care facility such as this aged care facility in Cowes.
Such environments are specifically designed to support seniors and ensure all of their comfort and safety needs are met.
Conclusion
It requires a thoughtful and comprehensive approach for a seniors’ environment to become safe and comfortable.
These five essential elements listed in this article can significantly improve the quality of life for seniors in their own homes when followed.
By providing a space where the elderly can feel the most at ease, not only will their quality of life improve, but so too will their emotional well-being.
Prioritising safety and comfort allows seniors to age gracefully while maintaining independence and dignity within their cherished homes.
Under the terms of a “Standard’ Building Contract you will be required to grant the builder ‘Exclusive Possession’ of the site once the builder is ready to start.
This means that the builder is responsible for, and is able to control, all people coming onto the site during the construction period.
The reasons for this are:
Safety – The builder is responsible for the safety of everyone on site.
Scheduling – Its harder to effectively schedule trades when you could be delayed waiting for other people to complete work.
Cost – If the builder’s workers are delayed by having other workers in the way it can mean extra costs.
Practically what ‘Exclusive Possession means for you is:
Before you go onto the site you should contact the builder, who may only allow you on site if accompanied by the Site Supervisor.
If your bank, or building inspector, want to go on site to check on the works they also need to make an appointment with the Site Supervisor.
You may not be able to have other work done at the same time by other people. For instance:
Landscaping.
Home Automation.
Swimming pool or Spa installation.
Additional Electrical work.
If your builder says your other tradies or contractors can go on on site make sure you get their permission in writing with any conditions clearly stated!
Rural and Large Blocks
If you are building on a rural block, or just a large urban block it can be worth marking out, and even fencing, the house building site.
You then give the builder possession of the house building site only, and work on the remainder of the block.
Did your builder allow you to bring your tradies on site?
So you want to build a new home in a retirement village?
If you’re looking to build a home of your own in a village, there’s plenty you need to consider.
But what really goes into constructing a new home in a retirement village? Let’s analyse some key tips you can use to succeed.
Location, location, location. . . It’s a core mantra of real estate for good reason.
Choosing the right location for your new retirement village home is essential.
Here are some things to look for when searching for the perfect community to build your home in:
Leisure amenities
Something very important to consider when looking for the perfect village for you is leisure amenities.
These can make or break your retirement village experience, and are definitely worth strong consideration when deciding where to build your home.
Here are just a few amenities to consider including in your village:
Swimming pool with ramp access and aquarobics classes
Bowling green and bocce court
Cinema
Arts and craft studio to help your residents unleash their creativity
Walking trails
Library packed with books, magazines and newspapers
Games lounge filled with cars, billiards, ping pong and more Outdoor patio complete with barbecue and dining spaces
Auditorium/concert hall for live shows, lectures and other special events
Healthcare
There’s no overstating the importance of robust healthcare in a retirement village.
Whether it’s a full-on integration with aged care facilities or some more modest offerings, you should have a strong understanding of what healthcare will look like in a retirement village before you construct a new home there.
Having an alarm system with 24-hour emergency assistance buttons will be important as you age.
Other healthcare facilities might include rehabilitation gyms and mental health services.
Before you begin construction, you should understand how the village offers holistic care to its residents.
This will give you the best peace of mind that the village is the right choice for you.
Safety and security
The safety and security of residents in a retirement village should always be paramount.
On top of the integration of healthcare into a retirement community, there’s plenty more to be done to ensure safety and security.
Video surveillance around the exterior of the village
Check-in at the front gate for all visitors
Staff available 24/7 – you never know when an emergency may arise
Adequate lighting all around the village
Period safety checks of smoke alarms and other critical pieces of equipment
Clear signage for emergency exits and fire extinguishers
These are just some of the markers of a safe and secure village, which you should look for when constructing your new home.
Designing your home
With your location set, now’s the time to make some design decisions.
Here a few key concepts to keep in mind as you’re drawing up your plans:
Wheelchair access: If wheelchair accessibility is a concern, your new home should be single-story with wide halls and doorways. Anti-fall measure: Include grab bars, railings and non-slip floors to help mitigate the risk of falls. Landscaping: When it comes to landscaping, prioritise flat walking paths with plenty of rest areas. Storage space: Your new home might eventually require some additional storage space for medical equipment including oxygen tanks and mobility scooters. Energy-efficiency: Include insulation and double-glazed windows for a more sustainable design. You can even consider solar panels, which might save you a penny to boot.
Type of home
Now, what type of home will you construct?
Many villages have a range of houses that you can choose from, while others may have more choice within style guidlines.
If you’re building your own home in an existing community, the choice is all yours. Do you want an extensive property with plenty of gardening to take care of? Or is a cosier accommodation more suitable for you?
Be sure to give plenty of consideration to this all-important detail.
Budgeting
Retirement community or not, budgeting for building a new home is a mammoth undertaking.
It’s often worth getting professional advice at this time.
Here’s a brief overview of some things to budget for when constructing a new home in a retirement village.
Who’s paying what?: For incoming residents constructing new homes in retirement communities, ensure you have a comprehensive understanding of which costs you are paying for, and what, if anything, is being paid for by the village itself. Village entrance and land fees: Fees and costs associated with acquiring land in a retirement village can be confusing at times. Be sure to read all the fine print so you understand exactly how much you are spending. Construction fees: At the outset of construction, create the most comprehensive budget possible, understanding that it is very much not set in stone. Be sure to ask around and get plenty of quotes. Landscaping and outdoors: Don’t forget these all-important parts of the process! Landscaping costs can add up quickly, so you’ll need to have a solid budget set aside for it.
Constructing a new home in a retirement village can be a daunting process.
Be sure that your new structure is a fitting and welcome addition to the community.
This will ensure happiness and prosperity in your golden years.