Which Air Conditioning Units are the Most Efficient?

Guest Post by Rebecca Lee

A lot of people fail to read the specs of they’re newly-purchased AC unit before buying it.

It’s new, does its job, and affordable? . . . Might as well be good as sold!

That said, overlooking these crucial factors before securing the appliance can be a costly act.

While any air-conditioning unit can perform its primary function, not all of them are efficient in doing so.

This could be because of deterioration of the hardware, from a blown fuse to dirty filters or coils.

In some instances, it can also be because of the inherent limitations of the appliance itself.

When you leave these limitations unattended, you could inadvertently be causing your electricity bill to spike up quite considerably.

Over time, this could rack in thousands of dollars of extra costs—something no one wants.

If you’re in the market for the top air conditioning units for your home, you’ve come to the right place.

Here are some air conditioning units that are a cut above the rest in terms of energy efficiency.

Let’s begin!

What Makes an AC Unit Efficient?

There are factors to consider when measuring an air conditioner’s efficiency. Let’s look into some of them.

SEER Rating

The primary measuring system for AC efficiency is the Seasonal Energy Efficiency Ratio (SEER). This is a scale of efficiency that starts at 1 and goes all the way to 26 for the top-grade, efficient air conditioning units.

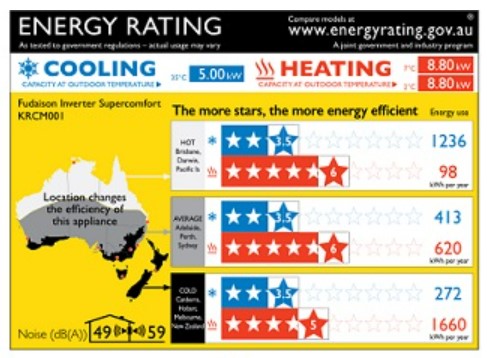
Most A/C units have a SEER rating attached to them. They’re usually found pasted at the back of the A/C unit in the form of a yellow and black EnergyGuide sticker. The rating may also be part of the name of the product model itself in number form.

SEER ratings are given to nearly all types of AC units, including central, mini-split, and window air conditioning units. This rating method has been around since 1987 and is still used today as a standard of measurement for cooling efficiency.

The higher the SEER unit, the less resources and energy the air conditioning unit requires to produce cooling for an area. When an A/C unit uses up fewer resources, it consumes less energy and rewards you with a happier electricity bill

Generally speaking, newer AC models are more energy efficient than older models. This is because they have undergone extensive development over time and the technology has made achieving a higher SEER number more simple.

Nowadays, you can typically find units with a SEER rating of around 13 to 15 at the minimum, which is already serviceable.

That said, some units with a SEER ranking of 19 to 24 are even more energy-efficient, but they typically come with higher upfront costs.

ENERGY STAR® Certification

If the product has an ENERGY STAR® certification, which is a blue sticker with the words ENERGY STAR written on it, you’re dealing with an efficient AC unit.

This symbol is a government-backed sign of energy efficiency, headed by the U.S. Environmental Protection Agency.

As this is regulated by a third-party organisation without business interests, this helps in removing any biases as only credible manufacturers can be given this label.

Energy Saving Features

Besides external labels that label the AC unit as environmentally friendly and cost-effective, a good sign of an efficient AC unit is when they are propped with energy-saving features.

For instance, some AC units, particularly split-type models, can automatically turn off when the surrounding zone reaches a certain comfortable temperature. This is often only the case if the A/C unit has inverter technology. This feature can save up to 50% of a home’s electricity bill if used regularly.

Some machines may also automatically turn the circulation and exhaust fan on or off as necessary, reducing energy consumption. Lastly, most A/C units have a timer feature that can turn the unit off after a set time has passed.

Which Air Conditioning Units are the Most Efficient?

There are four major types of A/C units: split, window, portable, and ducted (or central) A/C units.

Each type varies in terms of efficiency, and choosing the right one can also depend on your household’s size and your own financial capabilities.

But if you want the most efficient one for large houses, ducted A/C units are the way to go.

Want to know more? Here’s a breakdown of each AC type’s efficiency levels:

Ducted (Central) A/C Units

According to the Department of Energy, ducted A/C units are more efficient than room A/C units when cooling a big space.

This is because they come with a network of ducts that retrieve warm air in the house and then convert them using a refrigerant to cool air.

In the long run, having a ducted A/C unit is very efficient for your electricity bills. That said, the installation process can be quite difficult, so it’s best to consult HVAC experts Alliance Climate Control for them to help you safely set up your appliances.
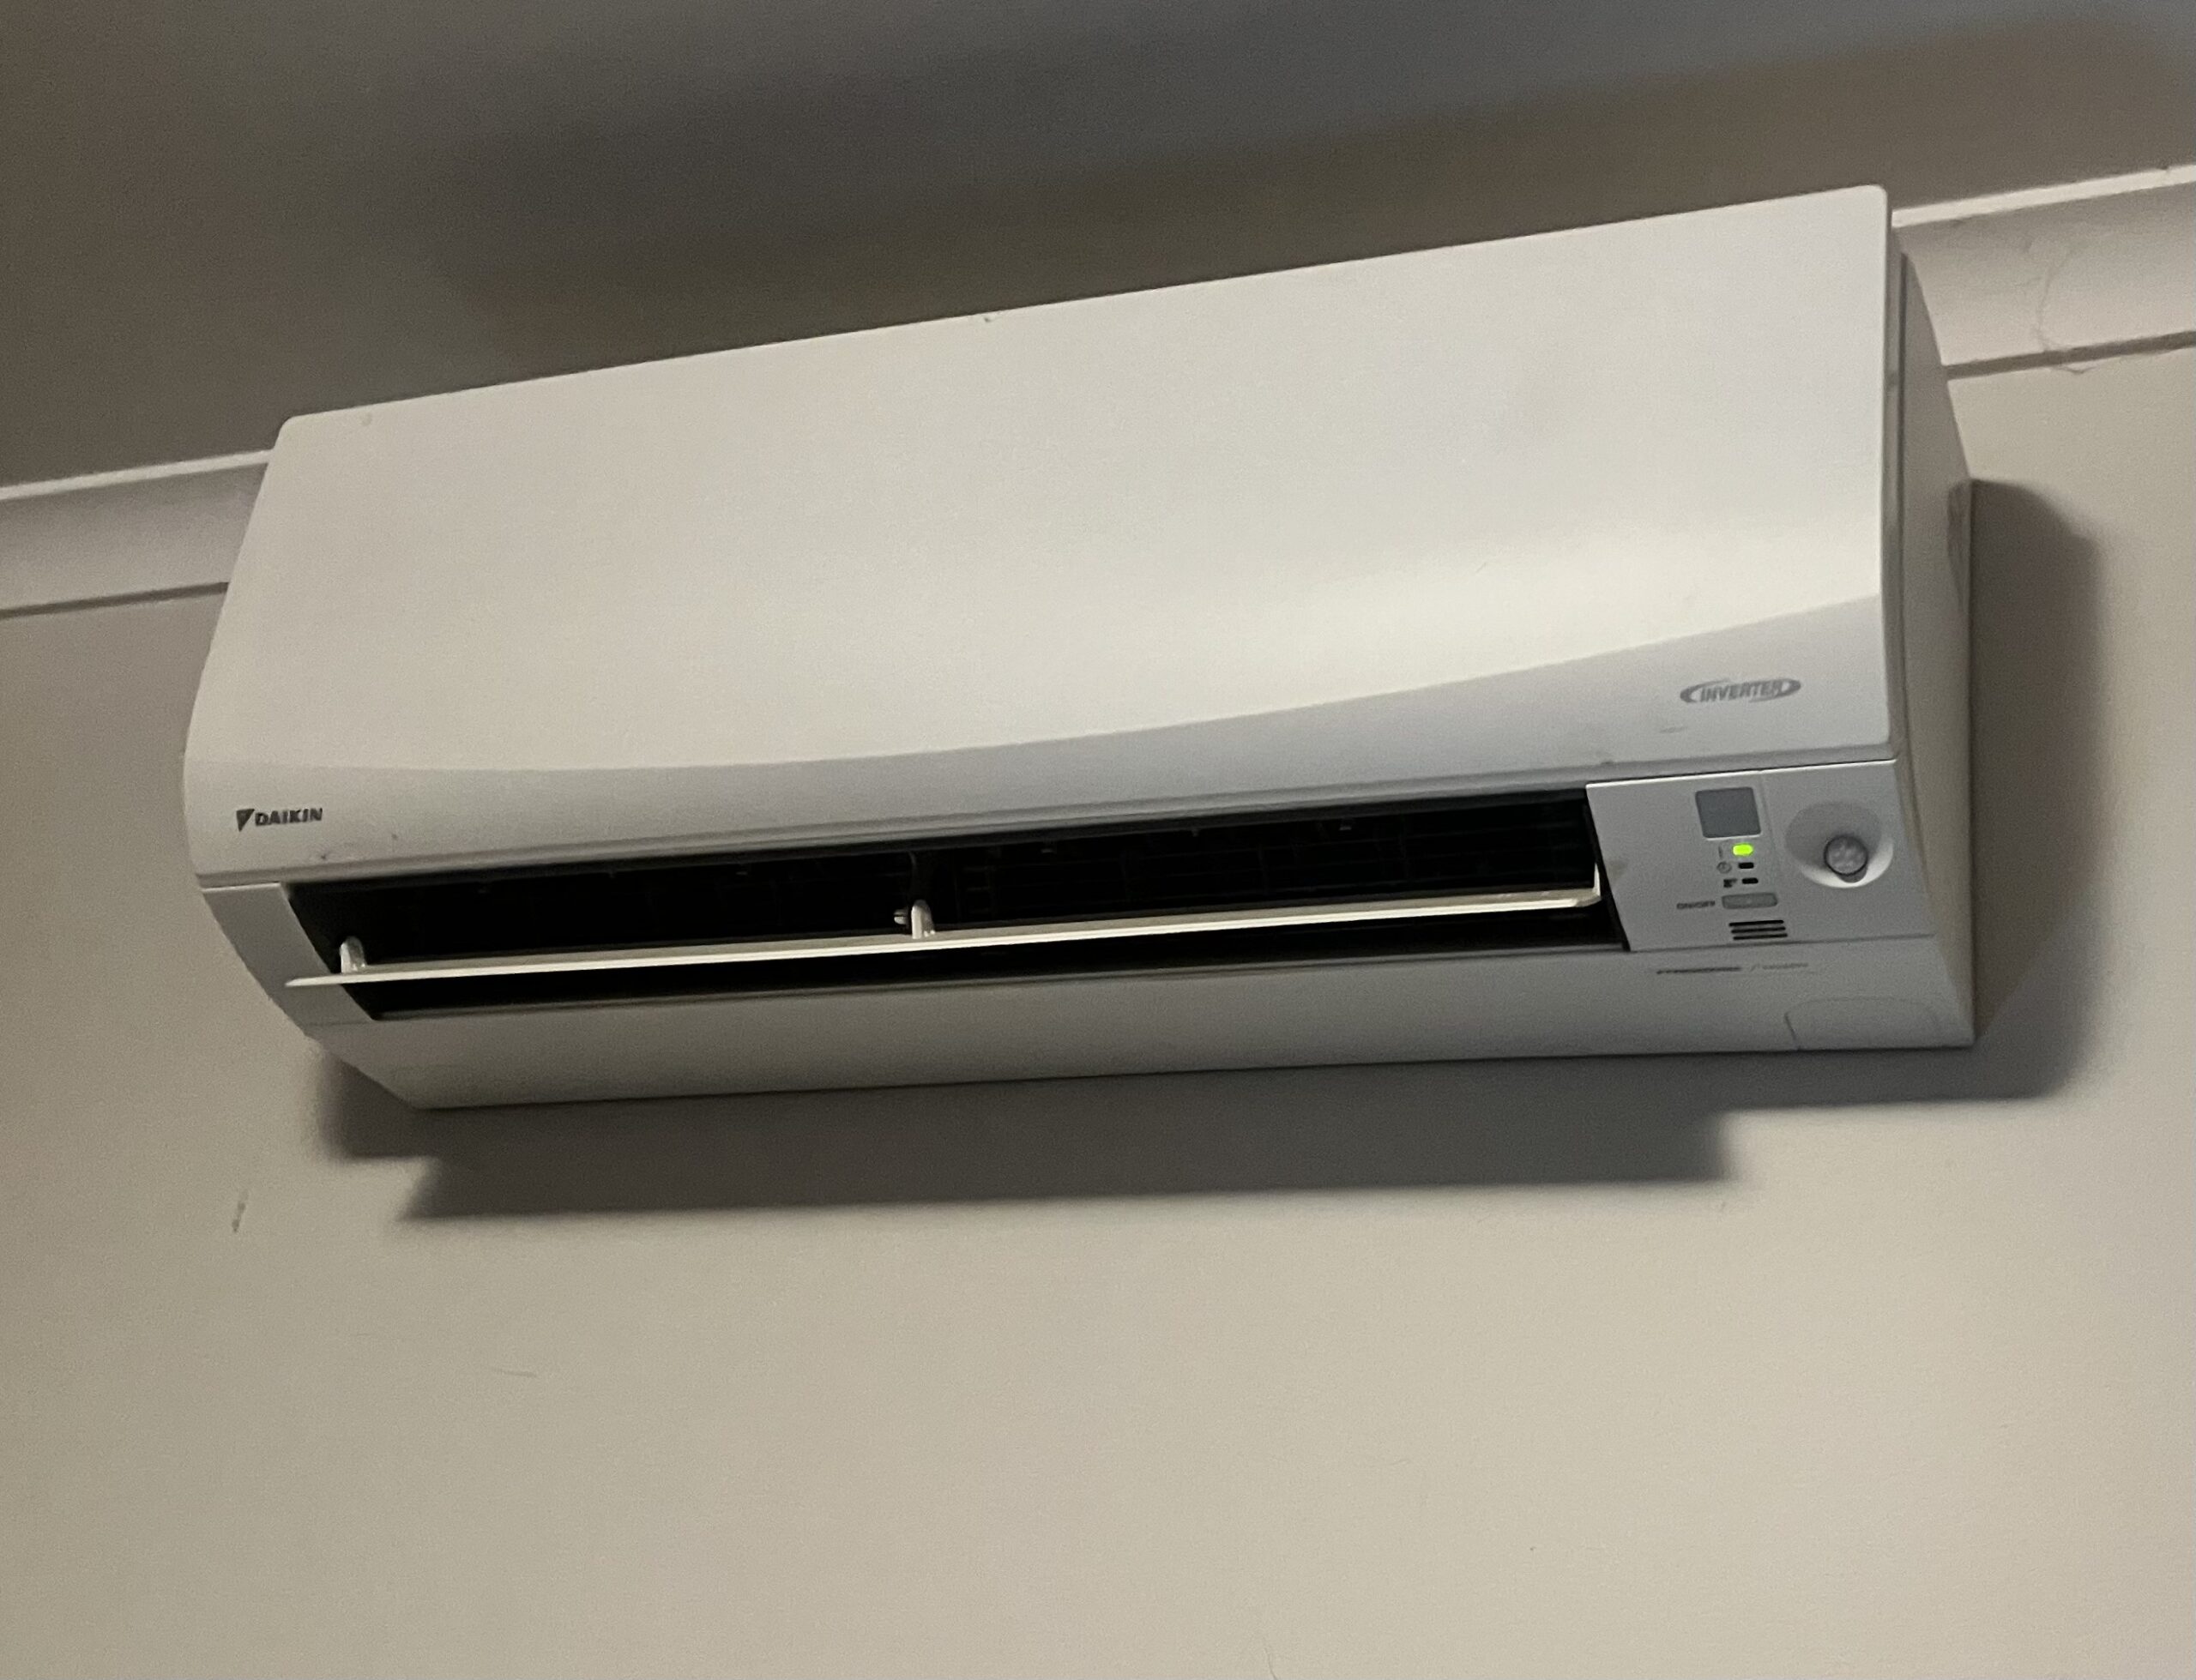
Split A/C Units

Split-type air conditioning consists of two primary units: the indoor A/C unit, and a large outdoor compressor unit to remove air.

This type of AC unit typically has good SEER ratings, an inverter type, and a wealth of energy-saving functionalities. This makes them fairly energy efficient compared to other energy-intensive AC types. They may cost more upfront, but they’re cheaper to run over time.

They also come in other variants, such as mini ductless split AC units, which can make them even more energy efficient. This is because there’s no reliance on ducts for the unit to operate.

Examples of Split Type ACs you can find in the market include the Awoco 36″. Mitsubishi and Fujitsu also offer split-type ACs.

Window A/C Units

Window units boast the cheapest upfront costs, easy installation process, and highly accessible nature. You don’t have to search far and wide to grab a small box-type window AC, as there’s usually one or more in your local appliance store.

As far as efficiency goes, many window A/C types can be pretty energy efficient, especially if you don’t own a large house. If your living arrangement needs only three or fewer A/C units, window units are generally more efficient to run.

However, if you have a large house and want to bring cool air to all areas of your place, you may want to consider central or split A/C units.

Portable A/C Units

Portable A/C units provide flexibility, as they can be moved from one room to another. They also can come with a wealth of energy-saving features like a timer.

However, in the long term, they’re not as energy efficient as split types or window types. This is because the air in the room gets recycled again and again, leading to hot and humid air over time.

While a large room may seem like it would mitigate this problem given the larger volume of air, portable A/Cs also come with the cost of not having enough power to cool a big space. This makes them the least efficient A/C unit type.

Travel Issues

It’s a Saturday morning and your partner says “Why don’t we go and look at some blocks that have been advertised in the paper?”

So you jump in the car and in no time at all you are at the developers office.

“That was easy!” you say………….but how realistic is Saturday traffic compared with a future weekday commute?

Once you move you may find you are spending a long time looking through your windscreen at traffic!

Before you make a decision perhaps you need to try the traffic out:

    • Arrange to meet your partner straight after work and see how how long it will take to get home in rush hour. Twice as long?……….or four times as long!
    • If you are really keen, then get up at 6.00am, and drive to the site. You can then see how long it will take you to get to work.
    • A quick check might be to use Google Maps to estimate journeys for a few work days
    • You might  also try out the public transport.

Were you surprised how long it took to get to work after you moved?

See Blocks for more information on buying land.


5 Power Tools You Need For Your Next Renovation

Guest Post by Rebecca Lee

Embarking on a home renovation project is always an exciting proposition.

Whether you’re planning a minor makeover or a major overhaul, having the right power tools can make a world of difference to its success and efficiency.

These tools simplify complex tasks and enable you to achieve professional-quality results.

From drilling and cutting to sanding and shaping, the right power tools can empower you to transform your living space with precision, confidence and a dash of flair.

This article will explore five essential power tools you should consider adding to your toolbox for your next renovation.

With these tools at your disposal, you’ll be well-equipped to tackle a wide range of tasks and bring your renovation dreams to life.

Power Drill

The power drill is one of the most versatile and indispensable power tools you can use in any renovation project.

Whether you’re installing new cabinets, hanging shelves, or assembling furniture, a power drill will be your go-to tool.

The ability to drill holes and drive screws saves you time and effort compared to manual tools.

So look for a cordless drill with a variable speed setting, as it offers convenience and flexibility.

The option to switch between different drill bits and screwdriver attachments makes a power drill an essential tool in any DIYer’s arsenal.

Whether you’re a seasoned renovator or a beginner, a power drill will undoubtedly become your trusted companion throughout your project.

Circular Saw

When it comes to cutting lumber and making precise cuts, a circular saw is an absolute must-have power tool for your renovation project.

When tackling framing, trimming plywood, or working on custom woodwork, a circular saw provides the speed and accuracy you need.

With its circular blade that spins at high speeds, it effortlessly slices through various materials easily including bricks and concrete if you buy stone saw blades in Australia

With adjustable depth and bevel angle settings, as it allows you to make angled cuts and achieve precise results.

From straight cuts to more intricate tasks, a circular saw is essential to help you achieve professional-level craftsmanship in your renovation endeavours.

Random Orbital Sander

Achieving a smooth and polished finish is crucial for many renovation projects, and that’s where a random orbital sander becomes an invaluable tool.

If refinishing furniture, sanding down surfaces, or preparing walls for painting, this power tool excels at removing material quickly and evenly.

The random orbital motion ensures that you won’t leave swirl marks or scratches on the surface, resulting in a flawless finish.

If you can, source a sander with variable speed control to match different materials and a dust collection system that minimises cleanup.

With a random orbital sander in your toolkit, you can transform rough and worn surfaces into beautifully smooth ones, adding a professional touch to your renovation project.

Jigsaw

For jobs requiring intricate shapes and curves or making delicate cuts in various materials, a jigsaw is an essential power tool to have available.

This versatile tool allows you to tackle tasks such as cutting out openings for electrical outlets, creating custom trim pieces, or shaping plywood quickly and precisely.

With its reciprocating blade that moves up and down rapidly, a jigsaw offers excellent control and manoeuvrability, enabling you to achieve intricate and accurate cuts.

Jigsaws with adjustable speed settings and orbital action are best for enhanced cutting performance.

Whether adding unique details or making precise cuts, a jigsaw is a must-have tool that empowers you to bring creativity and precision to your renovation project.

Angle Grinder

An angle grinder is a versatile and powerful tool that should be on your list of must-have power tools for your next renovation project.

With its ability to handle various tasks, an angle grinder is a true workhorse.

Capable of doing everything from cutting through metal and tile to grinding and polishing surfaces, this tool is indispensable.

With various attachments and discs available, it can tackle different materials and achieve professional results.

Whether you need to remove rust, sharpen blades, or shape stone, an angle grinder offers the flexibility and power to do the job.

However, it’s crucial to prioritise safety when using an angle grinder, so always wear protective gear, such as goggles and gloves.

That said, with an angle grinder in your toolkit, you’ll have the versatility and cutting power necessary to take your renovation project to the next level.

Conclusion

Having the right power tools can make all the difference in the success and efficiency of your renovation project.

The five power tools discussed in this article are all essential additions to your toolbox.

These tools enable you to tackle a wide range of tasks with precision, efficiency, and professional-quality results.

Whether drilling, cutting, sanding, shaping, or grinding, they empower you to transform your living space and bring your renovation visions to life.

Remember to also prioritise safety by familiarising yourself with the manufacturer’s instructions and wearing appropriate protective gear when using them.

With the right power tools at your disposal, you’ll be well-equipped to confidently embark on your next renovation project and achieve outstanding results.

Garage Doors

Originally garages doors were hinged doors, then tilt and lift doors came in.

More recently the main choice for garage doors is between roller doors or sectional panels.

Roller Doors

Fairly common as its the most used door in commercial applications.

Has the advantage in that its a fairly compact unit although it does need a bit more height to fit the roll over the opening.

Normally fairly draught proof but very hard to insulate.

Sectional Panel Doors

I think these look a bit more classy than roller doors, after all you want to look more like a house than a commercial garage.

They are available in a wide range of styles.

If you don’t have windows in the garage it might be worth having a door with windows to bring a bit of extra light in.

They can be quite easily insulated if your garage is your workshop (or man cave) but are harder to draft proof.

One disadvantage is that the door takes up a lot of ceiling space which restricts where you can put ceiling light.

Remote ?

Last time we built I didn’t bother about a remote opener.

After a couple of years I was served with the ultimatum ” Remote opening or else” (My wife said afterwards “Well worth the money!”)


For more posts on garages see: Garage Electrics and How much garage do you need?

More on doors including 24 pages of Check Lists for your new house choices in the‘Selection / Pre-Start Guide’


How to Pack and Move Large and Tricky Items

Guest Post by Rebecca Lee

Moving to a new home is an exciting adventure, but it can quickly become daunting when faced with the challenge of packing and moving large and tricky items.

Whether it’s a bulky piece of furniture that seems impossible to manoeuvre or delicate electronics that require extra care, these items demand special attention to ensure a smooth and damage-free transition.

This article will provide you with essential tips and strategies for packing and moving your large and tricky items efficiently.

From planning and organisation to proper lifting techniques and securing your belongings, we’ll guide you through the process, empowering you to tackle this task confidently and efficiently.

Plan and Organise

Planning and organising your moving process is the key to successfully packing and moving large and tricky items.

Start by creating a detailed plan that outlines all the items you’ll be moving, noting their size, weight, and any special considerations.

This inventory will help you determine the resources and materials needed for packing and moving.

Additionally, take measurements of doorways, hallways, and stairwells in both your current and new home to ensure that your items will fit through without any issues.

Having a well-thought-out plan and organising your move in advance can minimise potential obstacles and ensure a smoother transition for your large and tricky items come moving day.

Gather the Right Materials

Gathering suitable materials is essential for packing and moving large and tricky items.

Make sure to stock up on sturdy cardboard boxes in various sizes, as they will serve as the foundation for packing your belongings.

Invest in bubble wrap or packing paper to provide cushioning and protection for delicate and fragile items.

Furniture blankets or moving pads safeguard larger pieces against scratches and dents during transit. . . so, it is well worth you sourcing them.

Don’t forget to have ample packing tape to secure boxes and furniture blankets firmly.

Lastly, consider acquiring furniture straps or bungee cords to secure items and prevent shifting in the moving truck.

These materials go a long way towards ensuring the safety and protection of your large and tricky items throughout the moving process.

Hire Professionals

If you need help packing and moving large and tricky items on your own, hiring professional movers is worth considering.

Professional organisations such as local removalists with Muval have the expertise, knowledge, and specialised equipment to handle these items carefully and efficiently.

They are well-versed in disassembling and reassembling furniture, navigating tight spaces, and securing items for safe transport.

Hiring professionals saves you time and physical effort and provides peace of mind knowing that your belongings are in capable hands.

Professional movers will have the necessary tools, packing materials, and techniques to protect and safely transport your large and tricky items, making the entire moving process smoother and stress-free.

Disassemble Furniture

When faced with moving large and tricky items, such as furniture, disassembling them can make the process much more manageable.

If possible, take the time to disassemble your furniture before packing and moving.

Remove any detachable parts, such as legs, cushions, or shelves, and keep them together in clearly labelled bags or boxes.

If necessary, take videos or photographs or make detailed notes of the disassembly process to facilitate reassembly later on.

By disassembling your furniture, you can reduce its overall size and weight, making it easier to manoeuvre through doorways, staircases, and tight spaces.

This step simplifies the packing and moving process and minimises the risk of damage to your furniture during transportation.

Wrap and Protect

Wrapping and protecting your large and tricky items is vital to ensure their safe transport during a move.

Use bubble wrap or packing paper to provide a protective layer for delicate and fragile items like mirrors, artwork, or glass tabletops.

Wrap each item carefully, securing the wrapping with tape to prevent any shifting or damage.

When it comes to furniture, use blankets or moving pads to shield them from scratches, dents, and other potential harm. Ensure the blankets are securely fastened with packing tape or furniture straps to keep them in place during transit.

By wrapping and protecting your items appropriately, you can significantly reduce the chances of any damage occurring during the moving process, giving you peace of mind as you transport your valuable belongings to your new home.

Use Proper Lifting Techniques

Employing proper lifting techniques when packing and moving large and tricky items is essential in protecting yourself and your belongings.

Remember to bend your knees and lift with your legs instead of your back when lifting heavy items, such as furniture or appliances.

This technique helps distribute the weight and reduces your back and spine strain.

Avoid twisting or jerking motions while lifting to prevent injuries.

If an item is too heavy or awkward to carry alone, ask for assistance from a friend, family member, or hire professional movers.

Consider using lifting straps or a dolly to move cumbersome items, as these tools can provide additional support and make the process more manageable.

Practising proper lifting techniques makes you more likely to minimise the risk of accidents and injuries.

Protect Electronics

During the moving process, your electronics require special protection and attention.

Begin by disconnecting and removing cables or accessories, keeping them organised and labelled. If you still have the original packaging for your electronics, use it as it provides the best protection.

However, if the original packaging is unavailable, wrap each item individually in anti-static bubble wrap or packing paper.

Place them in sturdy boxes with ample cushioning using packing peanuts or foam inserts.

Clearly label the boxes as ‘fragile’ and indicate which side should be kept upright to avoid mishandling.

These precautions will help safeguard your valuable electronics from potential damage during the move, ensuring they arrive in working condition at your new destination.

Secure and Load Properly

To ensure a smooth and damage-free move, you must secure and load your oversized items properly.

When loading items onto a moving truck or van, place heavier items at the bottom and distribute the weight evenly throughout the space.

Doing this helps maintain balance and stability during transportation.

Use furniture straps or bungee cords to secure items and prevent shifting during transit.

Be cautious not to stack items too high, as they may become unstable or cause damage to other belongings.

Additionally, ensure fragile or delicate items are adequately protected and isolated to prevent any potential impact or breakage.

Securing and loading your items properly, will minimise the likelihood of damage and ensure a more secure transportation experience.

Conclusion

Moving large and tricky items can present unique challenges during the packing and moving process.

However, with careful planning, organisation, and proper techniques, it is possible to navigate this task successfully.

Each step plays a crucial role in ensuring a smooth and damage-free move, from disassembling furniture and gathering the appropriate materials to using proper lifting techniques and securing your items.

Remember to prioritise safety and protection, and don’t hesitate to seek professional assistance if needed.

By following the tips provided in this article, you can tackle the packing and moving of your large and tricky items with confidence and ease, making your transition to a new home a more enjoyable and stress-free experience.

7 Outdoor Patio Design Ideas to Revamp Your Outdoor Living

Guest Post by Rebecca Lee

Picturing lively parties under the starlit skies while smoke from a BBQ grill tantalises your tastebuds?

Or a cosy, louvred nook where you can hide from the sun and read a book?

That’s exactly what patios can do for you.

Patios are more than functional spaces.

They’re havens of relaxation, inspiration, and entertainment.

Unfortunately, making your patio the heart of your social sphere is a little challenging.

Looking for ideas to jog your brain? Let’s check out 7 patio design ideas that can take your retreat from forgot-it-existed to use-all-year-round.

1. Louvred Patio

If the weather in your neck of the woods is fickle like the sea, a louvred roofed patio is just the thing you need.

Created from shutters or blinds with horizontal slats, these smart shading systems open and close at the tap of a button, regulating light and blocking rain when needed.

Plus, you can get them in any colour you want, from black and blue.

This can help you compliment your patio’s decor while keeping yourself safe from harmful UV radiation, which causes 95% of all skin cancers in Australia.

Also, louvred covers are available in different styles, such as flat, sloping, and A-frame, enabling you to match aesthetics with function.

However, you’ll have to regularly clean these shading systems every few months to keep them looking new.

You can check out Trueline’s outdoor patio designs for more information on this patio design.

2. Aluminium Patio

An aluminium patio roof is an excellent option if you’re looking for a low-maintenance, durable, and three times stronger alternative to wood, which is prone to getting mushy and rotting, especially if exposed to water for long periods of time.

Plus, aluminium doesn’t fade under the sun, rust when rained upon, and weathers slowly because of its corrosion-resistant protective oxide film, which means it’ll outlast wooden patio covers by at least half a decade.

However, aluminium is three times heavier than wood, meaning you’ll have to invest in reinforced pillars for your patio.

It’s also more expensive and can quickly corrode if exposed to salt water or acid rain for long periods of time.

3. Steel Patio

If you’ve got a backyard-sized patio you want to turn into a space for family gatherings but are looking for indestructible options, steel is going to be your best friend.

It’s strong, can withstand heavy rain, snowfall, and freezing temperatures, and is resistant to wear.

Plus, if combined with metals like chromium or nickel, steel can become almost immune to oxidation, a process that causes rusting and corrosion.

This means a well-built steel patio roof or furniture can last for decades if properly cared for.

However, steel can cost a pretty penny and weighs a ton — at least one-third heavier than aluminium, which is already three times as heavy as wood.

Keep that in mind when looking for steel roofing, pillars, or furniture.

4. Insulated Patio

While steel and aluminium are some of the most durable patio materials around, they get hot — like, burn-yourself-to-the-touch hot. Plus, they sound deafening in a hailstorm or heavy rainfall, which is not great.

That’s where insulated patios save the day.

These patios have a thick layer of polystyrene foam between the ceiling (the topmost part of your patio) and the roof (the part you see when you look up).

This layer stops your patio from becoming a toaster oven, protects you from harmful UV radiation, and muffles sound, creating a cool, relaxing haven, even on scorching hot days.

However, insulated roofs can cost much more compared to non-insulated options, take more time to put together, and don’t offer much in the way of colour choices.

5. Concrete Patio

Concrete is one of the most versatile options on this list.

It’s affordable compared to a wood patio — typically costing $50 to $150 per square metre — as well as strong and durable, lasting upwards of 30 years if properly maintained.

And unlike paving stones, you won’t have to deal with grass and weeds sprouting from joints.

Plus, you can make concrete floors look gorgeous without needing to shell out lots of money, such as through acid staining, polishing, resin pouring, dyeing, and painting.

You can also pour epoxy into any cracks and crevices on your concrete floor or to level the surface.

Since epoxy comes in various colours, you can create unique designs on your floor while keeping it water-resistant.

However, concrete does have disadvantages.

For instance, it can easily develop cracks if the undersurface shifts due to heat waves or long periods of drought.

These can be costly and time-consuming to repair.

6. Patio Pavers

If you like texture and want your patio to look eye-catching, patio pavers — paving stones created from stone, concrete, or other materials — are a good choice.

They come in various shapes and sizes and are easy to install.

Plus, pavers can last for 20 to 25 years without needing major repairs if made from stone, concrete, or porcelain.

They also don’t crack when exposed to heat, which means you can get a fire pit if you want!

However, patio pavers can be expensive compared to concrete because they’re more time-consuming and labour-intensive to install.

7. Tile

Tiles are an excellent option for your patio floor because they’re made to last and are easy to maintain.

Plus, they come in millions of designs and styles, from polka-dotted and striated to solid-coloured.

This means you can stay stylish while fitting for function.

Unfortunately, tiles can be expensive to put in because they’re labour-intensive and difficult to install outdoors.

They’re also brittle — a dumbbell can easily crack them — and can be slippery in the presence of water, which makes them a hazard.

Contracts – Prime Cost Items

Some new house building contracts will have ‘Prime Cost’ items.

These are used for fixtures, or fittings, which the Client requires, but have not been finally selected prior to signing the Contract.

An example would be they want a professional level cooking appliance. but have not decided on the actual unit.

So the total contract price reflects the cost of building the house the builder will put in an estimated cost of supplying the particular fitting or fixture.

This price will reflect the cost of the item only.

The builder is not allowed to add any profit, administration, or labour costs, to prime cost up to the amount stated.

These are considered to be included in the overall contract price.

If the price is exceeded he is able to add his overheads (normally 20%) on the additional amount.

You are entitled to see a copy of the invoice as proof of the price paid by the builder.

Example

You might want an expensive European oven that wasn’t currently available from the builders local supplier.

The builder would put in the contract schedule a prime cost item of say $3,000 for the oven.

Once the price of the oven, delivered to the builders store, become known the contract price can be adjusted.

In the example above if the final price of the oven to the builder, with normal builders discount*, is $2,500 the contract will be reduced by $500.

Alternatively if the price was $3,300 the final price will be increased by $360.

*If the builder got an additional cash discount he keeps the benefit of that as he has to cover the cost until he gets paid at the next progress payment!

Watch Out

You need to check that the prime cost amounts in any quotation are reasonable. (For instance if you are planning for expensive tiles make sure the prime cost amount for tiles is enough for the tiles you like)

In order for a builder to win work builders may underestimate the cost of prime cost items. They know the contract allows them to increase the cost to you if they ‘have made a mistake’ in their estimate.

The more Prime cost items in a contract, the greater the chance of cost overruns!


See the following link for another cost item you need to be aware of: Provisional Sums.


See similar posts in Contracts


How To Choose The Right Wardrobe For A Small Space

Guest Post by Lila Bennett

Wardrobe management can often feel like a strategic chess game, especially when space is a luxury you can’t afford.

Imagine trying to squeeze your unique fashion collection into a compact room.

It’s no easy feat. . . . . But fear not! . . . . Choosing a wardrobe that encapsulates your style and optimizes storage can turn the tide in this clutter war, making even the smallest spaces a haven for your treasured attire.

Here are some ways to select the ideal wardrobe for a confined space:

Understand Your Needs And Budget

When choosing the perfect wardrobe, it’s essential to assess your needs thoroughly.

Are your shoes taking up half your current storage?

Or do you own a variety of garments that require ample hanging space?

Possibly, a balance of shelves, drawers, and hanging areas is what you’re after.

Identifying your storage priorities is the first step toward making an informed choice.

It’s more than just about counting your shoes or clothing items.

Think about the variety of your belongings.

Do you have bulky winter coats, long dresses, or formal wear that need more vertical space?

Or are you a fan of neatly folded apparel that requires extra shelving?

Your wardrobe should not only store but also organize your items effectively, catering to your specific needs.

Lastly, considering your budget is crucial when hunting for the ideal wardrobe.

With the variety of options available, finding cheap wardrobes that don’t compromise quality or style is feasible.

Just remember, a wise decision balances cost, functionality, and aesthetics.

Get The Right Measurements

In a small space, every cm counts.

Therefore, it’s crucial to get the dimensions of the room and the proposed wardrobe spot on.

You’re not just fitting a piece of furniture but integrating it into your space.

But it’s not just about measuring the room and the wardrobe.

Consider also the doorways and staircases the wardrobe must pass through on its way to the room.

Remember, the goal is to make the wardrobe look like a natural part of your room, not an imposing intruder.

Getting the correct measurements ensures your chosen wardrobe enhances your room’s appeal.

Consider The Wardrobe’s Interior Layout

Don’t overlook the importance of the interior layout when picking out your wardrobe.

It’s not just a box to toss your clothes in; it’s your personal, organizational tool.

The layout dictates how easy it’ll be for you to store and find your items.

In the best scenario, each item has its dedicated space, eliminating the time-consuming hunt for that one shirt or pair of jeans.

Seek out a wardrobe that offers diverse storage options.

Multiple compartments, adjustable shelves, and built-in drawers can make all the difference.

Such features allow you to tailor your wardrobe to your unique storage needs.

For small spaces, maximizing the usability of each square inch of your wardrobe is essential, ensuring a place for everything and everything in its place.

Select The Right Type And Style

Style and type are as critical as size and layout when choosing a wardrobe.

The ideal wardrobe doesn’t just store your items; it also complements your room’s aesthetics.

Consider the type and style that best aligns with your space and decor, whether modern, vintage, or eclectic.

Here are some popular types of wardrobes:

  • Free-Standing Wardrobes: These are the most common type of wardrobe. Their chief advantage is their versatility; they can be moved around your room or even to another room entirely. This makes them ideal for renters or those who regularly change their room layout. However, they can be bulky and might take up more space.
  • Built-In Wardrobes: These are tailored to fit your space, making them a fantastic option for optimizing storage in smaller rooms. They can be customized to meet your needs, whether extra hanging space, more drawers, or additional shelves. The downside is their permanence; they can’t be moved, and altering them after installation can be difficult and costly.
  • Walk-In Wardrobes: The ultimate luxury in wardrobe design, walk-in wardrobes provide ample storage space and often include various options for organizing clothing and accessories. They are ideal for those with extensive clothing, shoes, and accessories collections. However, they require a lot of space, making them less suitable for smaller living quarters.
  • Sliding Door Wardrobes: These wardrobes are designed with doors that slide horizontally, eliminating the need for extra space to open doors. This design is especially beneficial in small rooms where space is at a premium. The sliding doors also provide a sleek, modern look, making these wardrobes a stylish and practical choice.

Each wardrobe type serves a different purpose.

A sliding-door wardrobe might be your best bet if your room is tight on space.

A free-standing wardrobe might be your go-to if you’re all about flexibility.

With careful consideration of your room’s size and style, you’ll find the wardrobe type that not only fits your space but enhances it.

Opt For The Best Material

The material of your wardrobe significantly impacts its look, durability, and portability.

Wooden wardrobes exude a timeless charm, offering sturdiness but can be hefty and pricier.

Alternatively, metal and plastic wardrobes present a more cost-effective solution.

They balance style with practicality, with metal being durable and plastic being lightweight and generally cheaper.

However, remember to factor in the wardrobe’s location.

For moisture-prone areas, metal or plastic options trump wood.

Thus, when choosing, consider your specific needs, the decor of your room, and your budget to ensure the ideal fit for your compact space.

Conclusion

Venturing into the world of wardrobe selection isn’t just about picking a piece of furniture.

It’s a strategic balancing act between style, utility, and space optimization.

Let these guidelines steer your decision, leading you to that perfect wardrobe—your small space’s game-changer, injecting charm while optimizing storage.

Ready to revolutionize your compact living quarters?


Author Bio

Lila Bennett is a seasoned interior design enthusiast with a knack for optimizing small spaces. With years of experience in the field, Lila specializes in creating functional and stylish wardrobes for compact living areas. Her expertise lies in maximizing storage solutions, selecting space-saving furniture, and incorporating clever organizational systems. When she’s not designing, Lila enjoys practicing yoga, attending art exhibitions, and exploring local flea markets for unique decor finds.

Exit mobile version