Construction Stage 1 – Base

Most of the work that comprises this stage of the construction will be hidden when the house is completed

That doesn’t mean it should be ignored as it has a significant impact on the completed house.

This work package can be subdivided as follows:
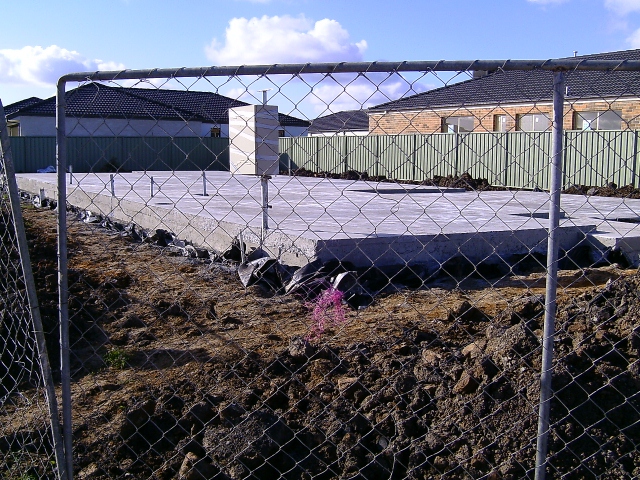
Site Set Up

  • Temporary Fencing. Most councils now require 1.8m high fencing of sites.
  • Power supply. Originally a temporary box on a pole at the start, These days installation may be delayed until slab construction and then the final box put in at the finished position.
  • Portable Toilet 
  • Silt barriers Only on sites where silt may be washed off site. Can be hay bales or a geotextile (like a shade cloth fence)

Excavation

  • Site clearance Removal of topsoil, vegetation and any rubbish.
  • Initial peg out. To provide enough information to allow excavation works.
  • Cut and fill Providing one or more level ‘platforms’ that the house will be built on.
  • Retaining walls Any major retaining walls that are required to either support or retain the building ‘platform’. Other retaining walls will often be part of landscaping.

Drainage and Pipework

  • Building set out.
  • Sewage and Drainage Pipes.

Slab Construction

For more about Construction Stages check out this link: Background

To find out about Stage Payments see this link: Progress Payments


Keeping Records – 5 things to do

My old contract management tutor at university always said that the three most important things when managing a construction contract are:

  • Records;
  • Records;
  • and Records.

Over 40 years in the civil engineering industry I have often reflected on the wisdom of those words.

So what does this mean when you are building your new house.

Well here are a few things you should do in case problems arise in your build:

A. Buy a one page to the day diary and record everything that happens about your new house from the start of the process until all defects from your three-month inspection have been fixed. Sign and date every entry. (Include a summary of any conversations)

B. Keep all correspondence from the builder, council, power supply companies, suppliers brochures, etc, etc.

C. Confirm all discussions and verbal agreements by either an Email or a letter.

D. Write a letter about any concerns immediately you think there is a problem.

E. Take photographs of progress, and any items of concern, with a camera that record dates.

For most builds this will just be an interesting record of your build.

However if major problems occur these records will give you the best chance of a satisfactory outcome.

Did you use your records to get the result you wanted?


More posts about the build are in the Construction Section


Working With Your Site Supervisor

If you are building your new house with a big builder once the contract is signed the most important person in the build is going to be the Site Supervisor(SS).

The site supervisor is responsible for programming the works, ordering materials, selecting who will carry out the various tasks (from the tradies contracted to the builder), and supervising the works as well as liaising with you.

To get the best results for your house building a good relationship with the site supervisor is important.

I am not saying that you have to be best friends, but you should aim for an atmosphere of mutual respect.

Here are a few thoughts:

  • When you are first contacted by the site supervisor why not suggest buying them a coffee to start the relationship off in a good way.
  • Let them know what things are important to you.
  • Arrange site meetings during the working day. – Typically the building trades works from 6.30am until 4.00pm. It’s your house so if you can’t make the effort to meet during their work hours don’t expect the supervisor to use their family time to meet you.
  • If you are given a mobile number that doesn’t mean you can ring in the evenings and at weekends.
  • If you spot a problem be firm but don’t go off the handle. “I noticed that ‘X’ was different to the required specification” is going to get a better response than “YOU SCREWED UP!”
  • The typical site supervisor will be involved in building several houses at once so sometimes they can’t get straight back to you.
  • If during construction you are told that something you wanted can’t be done ask to be shown the regulation that doesn’t permit it. On our last house I wanted the gas meter and electrical meter together. One night I checked the site and the plumber had installed the pipework to another location. When I was told that they couldn’t be together I asked the question about the regulations and the meter location was moved without further discussion.
  • Sometimes it can be worth waiting a bit longer for the better tradesman to become available, rather than rushing the build.
  • Always go through the site supervisor, don’t try to order the tradies around if you visit the site.

How have you got the best out of your site supervisor?

For more info while the build is underway see Construction


Energy and Water Ombudsman

If you have an ongoing problem with the supplier of Water or Energy utilities its worth contacting the Ombudsman in your state.

Our Problem

About the middle of June we got rid of our last gas appliance and asked for the meter to be removed.

We were told that by our energy retailer that it would take the wholesaler (Multinet)  20 working days to remove the meter.

Well 20 working days passed and the meter was still there so but we weren’t worried because we shouldn’t be paying anything.

Around about 40 working days a charge of 88 cents/day was taken from our credit card.

When we complained we were told that the request had been wrongly entered and it was going to take another 20 days to remove the meter and we ‘should’ get a refund.

‘Should’ isn’t good enough for me so we made an online complaint to the Victorian Energy and Water Ombudsman (EWOV).

Response

At 9.30 the next morning we were contacted by a representative of EWOV to discuss our case.

An hour later we received a email from Multinet saying they were looking into the problem.

By the end of the day the meter was gone.

Conclusion

If you are getting the ‘runaround’ from your water or energy retailer you should seriously consider taking your case up with the relevant ombudsman in your state.


Occupancy Permit – What Does It Mean?

Occupancy Permit (or Certificate of Final Inspection) is not the same as Completion.

It doesn’t even mean the house is ready for PCI Inspection or even that you would be happy to move in.

What’s typically needed for an occupancy permit are:

  • All the structure of the house has been completed and the rooms comply with the minimum dimensions (for example ceiling heights)
  • The roof drainage is connected to an approved point of discharge.
  • Bush fire protection measures are completed(If required)
  • Handrails and balustrades (and pool fences)  installed.
  • Provision of sanitary and other facilities in at least one bathroom.
  • The building is constructed to prevent the penetration of water and dampness to the inner parts.
  • Waterproofing of wet areas completed to the satisfaction of the Inspector.
  • Smoke detectors are working.
  • Power and water connected.
  • If you have gas appliances the pipework is  ready for connection to the gas supply.


Three things that you might expect are:

      • Painting
      • Internal Doors
      • Floor Finishes/Coverings

As well as many other things that are included the building contract.

Building Inspection- Compliance or Quality explains why a compliance certificate doesn’t mean the house has been built to the required standard


Construction Locks

Have you ever thought about who has keys for the locks on the doors of your new house?

After all there are lot’s of tradies working on the house after ‘Lock Up’ stage.

Well these days most builders use Construction Locks, sometimes called Project, locks. These are a special type of lock which comes with two types of key:

The Construction Keys

Standard pattern ‘master’ keys which are given to all the tradies, who can with a single key enter any of the builders houses under construction

The Final Key 

These are the keys which is given to you at handover. Once you use this key it displaces some ball bearings in the lock which should mean the Construction key will no longer work.

Some of the things you should know about Construction Locks are:

  • Before the end of the handover you should make sure you use the Final Key in every door lock in the house. check each lock with all the keys you are given. This will ensure that:
  • Every lock will be changed to only open with the final key. (It’s worth borrowing the site supervisors key to make sure his key no longer works)
  • All the locks, and keys work properly.
  • The  locks the builder uses are unlikely to be expensive/high quality.
  • Although the construction key won’t work there will be a limited number of final key combinations for this type of lock. If you want in increased level of security it could be worth getting a locksmith to re-key the locks as soon as possible. The cost is going to be around $60-80/lock plus a call out fee.

Would you go for better locks?


The Settling In Section contains lots of advice on what to do after

you have moved in your new house


Ornamental Brickwork

In Australia most brickwork these days consists of large panels of stretcher bond brickwork.

Where there are openings it usually spanned by steel lintels giving a square opening.

I’ve just shown a few examples of a different approach from my recent trip to England.

I wonder how many current Australian Craftsmen would be able to do something like these examples?

Liquid Limestone

You might have heard of Liquid Limestone as an alternative paving material…….But what is it?

Really its just a different type of concrete.

It is much more common in West Australia than other states.

The differences between conventional concrete and Liquid Limestone are:

  • Instead of standard Portland ‘Grey’ Cement it uses White Cement.
  • It uses crushed limestone rather than other types of rock gravel and sand.
  • Quite often a plasticiser is added. This means the mixture can be poured without having to add too much water.

Various patterns can be applied to the surface as the concrete sets. (see above photo)

As well as the standard limestone appearance the supplier can add various pigments. If you want a strong colour I think you would be better off  just going for coloured concrete.

Because it can be laid in large slabs like concrete there are less joints than in conventional brick or concrete slab paving. (There will still need to be some joints. For joint spacing see: Concrete Joints 1)

With the lighter colour it can be cooler underfoot than other pavements.

To maintain its appearance liquid limestone will need to be sealed around a week after laying.

Thanks to Concept Concrete WA. for these two great examples of  Liquid Limestone Paving

For  posts on on getting your paths and driveways correct see Concreting


Why Do Bricks Have Holes?

The holes are called ‘Core Holes’

Before ‘Core Holes’ were a thing most bricks has a large surface indentation called a ‘Frog’

So here are some reasons for the holes.

  • Better locking in with the mortar. As the bricklayer taps the brick down the mortar squeezes into the holes improving the hold between the set mortar and the brick.
  • Easier to Fire. When the brick is fired in a kiln the holes allow the heat to better penetrate the brick. . . . saves time and fuel.
  • Lighter bricks. Easier on the bricklayer, and trucks can carry more saving material costs.
  • Less material. More savings as it uses less clay

Pre-Plasterboard Inspection

Plasterboard can cover a lot of defects . . . . . . . so if worth checking on things before it goes up.

Typically the timing of this inspection will be after the ‘Lock Up Stage‘ but before the completion of the ‘Fixing Stage‘.

Due to cost lots of people don’t use a Building Inspector, or only use one for the Practical Completion Inspection (PCI).

I think making sure things are OK at the ‘Pre-Plaster Stage’ is as important as PCI , so if your budget is strained that is where I think your money is best spent.

Getting things fixed at this stage is much easier than trying to sort out issues between PCI and handover.

A further advantage of a detailed inspection at this stage is that it really emphasises to the Site Supervisor that quality is important to you before they get to the ‘Fit Out Stage’.

Don’t forget the outside, Checks, if they haven’t been done at an earlier stage, should include:

  1. Site Drainage –  Are the drains and sewers in and the construction looks OK. Is the site graded so water doesn’t pond against the house
  2. Brickwork /External Cladding – Does this look neat and well finished, and not have bricks overhanging the edge of the slab?
  3. Building Weather Tight – Look up is the roof complete? Is there any evidence of rain coming in? If you asked for sarking has it been installed?
  4. Layout – Are the rooms the right size and the doors and windows where you expected them to be
  5. Framing Defects – Does the frame look and feel solid, square and straight? Have the electricians and plumbers damaged any of the structural members during their installation of pipes and cables?
  6. Electrical and Plumbing – Are power cables and mounting plates in position where you want all your power sockets? Do the plumbing connections look to be in the right places
  7. Wet Areas – Has the waterproofing been applied and look complete?
  8. Insulation – Have the correct insulation batts been fitted into the external wall frame, with no missing areas, or gaps between individual batts. Has any noise insulation been installed between rooms and between floors, with no missing areas, or gaps?

Doing your own PCI ? . . . the PCI Guide provides extensive checklists and advice for only $4


Exit mobile version