Waffle Pod Raft Slab

A ‘Waffle Pod’ slab is now probably the most common Concrete ‘Raft’ House base.

It has generally taken over from the Conventional Raft Foundation.

It’s an example of composite construction with polystyrene pods forming the voids in the underside of the concrete ‘Waffle’.

This photo shows some of the pods, with the reinforcement fixed over them, prior to placing the concrete.

Advantages

  • Cost
  • No trenches resulting in:
    • Simpler excavation; and
    • Flat sub-base means site is easier to keep dry than trenches that collect water.
  • Waffle Pods bring house further out of ground so in an area that is wet the higher the better.
  • Better insulation from the ground meaning the floor will warm up quickly from cold when you put the heating on. (especially if you go for in slab heating)

Disadvantages

  • More susceptible to bad workmanship – If the pods move during placing of the concrete.
  • More susceptible to bad drainage which can lead to soil heave if building on reactive clay
  • Lower thermal mass so less suited to passive solar design.
  • Thinner slab (typically 75mm rather than 100mm) means may it not be as resistant to point loads such as jacking a car. Some people specify 100mm thickness for the garage floor.
  • A thicker overall slab may be needed if you want Floor Drains (To allow for the dropped floor in those rooms)

Problem Sites

If  your block has difficult ground conditions its still possible to use a waffle pod slab with:


Also see Ground Conditions
 

Conventional Raft Slab

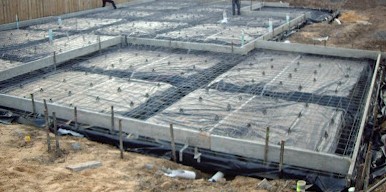
A ‘Conventional’ Raft Slab is a concrete base laid directly on a compacted base.

It is strengthened by cutting trenches in the base and adding reinforcement.

These ‘thickened beams’ are formed at the edges and also under loadbearing walls.

This photo shows the base covered in poly , reinforcement placed and edge forms in position ready for placing of concrete.

Advantages

  • Higher thermal mass, as it incorporates the thermal mass of ground  so better suited to passive solar design.
  • Less susceptible to bad workmanship by concretors
  • More resistant to point loads, such as jacking a car.
  • A thicker overall slab makes it easier if you want Floor Drains (To allow for the dropped floor in those rooms)

Disadvantages

  • Generally uses more concrete, than ‘Waffle Pod Slabs‘, with more waste as volume is less predictable
  • Rain can cause construction delays as the trenches for the beams can fill with water
  • More complicated excavation can lead to additional cost


Also see Ground Conditions


Building On Pipeline Easements (Or Close To)

Previous posts have talked about Sewer and Drain Easements but you build close to or over a pipe on an easement?

Permission

You must get permission from the owner of the easement to build on the easement.

Some easement owners won’t permit any building.

However some will allow certain works after a fee is paid.

This fee can amount to several thousand dollars particularly if you want to build right over the sewer.

Costs

The minimum costs are likely to be a CCTV survey of the pipe which could cost over a thousand dollars.

Additional costs may include either exposing the pipe and encasing the whole line in concrete, or re-routing the pipe and paying for the cost of establishing a new easement.

Getting the Design Right.

When building close to a buried pipeline, whether the building is in the easement, or close to it, the designer needs to ensure no loads are placed  on the pipe.

To avoid placing any load on the pipe the base of any foundation should be below the zone of influence of the pipe.

This zone of influence starts at the base of the pipe and rises at a slope of 1 in 1 to ground level.

In the diagram above

  • Foundation A is unacceptable The base is inside the zone of influence.
  • Foundation B is acceptable Even though it is the same horizontal distance from the pipe as Foundations A because the base is outside the zone of influence.

The base of the foundation is the lowest point of the foundation, that is the bottom of the slab, In the case of piers the base of the piers.

Building Over the Pipe

Some water authorities do allow building right over a pipe. in that case the base of foundations on both sides of the pipe needs to be outside the zone of influence.

Any beam or slab over the pipe needs to be designed to span between the foundations.


To better understand what you can build see

Restrictions in the Blocks section


Types of Fill

You will often find a reference to ‘Fill’ in your Geotechnical Report.

Your site may require ‘Cut and Fill’ to level the site.

Here is a bit of information about the various types of fill:

Ordinary Fill

Ordinary fill is normally excavated material from the site or from a unspecified location. After placement the excavator  tracks across it several times (known as Track Rolling) and then levels the top surface.

This fill is cheap but cannot be relied on for house foundations. You will either need to excavate through the fill to the underlying material, or use Concrete Piers.

Controlled Fill

Controlled fill is a known (tested) material either from the site or a specially imported material.

The filled area is constructed as follows:

  • The material is placed in layers, typically 150mm.
  • The water content is optimised, usually by adding water.
  • Each layer is compacted with specialised compaction equipment such as a vibrating roller.
Photo Courtesy of Coates Hire
  • At least 3 satisfactory tests of the compacted density of the filled area are carried out.

Providing the whole slab foundation will be on the controlled fill  your foundations only need to go down the required depth into the controlled fill.

No matter how well the fill was controlled I would not want to build where part of the house was to be on fill, and part on original ground…… In that case I would still like Concrete Piers, or Screw Piles installed through the fill to the original ground.


See Soil Classification for more information


Building On Rock

Based on the Soil Classification rock is considered one of the best surfaces to build a house foundation.

It comes under the Classification Class A.

That  doesn’t mean its going to be cheap especially for a conventional raft or waffle pod slab.

Any excavation such as leveling the site and excavation for sewerage and drainage trenches is going to be be expensive. This is due to it requiring a heavy excavator and rock breaking equipment.

Keeping Costs Down

If you have a site that has rock close to the surface the most economic base construction is likely to be Piers for Lightweight Construction. (including  Pole Houses and Queenslanders)

If  you want a Masonry House  (such as Brick Veneer or Double Brick) then you need to minimise the amount of excavation by going for suspended floors.
 

Also see Provisional Sums to find out the issues of finding rock during the construction.


Building on Fill – Screw Piles

I have previously posted about building on fill using Concrete Piers.

Well one alternative to constructing concrete piers is to use Screw Piles such as the one to the right.

These are made from a thick steel tube with:

  • A cutting edge on the bottom.
  • A  spiral plate close to the bottom.
  • A keyway at the top to lock into the drive tool.

The pile is screwed into the ground using a drive tool mounted on an excavator.

Screw piles will normally be more expensive than concrete piers when only a few shallow piles are needed.

They can be cost effective, and fast to install, when a larger number of piles are required or soil disposal is a major problems.

Other advantages are:

  • There is minimal spoil to be removed from site.
  • You don’t have to worry about rain as much during the installation.
  • They can be easily installed when the base of the pile is below the water table.
  • They can be installed in very restrictive locations.

Edit based on question I received

If you are worried about corrosion normal screw piles are fairly thick steel to stand the driving forces (individual thickness of material may vary)

Typically corrosion for plain steel piles in natural ground can be in the range 0.12 – 0.3 mm in 10 years, although galvanised steel will be less.

See Ground Conditions for more about your new house foundations.

Exit mobile version