Concrete – Pavement Joints 1

I have previously talked about Concrete Cracking …….but how do you stop random cracking across your driveway concrete?

Well the best way is to control cracking by making sure it cracks where you want it to and the cracks are neat.

To do this you need  ‘joints’  which ensure the cracks in the right place.

A good rule of thumb for a reinforced concrete slab is the joint spacing should be no more than 25 x the depth.  That is for a 100mm thick slab the joints should be every 2.5m.

Un-reinforced and I wouldn’t be happy with a joint spacing of more than 15 x the depth.

Contraction Joints

Contraction joints, sometimes called control joints, are the most common type of joints. They are formed to ‘break up’ slabs poured over large areas into the smaller final slabs.

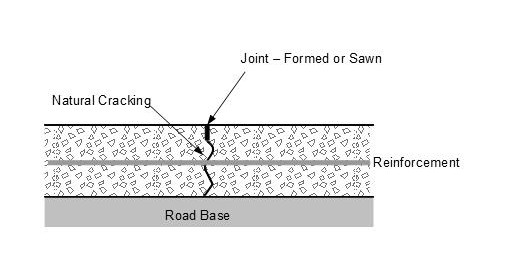
The following sketch shows some of the characteristics of a contraction joint.

The key features are:

  • A joint is either formed, or sawn, to weaken the concrete at the joint position. Below is a picture of a joint forming tool

  • Below the formed joint the concrete naturally cracks with a rough surface. This rough surface stops one slab moving up or down relative to the other slab.
  • Reinforcement continues across the joint to hold the joint closed. This reinforcement should be be weaker than the main slab mesh. One way to achieve this is by cutting out alternate bars in the reinforcement mesh.

Problems

Here are some of the the things that go wrong and mean you get random cracking spoiling the look of your concrete paving.

  • Too Much Steel
    This can be;
    • The mesh has not been weakened across the joint by removing alternate bars.
    • Two sheets of reinforcement mesh have been overlapped across the joint.
  • Shallow Initial Formed Joint This joint should be 1/3rd the total depth of the slab other wise it may not weaken the slab enough to form the crack at the intended position. When I have used a formed joint I usually run an angle grinder along the bottom of the groove  the morning after the pour to make sure it is deep enough.
  • Joint Not Sawn At Right Time If the joint is to be a saw cut it should be done 16 -24 hours after the pour. Too soon and the saw will pull stones out of the concrete leaving a rough edge. Too late and the concrete will have cracked at a place other than the intended joint.

You may think your concreter will know all this.  It’s a sad fact that a lot either don’t know, or don’t care, judging from  the jobs I see!


For more posts on on getting your paths and driveways correct see Concreting


Curtain Fail

OK, plenty of people put sheets on their windows when they first move in.

I have even done it myself.

The reason why I highlighted this house is because this is a top end, custom built, massive house and these sheets have been in the window for at least 2 years.

Wouldn’t it have been better to build a slightly smaller house and be able to afford proper curtains?

Make sure you Budget For All Your Costs when you are looking to build your new house


For more Fails and Unusual houses go to What the………………….?


Rainwater Tank – Inlet Improvements

In Understanding Tank Water Quality I explained that most tank inlets mix the dirtier incoming water with the cleanest water at the top of the tank.

So what can you do?

Its not as simple as just extending the inlet pipe to the bottom…..The jet of water will create turbulence in the anaerobic zone with the most silt. This will mix this very dirty water with the better quality water higher up the tank, creating problems.

One solution to reduce turbulence is:

  1. Put a ‘T junction at the inlet. (This will allow the falling water to draw in air to further oxygenate the fresh water.)
  2. Install a downpipe to just below the bottom of the tank.
  3. Put two 90 degree bends on the bottom so the flow is directed upwards with the outlet being about 150mm from the bottom. (above the anaerobic zone)

You can get a special fitting for the bottom of the pipe but my solution below will probably be cheaper and just as effective.

Put a ‘T’ at the bottom of the downpipe and have two bends so the flow into the tank from each pipe is half that of the single pipe. (See photo )


To help you pick a tank see Round or Slimline Tanks


Tips for Building an Outdoor Kitchen

Post sponsored by homesales.com.au

There’s nothing like cooking in the great outdoors, whether you are camping in the woods or sitting on your own patio at home.

Two of the hottest trends in new home construction today are island kitchens and backyard patios, so it stands to reason that homeowners are combining the two to create customizable outdoor kitchens.

Rather than messing about with fiddly propane or charcoal grills, you can install all the features of today’s modern kitchens into a cosy deck setting.

Keep it simple with grills built in to your patio, or go high tech with your favourite kitchen gadgets. Either way, you’ll benefit from being able to spend time cooking outdoors with your friends and family, while at the same time adding value to your new home.

Space and Location

As you look at plots of land for sale and start planning the construction of your dream home, think carefully about how much space you will have available for an outdoor kitchen.

In most cases, you’ll need to place your kitchen area close enough to the home to be convenient. Water and electricity supplies must be readily available to install a working outdoor kitchen.

Think about whether you want a concrete base or something more organic, and whether you want your dining area incorporated into the kitchen plans. Your outdoor kitchen may take up the same amount of space as an interior room, depending on your vision.

Style and Design

An island design is the most popular for outdoor kitchens; perhaps because it gives you room to move around a stand-up grill. You can choose a simple rectangular shape with a grill, countertop, bar, and sink.

Kitchen islands, however, could also be L-shaped or even curved to accommodate dining areas and give you added workspace. Another decision to make is whether you prefer to have an open or enclosed outdoor kitchen.

Partially enclosing your kitchen can protect you from foul weather, but it may also lead to the need for added ventilation to prevent smoke from the grill from accumulating in the dining area.

Equipment and Amenities

The primary piece of equipment that you will need for a working outdoor kitchen is a grill, which can be installed in the main kitchen island. These can be outfitted with burners, griddles, and other features.

Sinks can make it easier to prepare food outdoors, while refrigerators keep drinks and perishable items cold without the need to keep walking back into the house. These are the most basic items to install in your outdoor kitchen, but the sky is the limit when it comes to possibilities.

If you enjoy baking, you could install a stand-up mixer and cooling racks. Those who want to use their outdoor kitchen for parties may want to have a full bar installed.

As you draw up plans for your piece of real estate, think about the types of food you will be most likely to prepare in your outdoor kitchen, and how often you plan on entertaining. By customizing this space, you’ll be able to have everything you need for idyllic outdoor entertainment.


Also see: Outside Electrical Planning

and External Plumbing.


Pre-Start (Selection) Meeting

Some builders call it Selection, some call it Pre-Start, if you are having a custom built new house it will be Detailed Design.

Whatever it’s called this is the stage of the pre-construction planning when the basic floor plan and the structure have been settled.

Its now time to move on to all the details that finish the home off.

Spending some time thinking about the details can make a real difference to how you will feel about the new house you have built.

Cost

A word of warning, its easy to get carried away and add tens of thousands of dollars to the price of your new house so do some research and think about how you intend to use your house. (I have seen some houses with built in European Ovens costing thousands of dollars that hardly get used)

Choices

Some of the things you need to be thinking about at this stage are:

  • Roof and Walls – If you haven’t already chosen them you will need to select bricks and roof materials.
  • Electrical Planning – Have you got enough power sockets, are the light switches in the right place.
  • Kitchen Benchtops and Cupboards – The kitchen is the most expensive room in the house and the most used.
  • Plumbing – After Kitchens the next most expensive room. An expensive toilet can be ten times the cost of an acceptable builders standard toilet, so its worth thinking about costs not just the look.
  • Tiles and Splashbacks – A tile from the builders range won’t add much but choose hand made tiles and expensive glass splashbacks and the costs can rocket.
  • Floor Covering – There is a wide range of choice, or you could wait until the house is yours!
  • Doors – First impressions count so make sure your front door looks good.


Want all the relevant information from this blog and more in one place, with handy printable checklists?…….  Why not buy my E-book ‘Guide to Pre-Start / Selection’ for only $4


Understanding Tank Water Quality

The drawing on the right shows a fairly typical rainwater tank layout.

I have seen lots of tanks set up like this and have also seen this layout in tank supplier’s brochures.

The set up is probably OK for garden watering and toilet flushing but not much else………………………..”So what are the Issues?”

Variable Water Quality From Top to Bottom

Even with ‘leaf screens’ and ‘first flush divertors’ there is going to be some particles in the water coming of your roof, These particles will either be lighter than water and float to the top, or heavier than water and sink to the bottom.

The smaller the particle the longer it will take to sink to the bottom.

The 2nd diagram shows how the water quality varies through the tank a few days after it has rained.

  • There are some particles floating on the surface.
  • There is some material close to the bottom which can include rotting organic matter. Sometimes called the Anaerobic zone.
  • The water between the bottom and the top gradually improves as the height increases with the best water being about 1 cm below the surface.

Problems

Because of the variable water quality problems are:

  • The outlet is close to the zone of worst water quality.
  • When it rains the turbulence from the inlet mixes the tank which then takes time to settle.
  • The overflow takes some of the better quality water.

Over the next few weeks I will provide  information about ways of improving the water quality in your tank.


For more about tank water quality see Rainwater Safety


Modern Bird House

Just moved into your new modern house and would like to encourage birds in your garden?

Think all the bird houses look old fashioned?

How about this?


It’s called Camera Shutter.


Or this?

It’s called Right Angle.

These bird houses and several more interesting designs can be bought online from Twig and Timber


For more Unusual ‘Houses’ go to What the………………….?


Should You Use Yor Own Building Inspector?

Although I give lots of opinions on all aspects of building a house, including checking quality, I would never say “Don’t employ your own Building Inspector.”

I’m very experienced in the construction industry and have done lots of research so I’m happy doing it myself. A lot of people wouldn’t have the same level of knowledge and might be happier getting a more experienced person in.

A good inspector is going to charge around $400 for an inspection, so an inspection at every stage is going to cost around $2,000. . . . Not a lot for peace of mind when you are paying for a $200,000, or more, new house.

Be Involved

Even if you employ an Inspector they are only going to be going round at the completion of each Stage with several weeks between visits. A lot can happen in that time.

If you do some research and visit regularly you might see things that are covered up before the Inspector gets on site. I managed to stop things being done on my last build which would have caused delays if left unchallenged until the Stage Payment was due.

I would also say its well worth visiting the site with the Inspector and asking him about what he is looking at. He may also give you a different opinion on something the builder has told you.


To find out more about inspecting a new house see

Practical Completion Inspection


Pebble Gardens

Stone Mulches, Dry River Bed, Desert Gardens, they are all variations in having a garden covered with stones rather than having soil or an organic mulch.

It’s popular as a low maintenance finish to your new house garden.

I have used the technique a few times including back in 2006 when I went the Dry River Bed look.

Here is what you should know:

  • Give the whole area a good dose of weed killer first.
  • Put weed mat on the soil first, not plastic sheet. You want the soil to ‘breath’ and have water seep through to get to the roots of any plants you put in.
  • Don’t skimp on the stone, you need a thick layer to make sure you cover all the soil.
  • Don’t think its ‘No Maintenance’ It will probably be relatively weed free for the first couple of years than dirt and seeds will get blown into the gaps. If you don’t then keep on top of the weeds the whole area can start to look scruffy, like this photo below!


For similar posts see Garden


Exit mobile version