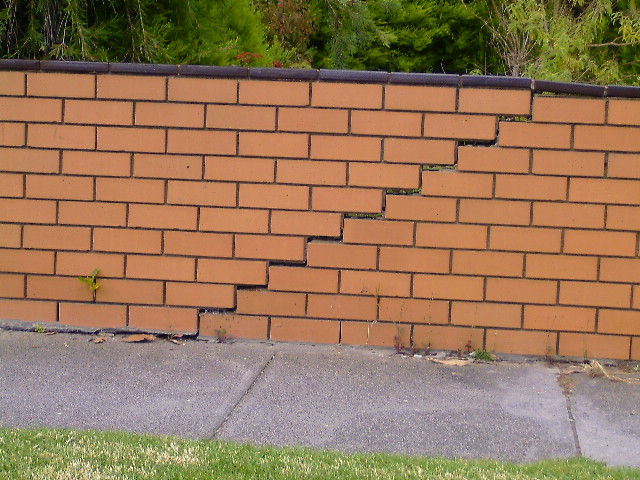
As I travel around the Melbourne Suburbs I see lots of brick fences……….. A problem with a large proportion is that they have obvious cracks.
If you don’t believe me just walk around your neighborhood and look at a few brick fences yourself!
So why are there problems with brick fences?
The actual cost of the wall in both materials and labour is high resulting in people trying to minimise on wall, and supporting pier dimensions.
Although many people think of brickwork as an inert material it is still subject to expansion and contraction which needs to be accommodated with proper detailing.
Brick work is actually a fairly brittle structural material which relies on its weight for a lot of its strength. The jointing material of mortar is much weaker than the bricks.
Due to the considerable weight of brickwork it needs substantial (costly) foundations which will not be subject to any settlement.
If it’s built on clay there is more chance of movement……The soil below the narrow foundation can gain, or lose, moisture more readily than under a house slab.
Although it ‘feels’ as solid as a concrete wall it may only have a tenth of the structural strength of a well designed reinforced concrete wall.
Here are a few recommendations;
Don’t try to save money on the foundation. After all that’s what all those expensive bricks are standing on. A 500mm wide x 300mm deep concrete with trench mesh should be the minimum.
Brick piers a minimum of 320mm x 320mm with vertical steel reinforcement.
Minimum wall thickness should be 210mm (double brick)
Have articulation/expansion joints at 5m intervals.
Use horizontal steel reinforcement every 6 courses.
It you are using the wall to retain soil get the wall properly designed.
All sounds too expensive?,,,,,,,,,,,,,,,Perhaps brick piers with infill timber or steel panels may be the way to go!
Remember – “There is no such thing as a cheap brick wall”.
In certain conditions you can easily see very slight surface imperfections
This is known as ‘Glanced Light’ . . . . so what does is mean?
Well when light strikes a surface at a flat angle like in this first sketch its said to be a glancing angle.
Because of the angle any imperfections in the surface cause shadows that make the defect more obvious.
The most obvious point where you may notice glanced light is at the joints between plasterboard panels.
Its not uncommon in the joints showing up as bands of a different shade.
In full light like the second sketch these sort of imperfections are less likely to show up.
What’s Acceptable
For the typical project home any imperfection that shows in full light is unacceptable.
In glanced light you should not see screw of nail fixings although joints will most likely be faintly visible.
If you are uncertain go to your builders display house and look at how their ceiling looks.
How To Minimise Glanced Light Issues
Specification – In the old days all plasterboard had a skim coat of plaster applied over the whole surface rather than just the joints. Although you can ask for this it will be at a substantially added cost.
Workmanship – If the plasterboards are fixed with the joints running towards the windows any joint imperfections will be minimised. A skilled tradesman should then be able to make the joints and fixings holes fairly smooth.
Lighting – Pendant light fittings are better than fittings that are closer to the ceiling as they give full light. Avoid windows that go up to ceiling level.
Decoration – Matt paints are better than silk finishes. Roller applied paint is better than spray applied. Alternatively a textured finish to the ceiling will mean the texture covers the joints.
To find out more about inspecting your new house see
One of the key misunderstandings by new house buyers is the role of the building surveyor with respect to building quality of their New House.
Many consumers believe that inspections by building surveyors against the minimum standards of the ‘Regulations’ are also an inspection of work quality specified in the contract.
This belief is incorrect, some of the key objectives of compliance with regulation are:
To protect the safety and health of people who use buildings and places of public entertainment; and
To facilitate the cost effective construction and maintenance of buildings and plumbing systems.
House Build Contract
The House contract between the owner and the builder for a new house construction includes the following aims.
To provide for the maintenance of proper standards in the carrying out of domestic building work in a way that is fair to both builders and building owners; and
To enable building owners to have access to insurance funds if domestic building work under a major domestic building contract is incomplete or defective.
An example of the differences would be:
If a builder ran out of bricks during the project and finished the wall off with another type of bricks.
As far as the building surveyor was concerned the wall would be structurally sound and would therefore meet the objectives of the regulations.
As far as, you the owner, is concerned a wall of two different types of bricks would definitely not be what you required.
Your remedy however, would be through your building contract, NOT the regulations.
For the first Australian house we built welived and worked close by and could visit every evening.
During our last build the site was 40km away so I only visited once or twice a week.
Many builders will tell you that you are not allowed to visit the site for OH&S reasons, unless the Site Supervisor accompanies you. There are two reasons for this:
If you have an accident they have evidence that you have been told not to be on the site.
They would prefer to get on with the building with the minimum interference from you.
I didn’t let this stop me from visiting although I have got a construction industry site (red) card and I understood I was there at my own risk.
I think that in the early stages its more important to keep a close eye on things if you have made a lot of changes from a standard design, or you are having a house built to your own design.
If you are using a standard design the Site Supervisor and the Tradies will generally know what they are doing. When there have been lots of changes to the design they may lose the plan/or forget and revert to the standard design.
Later when it comes to fit out you need to keep more of a watch on things. A couple of examples from our last house:
The wrong laundry trough was initially fitted and had to be ripped out.
The wrong kitchen tiles were delivered but we spotted them before they were fixed.
The Minimum
As an absolute minimum you should do an inspection when each stage payment is claimed.
If you spot what may be a problem it can be best to be tactful and ask questions in such a way that the Builder has a chance to explain what is going on. If you are not convinced then its time to do some research.
Best thing to do is also get to know your Builder.
If the Builder get’s annoyed and is impossible to talk to you should contact the Housing Industry Association and/or the Master Builders Association for advice.
Some people think that concrete is strong enough the day after it is laid……..WRONG
Some people think that concrete ‘dries’……..WRONG
Hardening of concrete is a complex chemical reaction which requires time and moisture.
Concrete takes at least a month to reach its final design strength.
This time is known as the ‘Curing Period’.
During this time the concrete strength will increase but the slab will also shrink.
Strength
The typical slab laid and exposed to air after finishing will increase in strength as follows:
After 1 Day – The concrete will have about 20% of its design strength. Being still relatively weak it can easily be damaged. If you are going to have saw cut joints now is the time to cut them. You can also remove any formwork.
After 3 days – The concrete will now be at around 60% of design strength. You should be able to walk on it and use wheel barrows without damaging it. This is the earliest time I would like to see frame erection start on a house slab.
After 7 days – Around 80% has now been achieved. At this stage you should be able to use a driveway for cars
After 28 days – Design Strength Reached.
Shrinkage
During the 28 day curing period the concrete will shrink by 0.8 – 1.3mm per metre. That’s 2.4 -3.9mm for a 3m slab. This means:
Paving – Unless you have adequate joints this shrinkage will stress the slab causing cracks.
House Slabs – The slab is normally cast without joints so its usual to find that there are fine cracks. As long as there is adequate reinforcement in the slab these cracks should be less than about 1mm and are not an issue.
Curing Best Practice
Proper treatment of the concrete will improve the final result.
If treated properly during the curing period concrete can be up to 50% stronger than the Design Strength, and will also be stronger at each stage of the curing period.
There is also less likely to be fine cracking of the surface.
The most important thing during curing is to stop the concrete drying out too quickly.
Ways to achieve this include:
Covering with material such as sacking, sand, or Old Carpets, which are kept damp.
Covering with Plastic sheet.
Apply a Curing Membrane (You may need to go to a specialist supplier for this)
Regularly spraying the slab.once the initial set is achieved (wait at least 12 hours.
Frost
Frost can damage curing concrete reducing the final strength.
If you are in one of the colder states during winter protecting the concrete by covering it at night is a good idea.
For more posts on on getting your paths and driveways correct see Concreting
Concrete is an artificial stone that you can make yourself.
It has four ingredients that all contribute to the overall strength.
Large stones (Aggregate) – The aggregate provides shear strength to the concrete. In other words the concrete has to crack around rather than through the stones. A good aggregate will have a mix of stone sizes rather than just one size of stone, this help the aggregate lock together
Sand – acts to fill in the spaces between the aggregate and further helps lock it solidly.
Cement powder – Is the basis for the ‘cement paste’ (glue) which coats the surface of the first two components and holds them together.
Water – Reacts with the cement powder to form the cement paste
Just like baking a cake its important to get the proportions of the various components right for the best results.
Too Much Aggregate compared with the sand and the cement paste will be be just cement coated stones stuck together where they touch. (known as ‘Boney’)
Too Little Aggregate, or Too Much Sand and the mixis called ‘Fatty’ There will be too little aggregate to provide shear strength and much of the aggregate will sink to the bottom.
Too Much Cement will cost you money without adding to the strength of the concrete.
Too Much Water will dilute the cement paste meaning the ‘glue’ has less strength and will also cause increased shrinkage as the cement cures. (It is very unusual to use too little water as the concrete will be very dry and as a result be hard to place and finish)
If you are going to lay large areas of concrete its probably be best to get premixed concrete which should have the ingredients in the correct quantities.
For small quantities you can buy bags of dry concrete mix where you just add water. Make sure you follow the instructions.
If you have got a job that is of a reasonable size but too small for premixed concrete here is a suggested mix:
Cement = 1 part.
Sand = 2.5 parts.
Stone or gravel = 3 parts.
This should be fine for paths, garden wall foundations, fence posts, washing poles, and driveways.
If you are going to order Ready Mix N25 (Normal 25) should be fine for a driveway, pathway or shed foundation.
Did you know you can get an Occupancy Permit before your house is finished?.
Useful to know for all those owner builders who want to move in while they finish.
The point of an Occupancy permit is to protect the safety and health of people who occupy and visit the house and to enhance the amenity.
What Needs To Be Completed
Here’s the list of things that will need to be checked off before you get a Certificate of Occupancy:
Building is watertight. (roof and walls)
Damp prevented. (Damp proof course OK and ground below DPC sloping away from house}
Roof drainage connected to an approved point of discharge.
At least the kitchen sink and one bathroom are connected and working.
All handrails and balustrades installed. If you have a swimming pool the fences should also be in place. (Even if the pool is empty there is a falling hazard)
Waterproofing of wet areas completed.
Smoke detector/alarms installed and fully operational.
Power installation completed to the satisfaction of the electricity supply authority. (Power company’s seal on meter)
If gas cooking is to be provided, the pipework is connected to the unit and the house ready for connection to the gas supply.
Water supply connected to the building.
An occupancy permit is not evidence that the building complies with the provisions of Building Codes and Regulations 2006.”
Unlike traditional built homes, modular homes are becoming popular due to quality construction, low cost, and quick turnaround.
If you’re planning to build one for you and your family, it’s essential to do your homework.
The reason behind it is that not all modular homes are the same.
So, before you get started with building your preferred modular home, the following are some tips you may want to know:
Understand The Basics Of Modular Home-Building Process
Modular is the term used for those constructed with standardized measurements or units.
Instead of building different sections of the house on- site, the construction happens inside the manufacturing facility and the home is often shipped to the specific building location.
Therefore, rather than getting a load of raw lumbers at your building site, you could receive walls or whole rooms.
The components of modular homes are made according to the quality control specifications and local building codes.
The actual number of the modules may depend on your home design’s complexity.
Whatever happens, get rid of the temptation of purchasing a piece of land on which to build your modular home.
The characteristics of a good location for modular homes are as follows:
Neighbourhood. Take some time to check out the location and its periphery for government and social amenities, such as churches, offices, work locations, and schools. If possible, opt for a neighbourhood that feels comfortable and safe.
<liWide Lot. Having a big piece of land is always better than a small one, regardless of how big or small your modular home is. In addition, having a wide lot makes it possible to create a beautiful lawn and driveways.
Type Of Soil. The type of soil in the land may influence the construction in your preferred location. Be sure to do your due diligence to determine the kind of structures that the soil in your location may handle. You’ll have to decide if you’d rather change your modular home or move to another area.
Water Availability. Make sure to purchase land in an area close to a clean water source. You wouldn’t want to experience water scarcity when you’re building your modular home.
Secure Your Financing
Once you decide to build a modular home, you may get a loan or opt for self-finance.
Self-financing can be done if you have enough equity or sufficient cash in another property to acquire another mortgage.
If you prefer the loan route, your first step is to meet with your mortgage broker or bank to go through the approval process.
This will give you an idea of how much you may need to spend on both your new home and land.
As a result, you won’t waste time considering other options that are way beyond your budget.
Focus On The Finishing Touches
Several things, such as showers and sinks, will be installed in the modules once they arrive from the manufacturer.
Some items, including dryers, refrigerators, and washers, will be delivered when the house is built.
Be sure to review your inventory properly to ensure you’ve received everything you were supposed to.
However, it’s also vital to note that not everything can be finished by your chosen manufacturers.
Choose Your Floor Plan
A floor plan is essentially the blueprint of a home’s overhead layout. Viewing a pre-drawn floor plan allows you to have an idea of the home style you want, what’s best suited for your needs, and how the rooms are connected. When selecting a floor plan, these considerations may help you make a well-informed decision:
Functionality. Designing a customizable space and browsing a floor plan is fun, but never forget about adding functionality to your space. Make sure to select the right number of bedrooms for comfortable living.
Purpose Of Your Modular Home. Think of every room as having a purpose of its own. Remember this when choosing your floor plan as you might not want bedrooms right beside the living room where it might be loud. So, take time to consider the purpose of every living space.
Calculate The Costs
Typically, modular homes are cheaper than traditional built homes.
Several locations and some factors might make your modular homes pricier than average, though.
Take your time. You have spent a lot of money and it’s your chance to get things fixed.
Look at things from a different angle. It’s easy to miss things below eye level, when you are standing. In each room sit on the floor (or a camp stool) and have a good look around at that level. Sit on the toilets and shut the door.
Take your shoes off and walk round in stocking feet then you can feel any problems with the floor.
Turn on the Taps. Fill the basins, sinks, and bath to the overflow level and then check for leaks.
Run the showers and check they drain.
Flush the toilets, check they are securely fixed to floor and don’t leak
Check locks Make sure privacy locks on toilets and bathrooms work
Checkswitches and power points Test power points. Make sure that where you have several lightswitches on one panel the layout of switches is logical
Check you have the electric points you selected. Make sure all the lights and power points have been fitted
Sensor check If you have any sensor lights make sure the delay and sensitivity is correctly set. We had one in a wardrobe in our current house that went off if you stayed still for 5 seconds.
Check for rough edges Such as on the edges of paintwork from paint drying in lumps/drips particularly window sills. Those rough edges can catch your curtain fabrics and pull threads.
Record everything Making sure ALL of your concerns are noted down on paper, legibly and not skipped over. There may be some things where your SS will just say “Oh, that always gets done before handover”. Make sure it is written in the PCI list anyway. Unless it’s in the list, it may not get done at all.
Why not buy the PCI Guide for much more advice and extensive checklists….still only $4
One area of annoyance for home buyers is when they want to vary something and the variation price is much more than the difference between retail prices.
For Example
An example is the builders standard oven may be $700 at your local discount store while the oven you want is $1100.
When you ask for a variation you may be quoted an extra $700 or more.
Even if you buy the oven and supply it to the builder he may only offer a cost reduction of $400 rather than the $700 you expected!
Why?
What’s the reason for the extra $300 over the retail price difference? . . . . . . .Well its not always the builder ripping you off.
A big builder is possibly buying over 100, or more of the same type of oven so he may be able to buy them direct from the manufacturer for less than $500.
When it comes to buying the different oven the builder is only buying one so he might be unable to get much if any discount.
The difference in price to the builder is thus around $600. Even if you buy the oven the builder only saves $500.
They may also have extra costs due to
Organising and administration of a single purchase,
Installation costs because the different oven may not build into the kitchen cupboards as easily as the builders standard oven.
I hope this helps you understand that some ‘additional’ costs can sometimes be justified.