Starting House Design 1- Bubble Diagram 1
A big mistake in designing a house is to get involved in detail too quickly.
Rough sketches of a floor plan, which you can easily change, are the best way to start. . . . Much better than using a computer drawing tool which can ‘Lock You In’ and stop you considering different ideas.
- Decide what rooms you need and the approximate size of the house (see How Much House?)
- Draw some bubble diagrams. . . . These are drawings where each bubble represents a room, or a feature of the house.
- Work quickly, while thinking, and discussing, how you want the various rooms to relate to each other.
- As you develop the plans try to draw the bubbles to roughly represent the room sizes, but don’t try to be too accurate.
- Because the drawings are done quickly you can easily do new ones as your ideas develop.
- Don’t throw the old one out though! You might want to go back to a previous idea.
The collection of diagrams will be a demonstration that you have gone through a process of developing a design rather than infringing someone else’s Copyright.
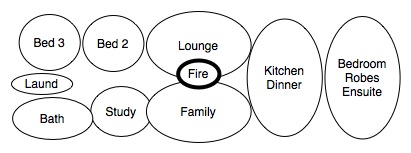
The above illustration is a tidied up version of the initial bubble diagram for our first Australian house. It was based on certain things we wanted in the floor plan. These were:
- A rectangular plan to keep things simple and economical
- A passive solar house with the main rooms facing North
- A wood burning stove in the centre of the house
- Our bedroom at the opposite end of the house to the children.
Next I will show how we developed the initial bubble diagram to a refined version which we could then use to develop the final floor plan.
For more Posts about Design see Floor Plans