Onsite Stormwater Dention – Why

If you want to redevelop or subdivide an existing urban house block, you might find that a planning condition is that you will need to provide On-site Stormwater Detention (OSD).

You may also find it is a condition on individual blocks on smaller subdivisions.

Why Is Onsite Stormwater Detention Needed?

Before development of towns and cities a large proportion of the rain that fell in an area soaked into the ground or flowed slowly across the land to a creek or river. When areas started to be developed two things happened:

  • More and more of the land was built on, or paved, which meant rain was unable to soak into this ground.
  • Stormwater drains were built to carry the rainwater quickly away from the houses to be discharged into streams and creeks.

Initially while Australia had a small population this didn’t cause too many problems.

Since the mid 1950’s and the rapid growth in population more and more land has been built on.

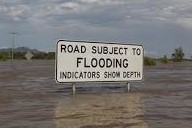
The result has been more and more water has been discharged surface water drainage systems causing overloading of the piped systems and flooding of the rivers.

In order to try and reduce flooding Planning Authorities are attempting to reduce rainwater flows from developments to a flows similar to an undeveloped site.

OSD On Large Subdivisions

If you buy a block on a large subdivision it is unlikely that you will be asked to provide OSD on your Block.  This is because large developers  as a condition of the overall development have to provide Stormwater Detention Storage for the whole development.

The way they usually do this is by making much of the open space they also have to provide as Ponds, Lakes or Wetlands, which can fill up during periods of rain and then slowly empty. (Now you know why so many developments have a reference to Water in their name)

Other posts will explain more about how the Storage Volumes are Calculated and will look at various storage options.

Guide to Buying a Block has lots of info like this on what to look for before you buy land.


Stormwater – Kerb Discharge

If you are going to build on an existing house block you will probably have a planning permit condition that storm water must discharge to an approved point.

If there is no surface water system one option can be to discharge to the street.

This is normally by constructing a proper kerb outlet like the photo below:


But not like this dodgy installation on the right!

Or even discharging over people walking along the path like the one illustrated in this post: Overflow Fail

A kerb connection can be at a reasonable cost as long as the house is above the road.

If the house is below the road you will need either:

or

  • A pump and storage for the storm water, which can add significantly to the build cost.


For more information on issues like this see Guide to Buying a Block


What Are Brick Articulation Joints?

When you are looking round your new home build you may think  “What’s that gap between the window and the brickwork?” . . . . . . .or even “Why is there a vertical gap between the bricks in the middle of the wall?”

Before you panic it might be worth checking if it is an Articulation Joint.

Why Are There Articulation Joints?

Brick Veneer houses can move for several different reasons including:

  • Temperature
  • Humidity
  • Movement of the frame
  • ‘Flexing’ of the foundation

As the structure moves articulation joints are used to accommodate these movements in the structure without cracking.

Unless the soil has been classed as either A or S (see: Soil Classification) vertical articulation joints must be installed in any un-reinforced masonry walls.

Location

In straight walls without openings, the articulation joints must be at a maximum spacing of 6m. They must not be closer than the wall height from the corners.

Where there is a door or window its normal practice to put the joint alongside so they are less obvious.

Construction

For articulation joints next to windows and doors a gap of 10 mm must be left between the edge of the frame and the brickwork.

In a plain wall the gap between bricks again should be 10mm.

The space between the bricks is taken up with a foam filler with a flexible seal on the outside face keeping water out.

The bottom of this photo shows what the finished seal should look like . . . . . . . the top part shows a problem that will needs to be sorted. (normally this tearing of the sealant from the brick is caused when the sealant is too thin)

What you can’t see is  that during the construction the bricklayers should be inserting expansion ties across the joint.

During construction it is well worth checking that there is NO MORTAR in the joint. . . . Any mortar will stop the joint acting as it should and can cause cracking over the next few years.

See Bricks for More Posts


Concrete – Adding Extra Water

A ‘Dirty Secret’ of the Construction Industry is;  adding of extra water to concrete mixes.

The ready mix concrete suppliers carefully design mixes with appropriate water cement ratios, which are loaded onto the delivery truck by computer controlled batching systems. . . . . . . All this effort on getting the mix right goes out of the window when the truck arrives on site and a hose comes out to arbitrarily add water to the mix.

Problems

Here are some of the problems adding extra water causes:

  • Too much water will cause settling and segregation of the aggregate to the bottom of the slab (with more sand at the top) which results in a lower strength slab.
  • Water that is not consumed by the chemical reaction will eventually leave the concrete as it hardens, resulting in holes that will reduce the final strength of the concrete.
  • As the excess water leaves there will be more shrinkage, resulting in larger internal cracks and visible fractures.

Reasons Why Extra Water Is Added

  • Easier To Lay A ‘wetter’ mix is said to be more ‘Workable’, in other words it can be spread and a top surface formed with little or no vibration. (Fully vibrated concrete will minimise voids in the concrete without the need to add water) Adding water saves the concretor time, effort, and hire costs for a vibrator
  • Delivery Drivers Time A ‘wetter’ mix comes out of the drum faster allowing the driver, who is paid per load, to fit an extra delivery in his day.
  • Material Costs Improved workability can be achieved by adding a plasticiser, rather than adding water, but this adds significantly to the cost.

Solutions

I have worked on big construction projects where every concrete delivery has been been tested before pouring. Any load that was too wet, or any driver seen adding water, and the load was sent straight to the tip. ( I once saw 5 consecutive deliveries sent to the tip)

For you, organising your own concreting, the best advice I can give make sure that anyone you ask for a price knows that are not prepared to accept added water.   Be prepared to pay extra for a plasticiser added to the mix.


For more posts on on getting your paths and driveways correct see Concreting


Block Retaining Wall – Loose Lay

Loose lay retaining wall blocks are concrete blocks that have a nib cast on the underside. (see photo) This stops each block slipping forward of the block below.

There are a number of different manufacturers and most produce more than one type of block. You will normally find several different types of block in any of the big DIY Stores.

The sketch below shows a typical construction detail for this type of wall. (check the manufacturer’s web site as most provide comprehensive design and installation guides)

The most critical aspect of building a wall is to get the foundation and the first course right. Although you can use gravel I would probably go for a concrete foundation and then lay the first course on mortar to allow for adjustment.

Although this type of wall will be more expensive than a sleeper wall it can be laid in curves as well as straight lines.


See: Retaining Walls  for more posts


Virtual Build?

I recently saw an advert for ‘MyPlace’ a ‘Virtual Build Information System’ by Burbank.

What Is A Virtual Build Information System?

MyPlace is a virtual construction site which provides a visual aid in the progress of your home’s construction. It lets you check out what’s happening on-site of your new home without having to leave your couch.

If you build your new home with Burbank home  you will be able to log into ‘MyPlace’ at any time. You will then be able to:

  • Download documents.
  • See photos of your home being built.
  • See updates from the Builder.

Is it A Good Idea

Well it sound ‘Modern’ and ‘High Tech’ but I’m not convinced.

  • I always like to be able to have signed document in my hand, not electronic documents!
  • Is it just a system to try and keep you away from the site, and stop you asking awkward quality questions?
  • How much detail will the photos really show to help you gauge the build quality?

  • Many people building have problems in getting a weekly phone update from the Site Supervisor, so how frequently and up to date will the information be?

I might be interested if I was having a house built a long way from where I lived, but in my mind nothing replaces regular site visits during the build.

If you have used one of these Virtual Build Information System I would like to hear about your experiences.

See: Relations With The Builder for similar posts.


Builders Excuses

Lets face it, building isn’t always easy. Each house has its own problems and the builders have to deal with the weather.

Things do go wrong . . .  so the measure of a good builder is how they resolve the problems.

Here are some excuses you shouldn’t have to hear. . . .  together with some suggested responses from me.

“That’s the way we always do it” – Response “Well why did you do it differently in the show house?’

“You don’t understand.” – even “You’re a women you wouldn’t understand.” – Response – “I didn’t think you needed to be a brain surgeon to get a job as a builder, so explain it to me.”

“The Regulations say its got to be like that.” – “Response “Show Me the Regulation”  This one was tried on me.  After the Site Supervisor heard my response he said “OK it will be fixed tomorrow.”

“The delay is due to the weather” – Response  – “As the standard contract requires you to make allowance for bad weather you had better show me the records the weather has been worse than usual.”

“We build them outside in all weathers – not in cosy factories” – Response – “I thought you were an experienced builder familiar with the problems of working on site”

You can’t get good tradies around here, so quality suffers. – Response – “You contracted to build to that quality so it sounds to me you are just trying to save money by not paying the going rate, and/or not supervising them properly.”

What excuses have you heard?


Too many excuses and it could be worth getting your own   Building Inspector  involved


Overhanging Brickwork

Unfortunately brickwork overhanging the slab like this is more common than it should be. . . . but it’s often not the brickie’s fault.

How it Happens

Normally the problem is that the slab has been constructed smaller than the required dimensions.

This wouldn’t be a problem, but for the fact that most houses come with prefabricated frames which mean the frame is too big for the slab. If the frame components aren’t  ‘adjusted’ to make them smaller they will overhang the slab, and as a consequence the bricklayer overhangs the brick to maintain the wall cavity.

How Much Is Too Much?

The Building Code of Australia (BCA), Part 3.2.2.7, Edge Rebates, states  ‘Exterior masonry must not overhang more that 15mm past the edge of the slab’.

Interestingly the maximum overhang permitted for the frame is only 10mm from the edge of the slab.

Solution

To my mind the best solution is to bolt a steel angle to the slab using masonry anchors.

The reason the masonry anchor is 50mm from the top surface of the concrete is to prevent it breaking out.

I have heard of people suggesting pouring concrete, or a cement grout I wouldn’t recommend that. To do it properly would require dowel bars to be drilled into the concrete and reinforcement fixed before trying to bond a thin piece of concrete to the slab.


Height Above Ground


For the typical modern house with slab on ground base there are two minimum heights above ground level that need to be considered:

  • Next to the building.
  • Distance of 1m away.

The reason for these minimums is to keep water out of the building, including the structure and foundations.

Next To The House

Floor level above external finished surfaces must be a minimum of:

  • 50 mm above impermeable (covered paved or concreted areas) that slope away from the building
  • 100 mm above the finished ground level in low rainfall intensity areas ( 5 minute intensity of less than 125mm/hour for a recurrence interval of 20 years -see: Rainfall Intensity to check your site), or sandy well-drained areas
  • 150 mm in any other case.

Distance of 1m

The external finished surface surrounding the slab must be sloped away from the building, for the first 1m by a minimum  of the following:

  • 25 mm in low rainfall intensity areas for surfaces that are reasonably impermeable (such as concrete or clay paving)
  • 50 mm  in any other case.

Normally in clay soils I would allow another 15-20mm to allow for any ‘Soil Heave’. (See:Building on Clay Soils)

Overall

To meet the Building Code the range of total heights above ground will vary between 75mm and 200mm depending on circumstances. If you want a smaller step between inside and outside (for reasons such as Better Accessible Design) you will need to talk with your House Designer about a detail which meets the intent of the Building Code (Keeps water out of the house).


Brick ‘Bulldust’


I hear a lot of people agonise over the choice of bricks for their new house.

That’s probably because they are:

  1. Looking Too Closely. At the builders display centre you may be handed individual bricks or see a board with about 8 bricks on it. When you have been in the house a month you probably won’t notice the individual bricks. You only see the overall effect.
  2. Taken In By The ‘Hype’. Brochures use words like Premium, Valued, Crafted and other ‘Bulldust’. (see ‘Brochure Bulldust’ below)


Brochure Bulldust

These premium bricks are derived from the uniquely textured and blended heritage of the original “hand made” English bricks. It is these timeless characteristics that have been applied by highly skilled craftsmen to a range of clay colours.

The palette now includes subtle grey blends, warm, earthy reds & tans, bold coffee browns and deep black tones.

This premium range of genuine clay bricks are unique and highly valued by building professionals. The range is a statement of luxury befitting premium homes, residential developments and commercial applications.

Translation

In the old days when all work was done by hand it wasn’t practical to mix clay to get a consistent colour, so you got what came from the raw clay.

These  bricks are machine made with a mix of clay colours, but we think we can charge a lot more for them.


HINT

When choosing bricks go to a Brick Suppliers Display Centre and only look at bricks panels from at least 3m away. It much easier to see if a cheaper brick gives the effect you want.


‘Premium Bricks’ will add thousands when ‘Choosing a House’

See Bricks for more posts


Exit mobile version