Different Soil Classification Results

When you look at a new house block its always worth asking the Developer’s Agent what the Soil Classification is ……….. Only don’t take what you are told too seriously!

Usually the developers opinion is going to be that the site is going to be better (lower site costs) than your builder.

To understand why you need to consider the differing situations of the Developer and the Builder.

The Developer

  • May have done 20 or 30 tests over the whole development.
  • Is mostly interested in selling blocks
  • Since the tests were taken has had sewers and drains constructed on the site.
  • Probably done some spreading of fill from roadworks construction and site leveling

The Builder

  • Has had 3 tests done on your block.
  • Knows that even with the three tests the information represents less than 0.01% of the soil under your block.
  • Want to be sure the foundations are strong enough.
  • Want to avoid claims, from you, for foundation movement causing structural cracks.

If I got a soil classification from a Developer I would ask the Builder what extra site costs would be required for that soil, and then budget for at least another $5,000.


For lots more information why not get the Guide to Buying a Block only $4 at this link: Buying a Block

Basic Timber Frame Panel

The House Construction-The Frame post explains the background to frame construction.

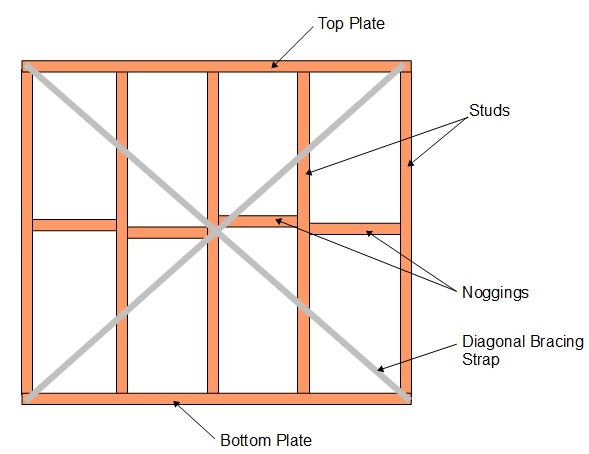
The drawing below shows a typical standard wall frame

Minimum timber size will be 95mm x 35mm although this may increase for the  following reasons:

  • Additional wall insulation may increase the depth of the frame to 125mm 
  • If the wall requires more structural strength that may increase the timber thickness from 35mm to 45mm.

Studs

Studs are the main structural component as they support the main vertical load of the roof and and upper floors.

Normal spacing is at 450mm centers for external walls and 600mm for internal walls unless specified otherwise for structural reasons.

Top Plate

The top plate fixes the top of the stud in position and acts as a mounting point for the structure above the frame.

A single top plate does not have the strength to carry major loads, such as roof trusses or upper floor beams so these should be fixed directly above the studs. 

To increase the strength, if required, a second timber can be added during erection to make a double top plate. This additional timber is fixed to overlap adjacent frames, junctions, and corners, and increases overall ridgidity

Bottom Plate

The bottom plate holds the frame to the base and fixes the bottom of the stud in position .

It needs to be firmly fixed to the base. If the base is uneven packing needs to be installed under the stud positions to prevent any vertical movement of individual studs.

Noggings

Noggings are the individual short pieces of timber between the studs. They are there to prevent the studs bowing under the load or warping. It is important that they fit exactly into the space.

Maximum spacing between noggons and top and bottom plates is 1350mm. For walls up to 2.74m  high a single noggin meets the standards. Taller rooms and you will need 2.

Diagonal Bracing Strap

The diagonal bracing straps are typically galvanised steel strip which is nailed to each strut. The bracing is the part of the frame that resists any sideways deformation of the frame, such as wind loading.

Although these braces seem insubstantial compared to the struts and plates they are vital to the overall strength. If you find a brace has been cut during construction ask for it to be replaced!

Where there are openings the details in the following link are required: Openings in Timber Frames.

Want to know more?  The following external link is worth a look: Timber Plus Toolbox

Overflow Relief Gulley

Have you ever wondered what this is in your garden?

Perhaps you have seen ‘ORG’ on a drawing.

Well the answer is it’s called an Overflow Relief Gully. It needs to between the house and the connection to the main sewer.

An ORG is a vital part of protecting your house against Sewage blockages in the main causing an overflow inside your house.

The grate is set 150mm below the level of the lowest waste water fitting in your house. Normally the shower drain or Floor Drain. ( In cases where the 150mm minimum height cannot be achieved, a reflux valve should be installed in addition to the ORG)

In the event of a sewer blockage the sewage can flow out of the ORG. Not very nice!…….. but much better than flowing out across your floor.

To make sure it works when you need it:

  • DON’T landscape over it!
  • DON’T put a plant pot …… or anything else, on top of it!
  • DON’T fasten the grate down! 
  • DON’T allow storm water to flow into it! 


House Construction – The Frame

The  Internal Frame is the key structural element in most Brick Veneer House Construction.

In more lightweight structures such as timber cladding and lightweight render it takes on an even more of the structural loads.

The overall frame is composed from a number of individual wall panels, which when fixed to the base, and fastened together, form a rigid box like structure.

Structural Loads

The frame carries several main structural loads:

  • It takes the load of the roof, and any upper floors, down to the foundation.
  • It resists the wind trying to push the whole building over.
  • It provides lateral support for the brick walls.
  • Holds the windows in place.
  • It gives a secure fixing point for the internal wall and ceiling lining boards.
  • In the case of weatherboard or lightweight render construction it supports the outer skin of the building.

Additional Functions

  • Provides a route and fixing points for cables and pipes.
  • Retains insulation.
  • Supports cupboards and shelves.
  • Fixing of building wrap.


See also Brick Veneer


Drop Edge Beams

If you want to build your new home on a slope you may need to have the additional cost of needing drop edge beams on the low side of the slabs.

These are a sort of retaining wall to hold the fill under the house slab as shown in the drawing below.

Here is a photo of a typical drop edge beam before the brickwork has been started.

Costs (2013) are in the order of $500-$700/sqm of beam, plus the cost of the fill under the slab.

Say. . . $12,000 to $18,000 for a 20m long house with a 1.5m drop beam so a significant extra!

The photo below shows the same wall after the brickwork has been completed.


If you are building on a slope you may also want to know about Retaining Wall Fairness

Thanks to Grumblebum54 for the photos

Spot the Garage


Can you see the garage?

Not just one, but two!

Perhaps this second photo helps


This is a device called a Cardok which I hear is coming to Australia.

Its quite expensive at around $60,000 each, but probably cheaper than having a basement garage with ramp.  It also would probably be easier to fit in a tight city block.

NB I have not been paid to promote this product I included it because it seems an interesting idea.

For more unusual houses go to What the………………….?


Building On Rock

Based on the Soil Classification rock is considered one of the best surfaces to build a house foundation.

It comes under the Classification Class A.

That  doesn’t mean its going to be cheap especially for a conventional raft or waffle pod slab.

Any excavation such as leveling the site and excavation for sewerage and drainage trenches is going to be be expensive. This is due to it requiring a heavy excavator and rock breaking equipment.

Keeping Costs Down

If you have a site that has rock close to the surface the most economic base construction is likely to be Piers for Lightweight Construction. (including  Pole Houses and Queenslanders)

If  you want a Masonry House  (such as Brick Veneer or Double Brick) then you need to minimise the amount of excavation by going for suspended floors.
 

Also see Provisional Sums to find out the issues of finding rock during the construction.


The Best House Shape

When you are looking at builders web sites the main things you can look at besides Facades are Floor Plans………But what is the best shape for the overall house?

Making good use of Winter Sun

If you have a Well Orientated site (Longest dimension runs East West) and you are not Shaded by tall trees or other properties the best shape will normally be a rectangle.

This will provide a long wall with North Facing Windows where most of the rooms can be warmed in the window. As the other dimension will be shorter the sun will penetrate well into the house. Just make sure you have proper eaves or a pergola to avoid the summer sun.

If you have got either a South or North facing site it’s probably best to go for as wide a house as you can fit on the block.

No Winter Sun

You should aim to provide the maximum amount of internal space compared to wall space. This is both economic in terms of wall materials and minimisation of heat transfer (Less heat lost in winter, less heat gain in summer)

The shape that fits provides the most internal space for minimum walls is a circle…….but not everyone wants to live in a yurt.

A couple of practical problems are:

  • Getting furniture to fit
  • Although the space is efficient the diameter is fairly large so larger round houses won’t fit into most rectangular blocks.

Don’t want a round house, then the next best thing is to make the shape as close to a square as possible.

Have you got a yurt or other type of round house?…….. What do you like about it?


See Bubble Diagrams if you want to design your own home plan


Cubby House – Fail

What do you think of this Cubby House that someone built in their garden, soon after moving in?

Well it looks pretty good…………………………. Solidly constructed building, nice colourful paint job,  and securely bolted down to a convenient concrete slab.

So why is it a Fail?

Well have a look at this close up of that convenient concrete slab.

That solid concrete slab is actually the top of a sewer manhole on the Easement.

This particular manhole has two covers (You can see the front one on the photo) which need to be accessed for cleaning about every 18 months!

How would you like to move this?


For more Unusual Houses and Fails see What the………………….?

To find out what you shouldn’t build on your block see Restictions


Tips for Setting up a Home Office

Sponsored Post

When you are drawing up plans for a new house, you may want to think about including a home office. The number of telecommuters and home business owners is on the rise, with the advances in technology that make it easier to conduct business at a distance.

Office workers are drawn to the flexible hours and lack of a commute, while business owners are interested in cutting costs. This makes it a win-win situation for many.

Whether you plan on simply telecommuting to your regular job one or two days a week or starting your own ecommerce business, you’ll want to create a space that’s conducive to your productivity.

The following are a few tips to consider before you start constructing your home office.

Consider your Individual Business Needs

Every business will have different needs, so before you start designing and constructing your home office it’s best to sit down and draw up a detailed plan of action. This should include a list of all of the items you will need to store in this room, including both furnishings and storage.

A graphic designer or illustrator would need a large worktop, for example, while someone working for a web design company Australia might need multiple computers or printers.

If you plan on meeting with clients you would need additional filing space and a room for consultation.

Be sure to outline what you will need and allocate the proper space ahead of time.

Build Storage into the Room

Rather than filling up your new home office with bulky filing cabinets, you can get creative and start thinking about alternative storage solutions in your home office.

You can use a desk with file cabinets built into its base, or build additional shelving units into the walls. This will give you more room to work and help you feel organised and productive when the room is completed.

Purchase the Right Equipment

When it comes to designing the basic layout of the room, you’ll need to ensure that there’s enough space for all of the equipment you’ll need. Again, this will depend on the type of business you plan on operating. It’s worth investing in a chair with good back support.

Computers that can be used for your most important tasks. This could include everything from accounting to web development Australia. For my home I would tend to look at having a lap top and a desk top to allow convenient daily back up 

A desk with adequate work space is also very important, so don’t skimp on this aspect of your office.

Illuminate your Office

There’s nothing more depressing than a workspace without windows. You’ll want to choose a corner of your proposed house that has no shortage of natural light to help you feel more positive and productive. A bright working space is particularly useful if you need to see fine details or are meeting with clients.

Remember to  position your computer in a way so that you can reduce glare.

You’ll also want to plan for good artificial lighting with  lighting fixtures that help fit in with your overall design scheme and provide good general illumination.

More concentrated lighting lighting for desks and worktops may also be needed.

By taking the time to draw up detailed plans for your home office, you can enhance its use and make sure that you have a clean, organised, and useful space for all of your business needs.
 

Don’t need a Home office?……Perhaps you need a Mission Control
 

Exit mobile version